Main quests - QUEST 2: Among The Stars: Primary locations - part 2 | Main quests F3: MZ Guide
Last update: 11 May 2016
![[#57] - Main quests - QUEST 2: Among The Stars: Primary locations - part 2 - Main quests - Fallout 3: Mothership Zeta - Game Guide and Walkthrough](/fallout3mothershipzeta/gfx/word/-1013301187.jpg)
[#57]
Wait here for the device to shut down, enter the room and inspect all the bodies. Notice that there are control panels here [#57] and you should use them to acquire two new recordings - #11, #17. Proceed towards the northern room where you should listen to Elliott's comment (assuming he's still alive).
![[#58] - Main quests - QUEST 2: Among The Stars: Primary locations - part 2 - Main quests - Fallout 3: Mothership Zeta - Game Guide and Walkthrough](/fallout3mothershipzeta/gfx/word/-1013301171.jpg)
[#58]
You'll now have to make an important decision on what to do with Elliott's frozen buddies. There are four solutions to this problem:
1) Awakening the soldiers without making any preparations. You would have to use the control panel located in front of the capsules. The soldiers would die and Elliott would be angry at you.
2) Convincing Elliott that he should leave his colleagues alone. You would have to pass a Speech challenge and then proceed the next area, leaving the soldiers behind.
3) Convincing Elliott that he should shut down life support for both capsules, so that the aliens wouldn't be able to experiment on his colleagues anymore.
4) Allowing Elliott to start the procedure and knowing that his colleagues will be alive for a few minutes. In this case you would have to approach the control panel [#58], BUT you would have to use it AFTER receiving confirmation from your follower. I would recommend choosing this outcome, even though the awakened soldiers won't last too long.
Once you're done making decisions allow Elliott to take a few samples and proceed towards a nearby door leading to the Cryo Storage.
MAP OF THE CRYO STORAGE:

Map legend: 1 - passageway to: Cryo Lab; 2 - recordings; 3 - healing archways; 4 - control panels releasing supermutants; 5 - generator; 6 - teleportation matrix to: Cryo Lab
![[#59] - Main quests - QUEST 2: Among The Stars: Primary locations - part 2 - Main quests - Fallout 3: Mothership Zeta - Game Guide and Walkthrough](/fallout3mothershipzeta/gfx/word/-1013301140.jpg)
[#59]
As soon as you've arrived turn left and use a nearby control panel [#59] to acquire a new recording (#25). You can now choose either of the passageways leading to the main warehouse, as well as use healing archways found along the way. Once you've entered the storage room start attacking the aliens.
![[#60] - Main quests - QUEST 2: Among The Stars: Primary locations - part 2 - Main quests - Fallout 3: Mothership Zeta - Game Guide and Walkthrough](/fallout3mothershipzeta/gfx/word/-1013301125.jpg)
[#60]
Make sure that you've listened to Elliott's advice and watch yourself while standing next to the staircases, because some of the aliens may decide to use them to surprise you. Be careful and prevent the creatures from inflicting serious injuries to you or Elliott. Don't worry about your new soldier friends, because they'll die sooner or later and you won't be able to prevent that from happening. After you've secured this floor head down and proceed to the south-west. A new control panel can be found in a corner and it contains a recording (#16) [#60].
![[#61] - Main quests - QUEST 2: Among The Stars: Primary locations - part 2 - Main quests - Fallout 3: Mothership Zeta - Game Guide and Walkthrough](/fallout3mothershipzeta/gfx/word/-1013301109.jpg)
[#61]
You don't have to explore any of the four lower corridors, however you would encounter capsules with supermutants. You may revive the mutants if you want to and this can be achieved using two control panels found on the upper balcony [#61]. The mutants are unarmed so may consider doing this if you want to earn experience points easily. The generator which is your primary target can be found easily. Just make to choose one of two passageways leading to the northern section of the deck.
![[#62] - Main quests - QUEST 2: Among The Stars: Primary locations - part 2 - Main quests - Fallout 3: Mothership Zeta - Game Guide and Walkthrough](/fallout3mothershipzeta/gfx/word/-1013301093.jpg)
[#62]
Thankfully you won't be presented with any other unpleasant surprises near the generator. Start off by using the central control panel to uncover its core and then interact with three remaining switches. Don't forget to move back before the explosion destroys everything in the room [#62]. There's a teleportation matrix nearby which you can now activate.
![[#63] - Main quests - QUEST 2: Among The Stars: Primary locations - part 2 - Main quests - Fallout 3: Mothership Zeta - Game Guide and Walkthrough](/fallout3mothershipzeta/gfx/word/-1013301078.jpg)
[#63]
Activate the teleportation matrix to return to the Cryo Lab and from there you can go back to the Engineering Core almost right away. Use this opportunity to talk to Elliott and ask him about the samples he's gathered in the lab [#63]. You'll find out that he'll have more info for you in an hour. When you return to him later on he'll give you three cryo grenades and three cryo mines. Elliott will also promise to deliver new shipments once every three hours.
MAP OF THE ROBOT ASSEMBLY:
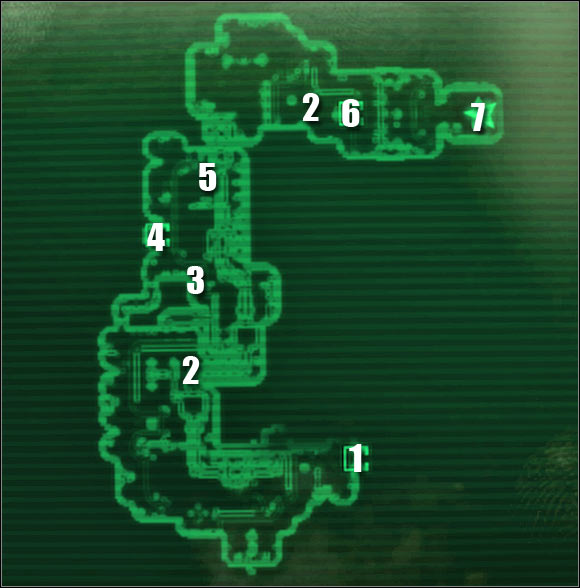
Map legend: 1 - passageway to: Engineering Core; 2 - healing archways; 3 - control panel; 4 - teleportation matrix (to a different floor); 5 - control panel for the conveyor belt; 6 - teleportation matrix (to the southern section of the factory); 7 - generator
![[#64] - Main quests - QUEST 2: Among The Stars: Primary locations - part 2 - Main quests - Fallout 3: Mothership Zeta - Game Guide and Walkthrough](/fallout3mothershipzeta/gfx/word/-1013301046.jpg)
[#64]
Once you're inside the factory start following Somah's lead and listen to her comment on the inactive teleportation devices. Ignore the fact that she's disappeared, because nothing bad is going to happen to her and you'll meet up again soon enough. Don't forget not to attack alien workers encountered in this area. Instead wait until you come across security bots. The machines will appear on the lower floor [#64].
![[#65] - Main quests - QUEST 2: Among The Stars: Primary locations - part 2 - Main quests - Fallout 3: Mothership Zeta - Game Guide and Walkthrough](/fallout3mothershipzeta/gfx/word/-1013301031.jpg)
[#65]
Once you've taken care of the bots use the stairs to get down to a lower level. Head north-east and witness a short conversation with Somah along the way. You may ignore this scene, because nothing important will come out of it. This time you should be moving north, using an archway found along the way. Once you're close to enemy positions hack into a nearby security console [#65] and override the system to blow up a security turret (last option on the list).
![[#66] - Main quests - QUEST 2: Among The Stars: Primary locations - part 2 - Main quests - Fallout 3: Mothership Zeta - Game Guide and Walkthrough](/fallout3mothershipzeta/gfx/word/-1013301015.jpg)
[#66]
There are also security bots in the area. Destroy the machines and you'll soon team up with Somah. You should also inspect a small storage space found to the south-east of your current position. If you're interested only in completing your primary objective proceed to the north right away. Ignore a teleportation matrix found along the way and instead find an electronics access panel which controls the nearby conveyor belt [#66]. Choose the last option from the list and move back to a safe distance. A huge explosion will occur near the panel in just a few seconds.
![[#67] - Main quests - QUEST 2: Among The Stars: Primary locations - part 2 - Main quests - Fallout 3: Mothership Zeta - Game Guide and Walkthrough](/fallout3mothershipzeta/gfx/word/-1013301000.jpg)
[#67]
Head on to the area where the explosion has taken place and quickly walk through a large hole. Proceed to the north. Once you're inside a new warehouse eliminate alien beings AS SOON AS POSSIBLE [#67]. It's extremely important to prevent the creatures from reawakening nearby security bots, because it would only make killing them more difficult. Once you've killed the aliens (and destroyed the machines) check their bodies and pick up a Drone Control Device.
![[#68] - Main quests - QUEST 2: Among The Stars: Primary locations - part 2 - Main quests - Fallout 3: Mothership Zeta - Game Guide and Walkthrough](/fallout3mothershipzeta/gfx/word/-1013300984.jpg)
[#68]
You may test your new toy on one of the nearby drones. In order to do that you must approach one of the glowing pods [#68], press the action key and confirm that you want to begin controlling the robot. I would recommend that you take a security bot with you, because they're more powerful and because you can only have one mechanical follower. Head east and make sure to check the balcony along the way to find the second archway.
![[#69] - Main quests - QUEST 2: Among The Stars: Primary locations - part 2 - Main quests - Fallout 3: Mothership Zeta - Game Guide and Walkthrough](/fallout3mothershipzeta/gfx/word/-1013300968.jpg)
[#69]
Reaching the final generator room shouldn't take much of your precious time and you won't be interrupted by anyone else. Just as before you must raise the main generator core and then interact with three coolant switches. Wait for the generator to blow up. I guess you won't be surprised to hear that you won't have to return on foot, because there's an active teleportation matrix nearby [#69]. Use it and then travel to the Engineering Core.