Galaxy Map | Travelling Elite: Dangerous Guide
Last update: 11 May 2016
The galaxy map is one of the crucial parts in the game, and it is vital to learn how to use it. It will help you find your way in the galaxy which consists of 400 billion of the star systems. It also helps with creating the special routes which will make the smaller jumps much more comfortable. There are also basic details concerning the export/import and the trade overall.

The first thing you will see after turning on the map (Connecting the 'M' button is suggested as by default the map can be open only by using the left panel's 'navigation' bookmark) is a rather small area of the system that surrounds you and the key with the description. The 'info' bookmark will give you the information about the selected star system:
- Star classification
- Fraction connection
- Economic system
- Political system
- Population number
- Guard intensity
- Short overall description
For each player the other piece of information may be important, dependable for the player's in-game occupation, but everyone will find something interesting in here.

In the window that shows by the selected star system, you will see the system's name, your distance from it and five buttons. Their function is, from the left: selecting the system, route planning, detailed map of the system, permanent acquisition of the cartographic data and 24 hours acquisition of the trade data.
The last two buttons are important for the non-discoverers and merchants. The acquisition of the cartographic details enables the player to see the detailed map with all of the objects in the area. The trading acquisition on the other hand, gives the information on the imported/exported goods. It is available only for 24 hours for the economic doesn't stand still and throughout the 24 hours it may drastically change. If some button is highlighted in red, then it indicates that the station does not provide this certain information.

If you are interested in the complex details concerning the particular system, just press 'System view" button which shows up after you hover your cursor over the star. It will display the scheme for the system as well as its moons, planets, stations and asteroid fields. The key includes the information for the astronomy hobbyists and potential merchants. Clicking any element in this window will result with loads of data showing up concerning plenty of branches.

Let's go back to the main window of the map and go to the 'navigation' bookmark. One of the most important functions here is the route planning. Depending on your needs you can choose either the economical or the fastest route. Obviously, the first one will be using less fuel than the latter.
Another matter here is the area of your FSD for the different amount of cargo. Use the bar to indicate the amount of cargo you are taking and you will be able to see the distance you will cover with it via the FSD (number in brackets is the distance without any cargo). The heavier the ship is, the smaller the distances are.

Another limitation (indicated in the maximum distance) is the capacity of the fuel tank as well as the power of the drive. Only little amount of the fuel will be enough to get to the area shown in the screen above. So why is it impossible to buy a lot of fuel and go into the opposite edge of the galaxy at once? It is because of the drives' limitations, none of them will be able to use that amount of fuel at once. It helps the economy of the FSD compartments. If not for that, even the worst drive would be the same as the best if only there was enough of fuel. The amount of the fuel needed for the jump is indicated in the blue color in the bottom-right corner of the cockpit.

Another useful function which can be found in the 'navigation' bookmark is the 'search'. If you know the name of the star system, or at least the part of the name, you will only have to type it there and the computer will find it and center it on the map.
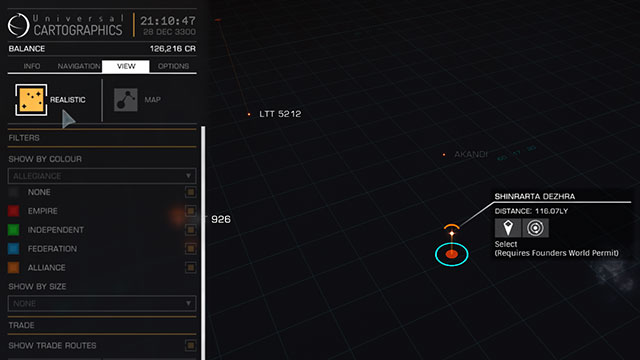
"View" is another helpful bookmark in the map's key. By default, the view is realistic, which reflects the look of the stars (their color and size) the same way as they are. It also shows the connections between them, but only if the ship is able to reach them via one jump. Remember that when planning your routes.
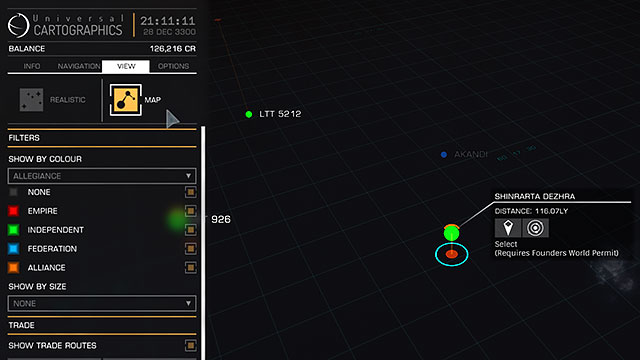
Other view that can be displayed is the "map". Stars here, are shown schematically, the connections are shown too but here, you can choose which pieces of information you want to see. You can select the division on; fractions (as shown above) in order to know which systems you should avoid if you have any bad relations.

You can also show the division concerning the trading lines. By default the routes will show every kind of traded goods, but you can select the particular ones, to make it look clearer. Each line differs through its thickness, direction and color. The thicker it is, the more intense is the trade on that route. The flashy points indicate the direction from the import to the export center.

Apart from the mentioned earlier filters, there are some more. They are:
- Population
- Allegiance
- Government
- Economy
- Cartographics shop
- Trade data shop
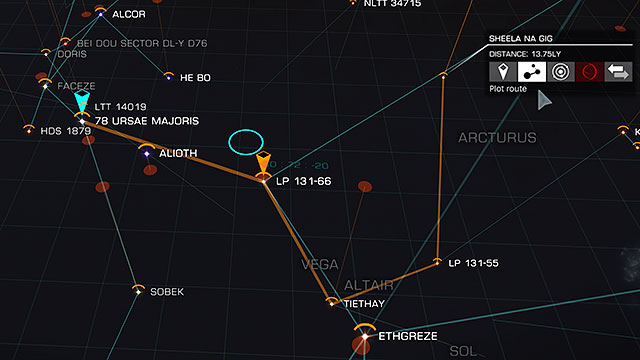
After selecting your destiny ('plot route' button) your way will be shown with an orange color. If the target is placed couple of system away, the route will use every system on the way. Unfortunately there isn't any way to save your routes in the computer which means that you will have to plot it every single time. Even when you want to reach a distant star, the computer will automatically connect you with the nearest star in the map. It happens because of the computer which plans the jump every time when reaching a 'sub-destination'. There can only be one route at a time planned on the map. The starting point of your way is marked with a blue arrow, and every other point is marked with an orange one.