
Dying Light 2: Let's Waltz! - walkthrough Dying Light 2 Guide, Walkthrough
This page of the Dying Light 2 guide contains a walkthrough of the Time for Waltz (Let's Waltz) story quest - sniper, tunnel and bridge, car factory, finding Waltz.
Last update: 09 February 2022
On this page of the Dying Light 2 guide you can find a walkthrough for Let's Waltz! story quest. . Thanks to our walkthrough, you'll learn how to deal with the enemy sniper, how to get into the tunnel and start the generator, how to cross the destroyed bridge and reach the car factory and how to complete the escape scene.
- Rewards for completing the quest
- Deal with the sniper
- Get to the Dynamo Car Factory
- Find the utility room and restore the power
- Follow the traces
- Follow Waltz into the car factory
- Escape from Waltz
Rewards for completing the quest
- XP - combat: 3000
- XP - parkour: 1000
- Pipe Bow - a useful weapon, as it allows ranged attacks
- arrows blueprint - you can now produce regular arrows - further into the game, new arrow blueprints will appear e.g. for fire arrows)
- arrows
- crafting parts - scrap, feathers (needed to craft arrows)
- A Place to Call Home story quest unlocked
Deal with the sniper
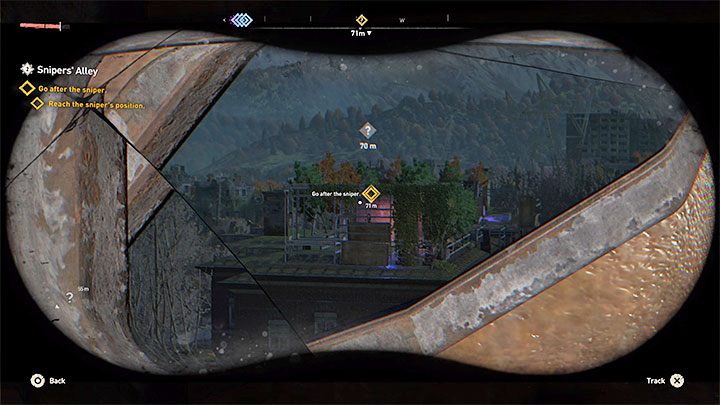
The first objective involves taking care of a sniper that fired at you from the nearby building. The action is a part of the Sniper's Alley side quest, but you will complete it as a part of the storyline.
First of all, you need to find out from where the shots had been taken from. Use the billboard as cover and locate the sniper's hideout, which is at the power plant building in the distance.

You have to jump down from the roof and head towards the building. Try to stay mobile at all times, run zig-zag and use large objects as cover if needed.
Once you get close to the main entrance, an explosion will occur, blocking you from accessing the main door. You have to circle the building from the left and examine its side. There is a scaffholding here that allows you to start climbing.

Along the way, you need to descend using a rope and continue the rather linear climb. After a failed attempt to use the ladder, locate another one and then climb the yellow planks nailed to the wall. You will also have to jump towards the hanging cage and bounce from it towards the higher ledge.
Ultimately, you will reach the sniper's hideout . Approaching the sniper from the rear will activate a cut-scene.
Get to the Dynamo Car Factory
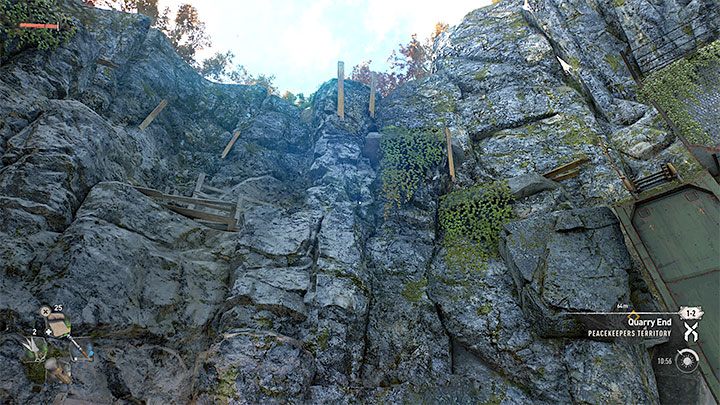
The way to the factory will take some time, as you are moving from Old Villedor district to the city center.
Your journey begins at the tunnel entrance. Attempting to press the button will fail. In the place shown in the screenshot, you have to climb the rocks near the tunnel. Remember that yellow indicates places which you can climb or jump to.

Ultimately, you should reach the rock ledge shown in the screenshot above. When you jump down, you will find yourself on the other side of the closed gate where the tunnel is located.
Proceed through the tunnel. After reaching its other end, try pressing the button. The action will be unsuccessful - you have to find generators in the area and turn them on.

You'll encounter a charging infected. Use nearby objects to avoid charges or sidestep right before impact. Stay on objects and attack the opponent when available. Don't try to block his attacks, as you won't succeed.
After dealing with the creature, try to turn on the generator again. The action will be successful, activating a cut-scene depicting the appearance of Peacemakers.
Find the utility room and restore the power

After regaining control over Aiden, explore the area again. This time, look for side passages that will allow you to temporarily leave the tunnel and explore the adjacent rooms.
While exploring the side rooms, locate the torn-out grate shown in the picture above. You can crouch here and use the ladder on the other side.

Jump towards the next hole in the wall. You will reach the room with the generator. You have to pick up the cable with the red tip and then insert the cable into the socket of the generator.
Follow the traces

The route is linear, so you can't get lost. On your way, jump into the water for a moment and jump to the hole in the ceiling.
Go through the ventilation shaft to the next room. Now you have to return to the Peacekeepers - the door from this side will allow you to return to the tunnel. A new major cutscene will be activated.

After you regain control over Aiden, you need to face a group of Renegades. Initially, the battle proceeds as planned - use melee attacks and react to enemies' strikes with parries, blocking, or dodges.
During the battle, you will become "enraged". In this mode, the hero moves faster and kills with more ease. Similar scenes will also take place in further parts of the story, yet this mode cannot be activated by simply pressing a button. Its activation is related directly to story events.
Follow Waltz into the car factory

After the next cutscenes, you have to use the newly unlocked exit from the tunnel. You will reach a damaged bridge . Crossing the bridge involves a hazardous platforming section, as falling off the bridge means death. Take your time as there is no time limit on your objective. Watch out when crossing a metal element that bends under the hero's weight.

The final part of the journey can be quite confusing. You don't have to cross the whole of the bridge, as at some point you'll be able to get off it. Once you touch ground, look for panels (shown in the screenshot) You can descend using them and get closer to the factory building this way.

While in the factory area, you'll encounter further renegades. Sneaking is useful in this area, but don't try to avoid battle at all costs. Instead, perform surprise attacks on renegades. Deal with them all (you can make use of spears encountered in the area)
Enter the destroyed building. In the first room, you have to jump towards the higher yellow ledges and grab the hanging yellow elements - an example is shown in the picture. You can face different directions while hanging from them and plan your next jumps. You'll soon reach Waltz.
Escape from Waltz

The meeting with Waltz starts a new mission objective and an escape sequence. Don't try to fight with Waltz - if he manages to catch up to Aiden, you're dead.
You need to focus on escaping along with the female sniper. In the first part of the escape, time the jumps between hanging ropes to avoid falling down and reach the metro carriage.

In the second part of the sequence, you'll move through tunnels - you should recognize some of the areas, as you have been here before. Turn the flashlight on so you won't miss e.g. an interactive ledge or areas where you can fall down and fail/hinder the escape.
You will encounter a few zombies in the tunnels, but ignore them and focus on escaping. At the end of the mission, you will have two conversations with the female sniper - her name is Lawan . The quest will end and you'll unlock a new one (A Place to Call Home)