Guides & Walkthroughs New Guides Popular RPG Action Strategy Adventure YouTube Guides Mobile App
Free iOS App iPhone & Ipad
Download Game Guide PDF, ePUB & iBooks

Duke Nukem Forever Game Guide by gamepressure.com

Duke Nukem Forever Game Guide

Table of Contents

17.2. The Shrunk Machine: Part 2 | Campaign Duke Nukem Forever Guide

Last update: 11 May 2016

After going down the stairs you will reach a room partly blocked by alien "plants". The only way to destroy them is using hot steam. In order to do it, you have to turn the nearby valve, wait for them to melt and turn it again.
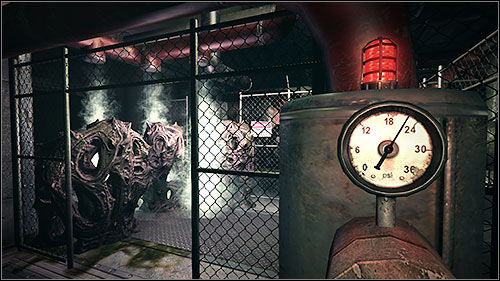
Of course that was only an introduction to a puzzle, as the further road is blocked my more plants - 17.2. The Shrunk Machine: Part 2 - Campaign - Duke Nukem Forever - Game Guide and Walkthrough

Of course that was only an introduction to a puzzle, as the further road is blocked my more plants. This time you have to properly set the red pipes, so that the steam can get from one end of the room to the other.

After a short walk you will reach the engine room - 17.2. The Shrunk Machine: Part 2 - Campaign - Duke Nukem Forever - Game Guide and Walkthrough

After a short walk you will reach the engine room. Eliminate the enemies and destroy the plank blocking the valve which lowers the ladder.

Go up and follow the corridor, but look out as at its end there's a Pig with a RPG and its companion - 17.2. The Shrunk Machine: Part 2 - Campaign - Duke Nukem Forever - Game Guide and Walkthrough

Go up and follow the corridor, but look out as at its end there's a Pig with a RPG and its companion. On your way you will also find a can of beer inside the locker. Behind the door the Pigs were guarding there's a room with a "shrinker" - use it and enter the vent the rats came out of. Inside you will find a small EDF supply crate.

Return to the main room and remove the screws to enter the next vent, this time the proper one - 17.2. The Shrunk Machine: Part 2 - Campaign - Duke Nukem Forever - Game Guide and Walkthrough

Return to the main room and remove the screws to enter the next vent, this time the proper one.

Move deeper and a grate will crumble beneath you, taking you all the way to where a fan is blocked by a broom - 17.2. The Shrunk Machine: Part 2 - Campaign - Duke Nukem Forever - Game Guide and Walkthrough

Move deeper and a grate will crumble beneath you, taking you all the way to where a fan is blocked by a broom. Before you destroy it, shoot the puffballs blocking the vent and waiting to explode you in the face.

Now unblock the fan and keep the forwards button pressed down while going up - 17.2. The Shrunk Machine: Part 2 - Campaign - Duke Nukem Forever - Game Guide and Walkthrough

Now unblock the fan and keep the "forwards" button pressed down while going up. that way you will reach a hidden room.

Collect the items found inside, jump back into the shaft and enter another one at the top - 17.2. The Shrunk Machine: Part 2 - Campaign - Duke Nukem Forever - Game Guide and Walkthrough

Collect the items found inside, jump back into the shaft and enter another one at the top. Remove the screw from the hatch and follow the wires to the very top of the shaft, where there are gears. At the very top, jump down into the canal. You will come across a fan with electrodes around it and a fuse. Shoot the fuse and switch off the vent to move on.

Inside the heated room with moving gears, you will have to pass through the holes found in them - 17.2. The Shrunk Machine: Part 2 - Campaign - Duke Nukem Forever - Game Guide and Walkthrough

Inside the heated room with moving gears, you will have to pass through the holes found in them. Look out now to fall between electrical arches by the end.

Above, you will find yourself beside the pistons - 17.2. The Shrunk Machine: Part 2 - Campaign - Duke Nukem Forever - Game Guide and Walkthrough

Above, you will find yourself beside the pistons. Shoot all the fuses in the vents around them to stop the machine. You will have to move between the pistons to reach the last fuse. Once you're done, you will be stopped by a giant fan blocking your way and you will be able to enter the next vent.

After getting out of it, climb up to the top shelf of the room you're in - 17.2. The Shrunk Machine: Part 2 - Campaign - Duke Nukem Forever - Game Guide and Walkthrough

After getting out of it, climb up to the top shelf of the room you're in. At the top, go through the window to the next room.

Approach the elevator, jump inside and press the button - 17.2. The Shrunk Machine: Part 2 - Campaign - Duke Nukem Forever - Game Guide and Walkthrough

Approach the elevator, jump inside and press the button. A swarm of Octababies will enter the room. If that wasn't enough, an alien soldier will come out of the elevator once you're done with them. Luckily killing him isn't that hard, if only you stay at safe distance and aim at the head.

Inside the elevator, approach the button by going along the handrail - 17.2. The Shrunk Machine: Part 2 - Campaign - Duke Nukem Forever - Game Guide and Walkthrough

Inside the elevator, approach the button by going along the handrail.

See/Add Comments

You are not permitted to copy any image, text or info from this page.

This site is not associated with and/or endorsed by the Take 2 Interactive or Gearbox Software. All logos and images are copyrighted by their respective owners.

Copyright © 2000 - 2024 GRY-Online S.A. for gamepressure.com, unofficial game guides, walkthroughs, secrets, game tips, maps & strategies for top games.