World Atlas - Maps - Main areas - Orzammar Dragon Age: Origins Guide
Last update: 11 May 2016
Map M47: Frostback mountains pass

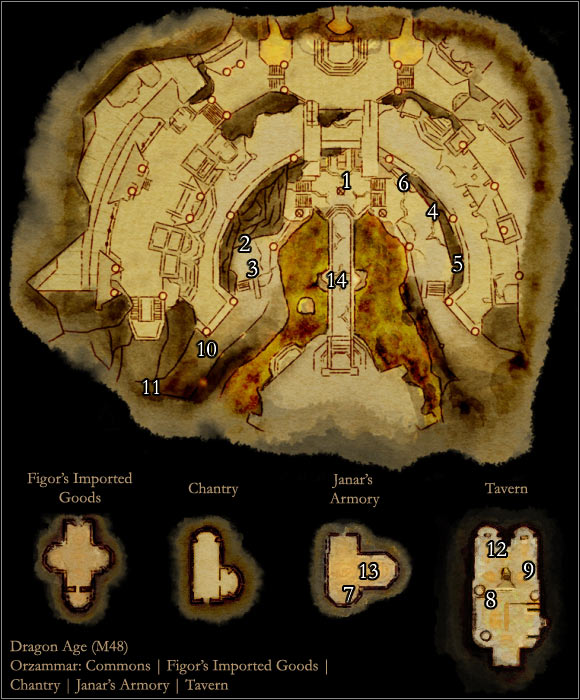
Map M48: Commons
Map M49: Dust town

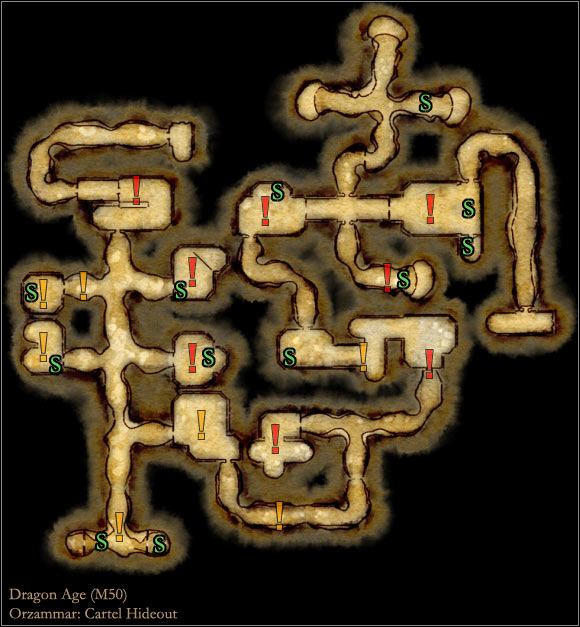
Map M50: Cartel hideout
Map M51: Proving grounds

Map M52: Diamond quarter

Map M53: Orzammar - Other locations

Map M54: Royal palace

Map M55: Aeducan thaig

Map M56: Caridin's cross

Map M57: Ortan thaig

Map M58: The dead trenches

Map M59: Anvil of the Void

Area description
AREAS OF INTEREST
- During your first visit to [Frostback mountains pass] you'll have to be very careful, because you're going to be attacked by a large group of bounty hunters (M47, 1). Other attempts on your life will be made after showing up in [Orzammar - Commons - Dust town] for the first time (M49, 1) and after successfully defeating Jarvia as a part of one of the main quests. After you've aligned yourself with Harrowmont or Bhelen fanatics of the other contender will also start attacking you from time to time. Expect to meet them near the tavern (Commons) and near the entrance to the palace (Diamond quarter). Sadly peaceful negotiations won't be possible with any of these groups.
- It would be wise to spend some time in [Orzammar - Hall of heroes] clicking on each interactive statue to gain codex entries and experience points. You can even talk to a scholar if you want to (M47, 2). The same applies to rest of Orzammar, especially since you'll be finding a lot of dwarven objects worthy of examining them more closely.
- If you decide to explore [Orzammar - Diamond quarter - Royal palace] don't be surprised to encounter a group of dwarven thieves (M54, 1). Apparently they wanted to dig their way to a royal vault, but ended up in a wrong place. The only solution will be to attack them and sadly you can't count on any of the royal guards helping you.
![- If you decide to explore [Orzammar - Diamond quarter - Royal palace] you should check one of the smaller rooms in the eastern section of the palace to find a glass phylactery (M54, 2) - World Atlas - Maps - Main areas - Orzammar - World Atlas - Maps - Main areas - Dragon Age: Origins Game Guide](/dragonageorigins/gfx/word/600636609.jpg)
- If you decide to explore [Orzammar - Diamond quarter - Royal palace] you should check one of the smaller rooms in the eastern section of the palace to find a glass phylactery (M54, 2). Interacting with this object will result in you having to defeat a powerful revenant.
- A similar vial to the one described above can be found after you've started exploring Deep Roads and made your way to [Caridin's cross] (M56, 1). The idea remains the same so if you want to fight a boss (revenant) you must first interact with the vial.
![- You can talk to a Proving Armsman found in [Orzammar - Proving grounds] (M51, 1) and agree to take part in a series of team battles - World Atlas - Maps - Main areas - Orzammar - World Atlas - Maps - Main areas - Dragon Age: Origins Game Guide](/dragonageorigins/gfx/word/600636625.jpg)
- You can talk to a Proving Armsman found in [Orzammar - Proving grounds] (M51, 1) and agree to take part in a series of team battles. I have to warn you that these challenges are far more difficult than what you would have to sustain after complying to Harrowmont's wish. Don't count on winning a lot of money. Instead you'll want to fight mostly to earn experience points.
- After a new king has been crowned you can talk to Kardol found in [Orzammar - Diamond quarter] (M52, 1). If you succeed in a persuasion attempt you'll convince him that the Legion should take part in a battle with the archdemon.
- Soon after completing A chant in the deeps subquest you'll notice that Brother Burkel has founded a temple. You can visit him in [Orzammar - Commons - Chantry].
![- It would be a good idea to visit [Orzammar - Diamond quarter - Royal palace] before finishing Orzammars main quest (finding the Anvil of the Void) - World Atlas - Maps - Main areas - Orzammar - World Atlas - Maps - Main areas - Dragon Age: Origins Game Guide](/dragonageorigins/gfx/word/600636640.jpg)
- It would be a good idea to visit [Orzammar - Diamond quarter - Royal palace] before finishing Orzammar's main quest (finding the Anvil of the Void). Enter the throne room and start off by clicking on the throne of Orzammar (M54, 3). Doing this will result in a new entry appearing in your codex (Caged in stone). Place two members of your team on movable tiles found to the left of the entrance to the throne room (M54, 4; check the screen seen above if you can't find them). As for the fourth member of your team, he or she must stand on a bigger interactive platform found in front of the entrance to the royal palace (M54, 5). Make sure no one has moved and use the main character to click on the throne again. If you've done everything according to the plan you'll notice that a dragon has appeared inside the throne room. It won't be easy to defeat it, but if you succeed you'll gain possession of an excellent Ageless blade.
TEAM
- A dwarven warrior Oghren will want to join your team soon after you've started two important quests in Orzammar - Anvil of the Void and Paragon of her kind. You'll meet him near the miner checkpoint in [Orzammar - Commons] (M48, 1) and naturally you should agree to his offer.
SHOPPING
- Faryn [Frostback mountains pass] (M47, 1)
- Garin [Orzammar - Commons] (M48, 1)
- Legnar [Orzammar - Commons] (M48, 2)
- Janar [Orzammar - Commons - Janar's armory] (M48, 3)
- Alimar [Orzammar - Commons - Dust town - Alimar's emporium] (M49, 1)
- Ruck [Ortan thaig] (M57, 1) - during your initial conversation with Ruck you must mention the fact that you want to trade goods with him (don't ask him about his treasures without offering something in return, because he may attack you)
- Figor [Orzammar - Commons - Figor's imported goods] (M48, 4) - you'll be allowed to visit his store and trade goods with him later in the game.