
TADS - Target Acquisition and Designation Sight DCS AH-64 Apache guide, instruction
This DCS AH-64D Apache tutorial page describes the Target Acquisition and Designation Sight (TADS) system. We explain how to target, operate TEDAC, LRFD, LMC and how to use Xbox controller as TEDAC left hand grip and right hand grip.
Last update: 28 April 2022
This chapter of our DCS game guide provides info about DCS: AH-64D Apache add-on and depicts the TADS system (Target Acquisition and Designation Sight). We explain how to operate TEDAC, that is, TADS Electronic Display and Control and use it to lock enemy targets, indicate targets by military laser known as Laser Range Finder and Designator. Also, we explain how to track moving targets with the LMC - Linear Motion Compensator. Furthermore, we explain how to use an Xbox gaming controller to operate a TEDAC device.
- TADS Overview
- Key buttons
- Enabling the TADS system
- Calibrating the TADS image
- Description of the TADS screen
- Main functions & features of TADS
- TADS in the pilot's seat
- RHG - right grip - button list
- Xbox controller as right and left TEDAC Hand Grip
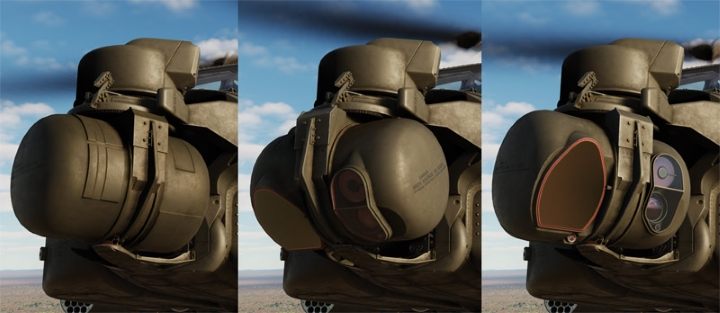
TADS Overview
TADS (Target Acquisition and Designation Sight) is a targeting system integrated with the helicopter structure, consisting of a dayTV camera, a FLIR infrared thermal imaging camera, a laser pointer and a laser rangefinder. TADS enables observation and tracking of targets in all lighting conditions. Also, it uses a laser to guide Hellfire missiles to the target. TADS camera can be slaved to the CPG gunner's head movements, that is, by aiming at a point where the pilot or gunner is currently looking, or any point on the map.
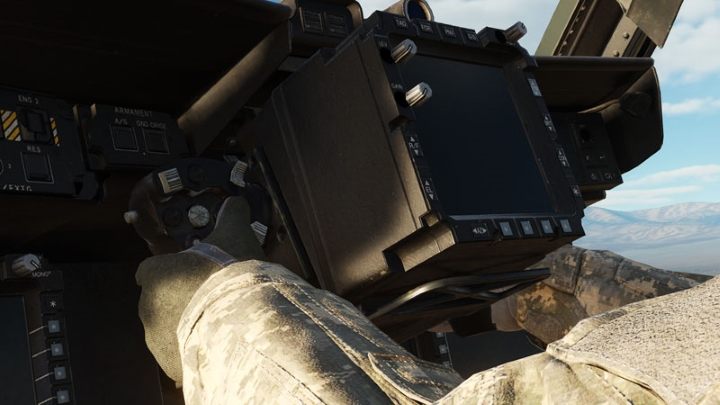
The TADS system in the gunner's cockpit can be operated by TEDAC which contains the TADS Electronic Display and Control. It consists of a screen and two grips on the left and right side (LHG - Left Hand Grip, RHG - Right Hand Grip). These are similar to cut in half joypad/xbox controller - they have analog axis knobs, a trigger on the opposite side, and a lot of buttons and switches.
For convenience, many of the key TEDAC buttons can be assigned to the xbox controller connected to PC, instead of looking for spare slots on the cyclic or collective stick. The instruction and example is located further in this chapter of the guide.
{ramkaniebieska} NOTE - our description contains the basic principles of using the TADS system. This means that we didn't include detailed information on how to use it with various types of weapons. Such instructions will appear in the weapon & armament chapters. The FCR radar functionality will appear later in the Early Access period of the AH-64D Apache expansion pack.{/ramkaniebieska}
To operate TADS efficiently, you must be familiar with the terms "sight" and "acquisition" described in the Sight Source and Acquisition Source chapter.
Key buttons
All of them are in the CPG AH-64D gunner category and subcategories
RHG - Right Hand Grip
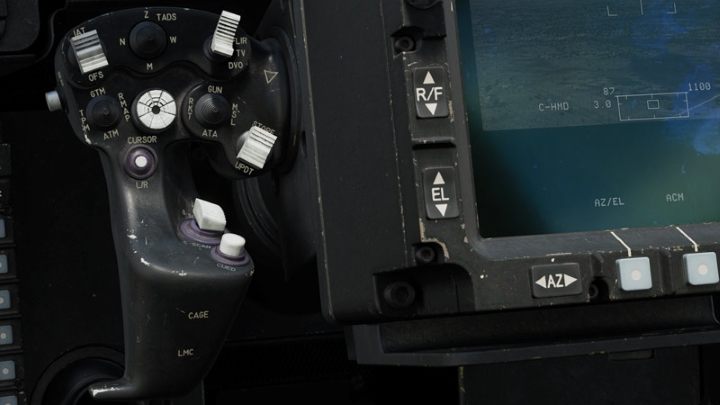
LHG - Left Hand Grip
- LHG Weapons Action Select GUN - select specific type of gun
- LHG Weapons Action ROCKETS - select specific type of rockets
- LHG Weapons Action MISSILES - select Hellfire missiles
- LHG Weapons Trigger First Detent (weapon trigger)
- RHG SIGHT MANUAL TRACKER - camera control knob
- LHG CURSOR CONTROLLER / ENTER - MPD cursor control knob
- LJG CURSOR CONTROLLER / ENTER - confirm selection button on MPD (after hovering over it by cursor)
- LHG TADS FOV SWITCH Z-ZOOM - max camera zoom
- LHG TADS FOV SWITCH - W-WIDE - wide camera FOV
- LHG TADS FOV SWITCH M-MEDIUM - medium camera FOV
- LHG TADS FOV SWITCH N-NARROW - narrow camera FOV
- LHG TADS SENSOR SELECT SWITCH FLIR (FLIR camera)
- LHG TADS SENSOR SELECT SWITCH TV (TV camera)
- RHG LRFD TRIGGER 2nd DETENT - laser trigger (in DCS 1st detent it is not useful)
- LHG STORE / UPDATE SWITCH - STORE (saving points on the map)
- RHG SIGHT SELECT SWITCH HMD - select helmet sight
- RHG SIGHT SELECT SWITCH TADS - select TADS crosshair
- LHG LMC LINEAT MOTION COMPENSATOR - facilation of using laser to lock a moving target
- RHG SLAVE BUTTON - directing the camera to the "acquisition" source
- RHG FLIR POLARITY BUTTON - change the FLIR camera spectrum
Enabling the TADS system
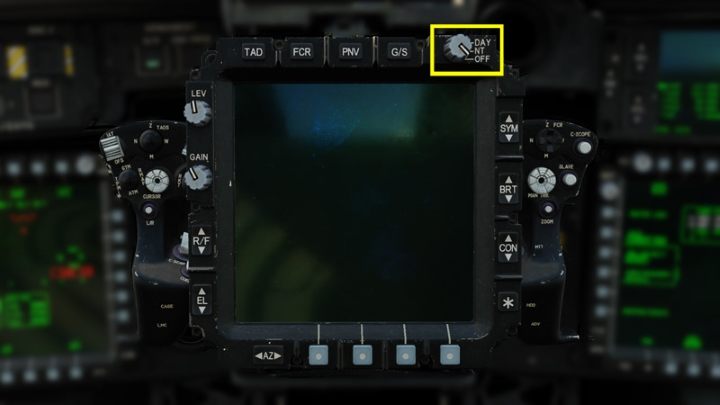
Turn the screen switch to the DAY (day) or NT (night) position. NT displays the image in green color only. The DAY mode with a black and white screen can also be adapted to night conditions. Green can be less strenuous for the eyes in the dark.
If the pilot has just turned on the APU during Cold Start, it will be a short while before the camera shows the image. The symbols will appear first.
After a while, the screen will be ready to work.

Press SIGHT SELECT SWITCH Right - TADS on the RHG to start controlling the system camera by using Hand Grips.
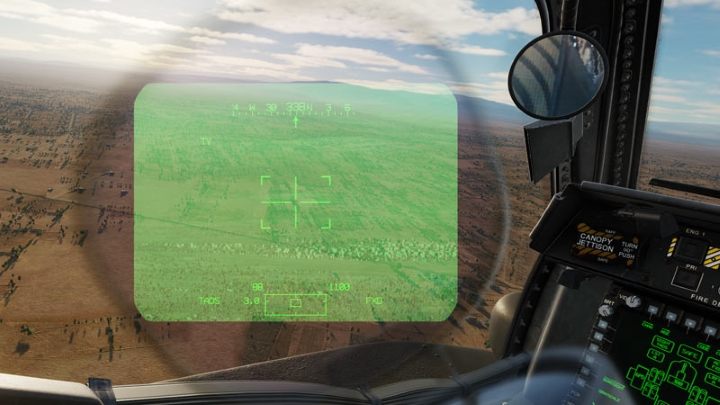
If you have the IHADSS helmet display turned on, the TADS image will also appear on it by default. With acquisition source other than GHS, camera image will be static and change when camera controller is manipulated on RHG or when the acquisition source gets changed. The fixed image function can be useful after acquiring the target, especially when you want to keep an overview of the target location and look around at the same time.

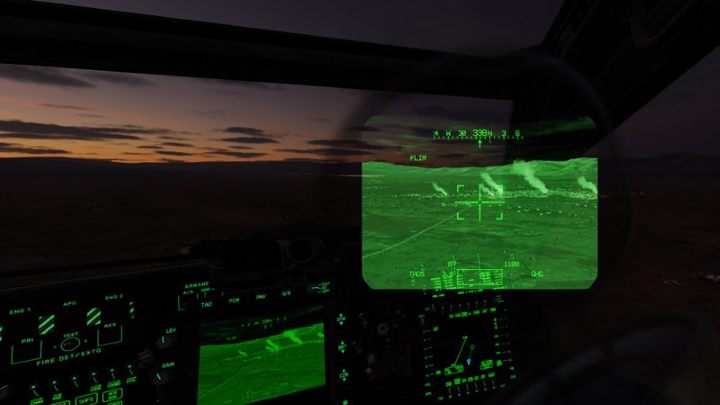
By setting the ACQ source on the GHS (Gunner Helmet Sight) and pressing the SLAVE button on the RHG, you can combine the head movements and the viewing direction with the TADS camera. Detailed instructions are provided below in the TADS Main Features chapter. This function is very useful at night, allowing the gunner to see in the dark and to be able to quickly find targets by looking around.
You can also try to calibrate the image by using the BRT, CON, LEV, GAIN knobs and buttons to remove the camera view from IHADSS, leaving all other information. Note - it is not always possible to get the perfect effect depending on the lighting conditions.
In many other situations, simply turn off IHADSS by using the I key to focus only on the TADS screen.
Calibrating the TADS image
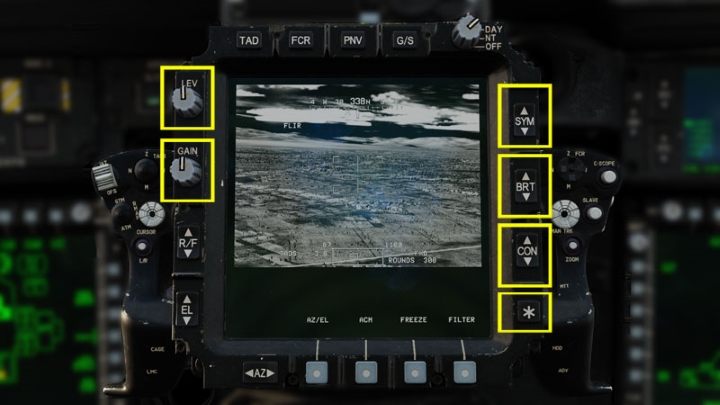
Use the buttons and knobs around the screen to calibrate the image quality. The first calibration is usually done during a Cold Start. Later on it takes place at virtually every location where we focus the camera image for longer or in accordance with the changing lighting during the day.
- LEV (Level) - FLIR image exposure level
- GAIN - FLIR image gain
- SYM (Symbology) - brightness of text and symbols
- BRT (Brightness) - image brightness
- CON (Contrast) - image contrast
- * Asterisk - reset settings
All buttons operate the FLIR infrared camera. The DayTV camera is only controlled by the BRT and CON buttons. Besides, the last two buttons only work with active TADS as "sight".
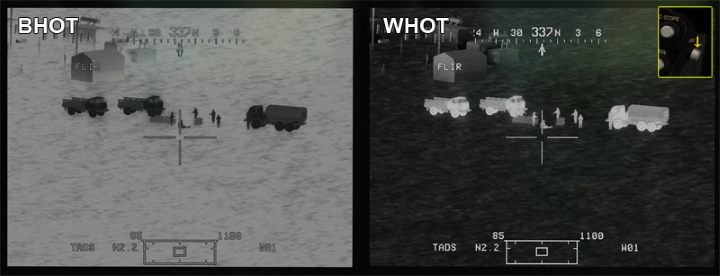
Separate settings will be necessary for the different polarities of the FLIR infrared camera (BHot, WHot).
- BHOT (Black Hot) - “hot” targets appear as black
- WHOT (White Hot) - “hot” targets appear as white
In case of the FLIR camera, press the FLIR Polarity button on the RHG or the Polarity button on the Collective to toggle between BHOT and WHOT.
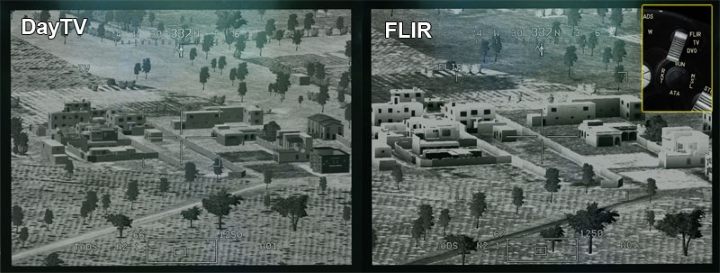
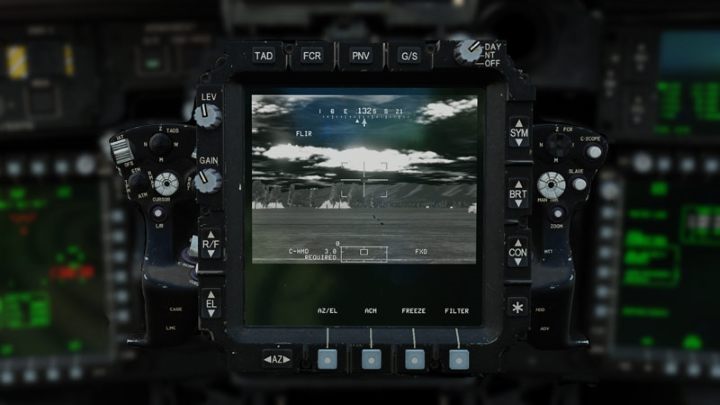
The DayTV camera will also require separate settings. Press the 3-stage TADS Sensor Select switch on the LHG to switch the camera between FLIR and DayTV.
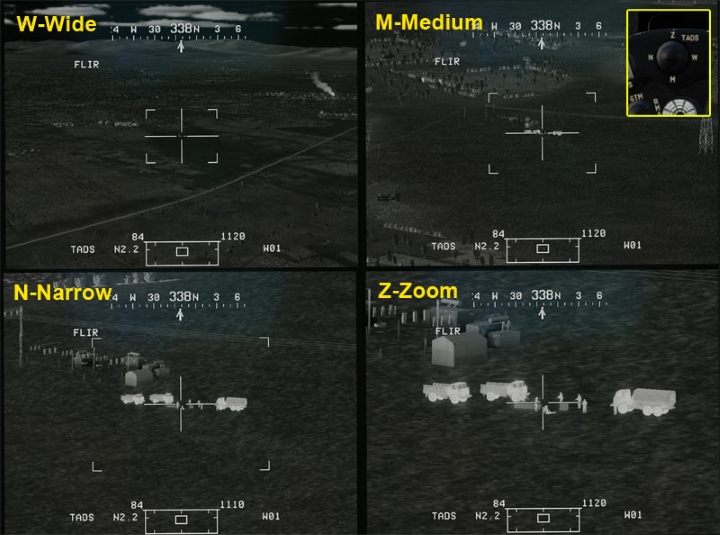
The image can also be zoomed in step by step (without smooth zoom adjustment) in 3 or 4 FOV ranges (Field of View), depending on the selected camera. The top 4-way button on the LHG is used for this.
FLIR Camera:
- W (Wide) - wide viewing angle
- M (Medium) - medium viewing angle
- N (Narrow) - narrow viewing angle
- Z (Zoom) - maximum zoom
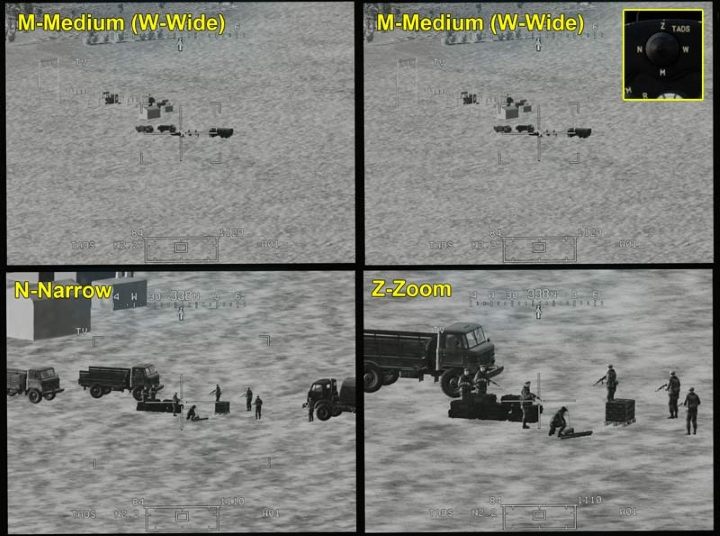
The DayTV camera doesn't have the Wide option, but it does offer a much greater zoom. The W-Wide and M-Medium functions set the same zoom level
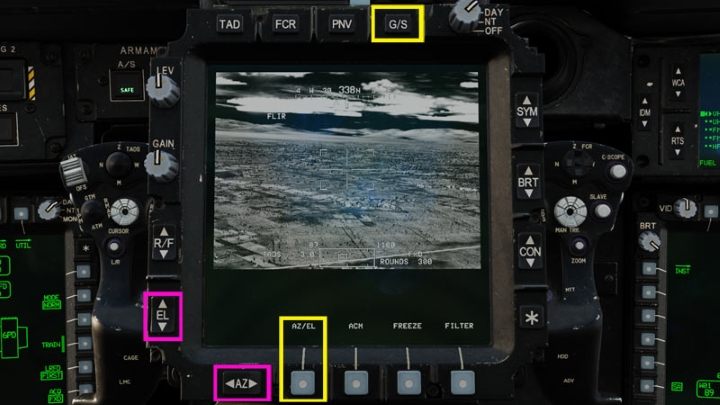
Other working buttons:
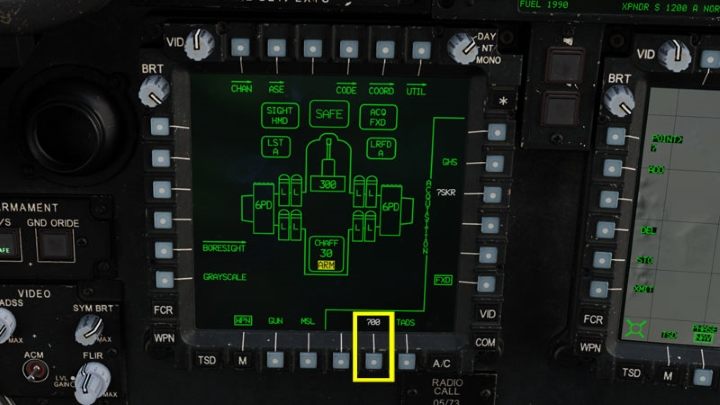
- G / S (Gray Scale) - displays the grayscale for image calibration
- AZ / EL (Azimuth / Elevation) - with AZ / EL pressed, the AZ and EL switches correct the position of the camera horizontally and vertically, if the image is drifting in some direction, e.g. when the helicopter is hovering.
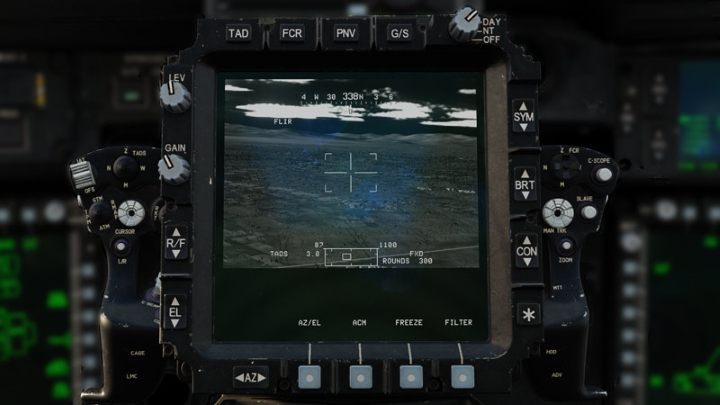
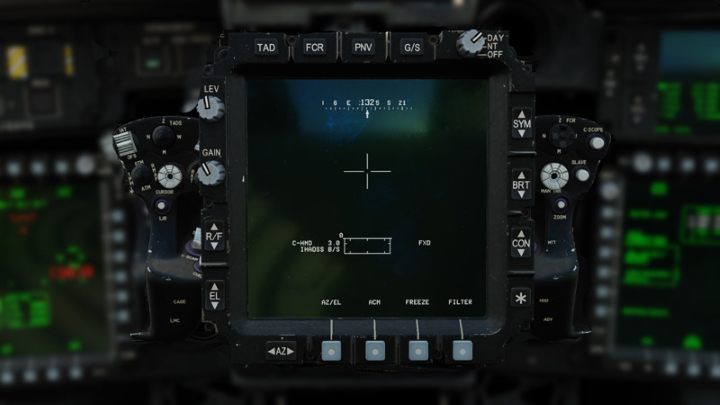
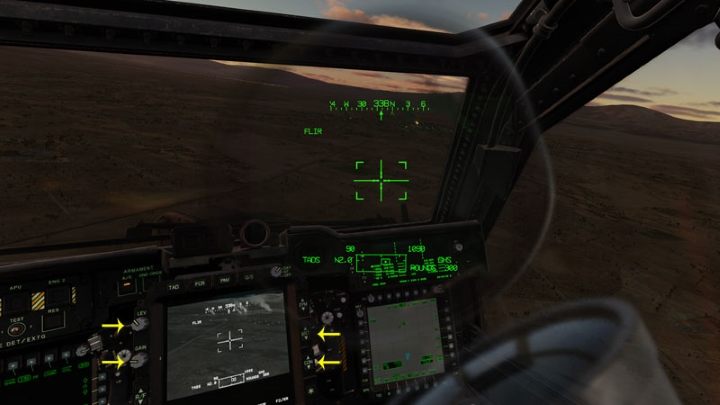
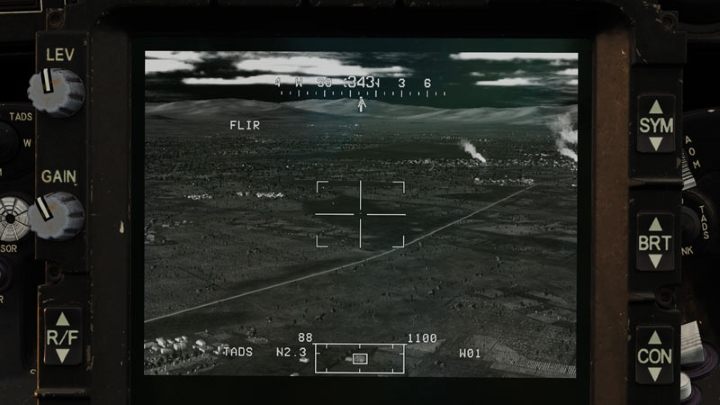
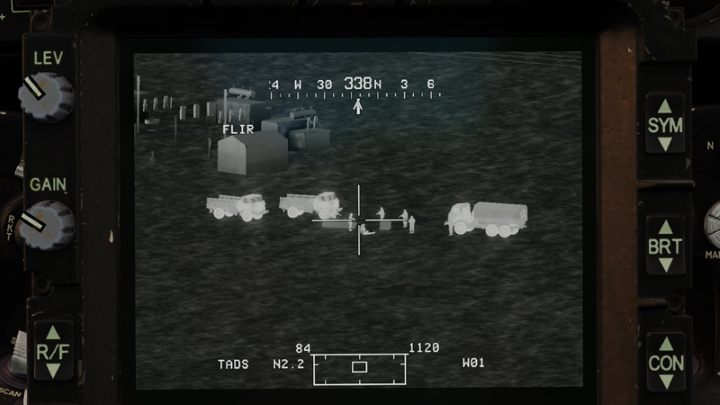
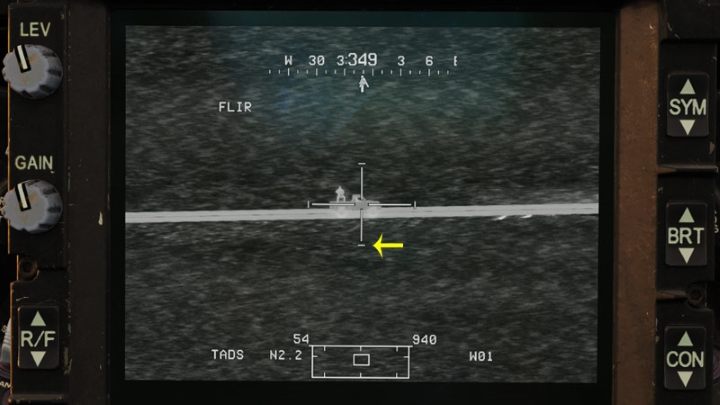
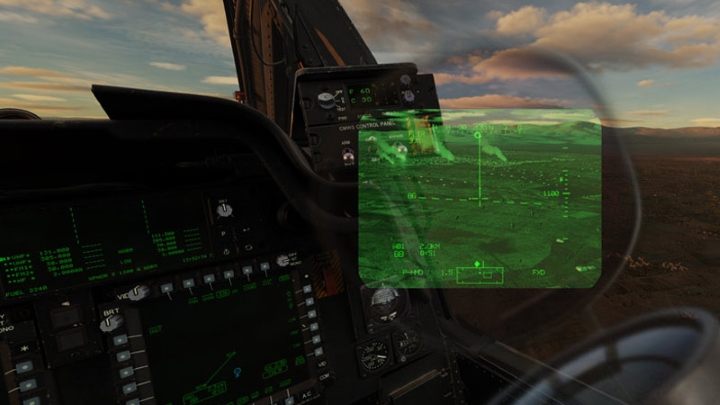
Description of the TADS screen
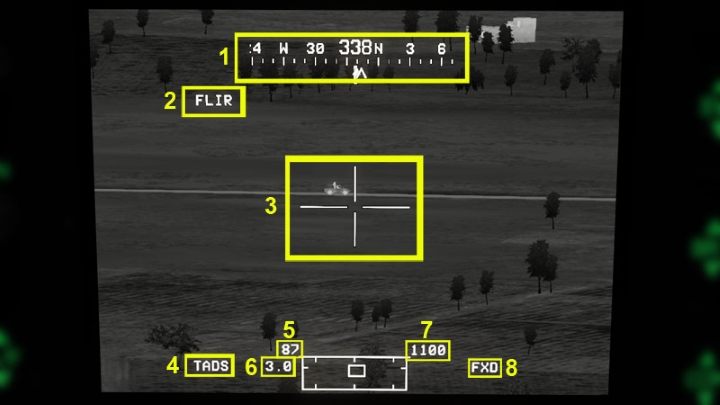
- (1) Compass tape showing the current flight course
- (2) Active camera
- (3) LOS Reticle
- (4) selected sight source
- (5) the current Ground Speed
- (6) the distance to the acquisition source point
- (7) current altitude
- (8) selected point for tracking by the TADS camera - acquisition source
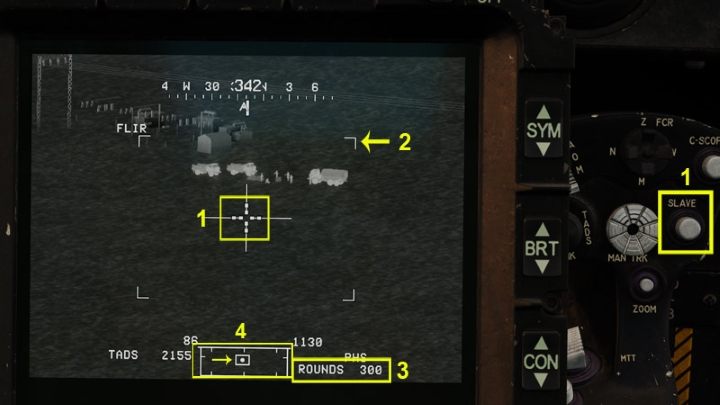
- (1) 8 dots on the LOS cross indicate that the SLAVE mode is on - the LOS reticle is aimed at the active "acquisition source" point and it cannot be moved in any way
- (2) the four corner markings show the field of view for the next zoom level
- (3) Weapon Status - information about the active type of weapon is displayed on the lower right
- (4) HAD (High Action Display) - the large rectangle is the field of view from the helicopter, the smaller rectangle is the field of view of the current Field of Regard sight. The dot in the middle indicates the direction of the line of sight / aiming of the other crew member if their crosshair is selected as acquisition source
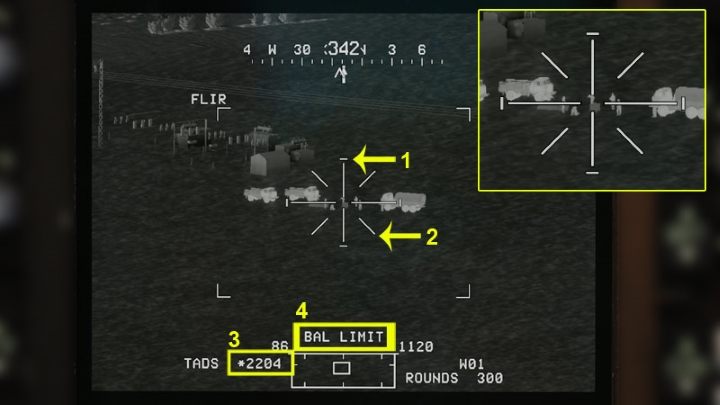
- (1) LMC Indicator - The small horizontal lines indicate that the Linear Motion Compensator is on
- (2) LRFD Indicator - diagonal lines by the cross appear when holding the trigger of the Laser Range Finder and Designator
- (3) laser distance to the point available in the center of the crosshair
- (4) Weapons Inhibit - displays information about the safety and usability of the selected weapon in the current conditions
Main functions & features of TADS
Searching for Targets
By pressing the Sight Select Right button on the RHG, select TADS as the active sight.
Use the Sight Manual Tracker knob to move the camera lens to the desired area. Adjust the image as necessary by using the following buttons:
- TADS Sensor Select (LHG) - switches the type of camera
- TADS Field of View (LHG) - changes the zoom level
- FLIR Polarity (RHG) - changes the BHOT / WHOT polarity
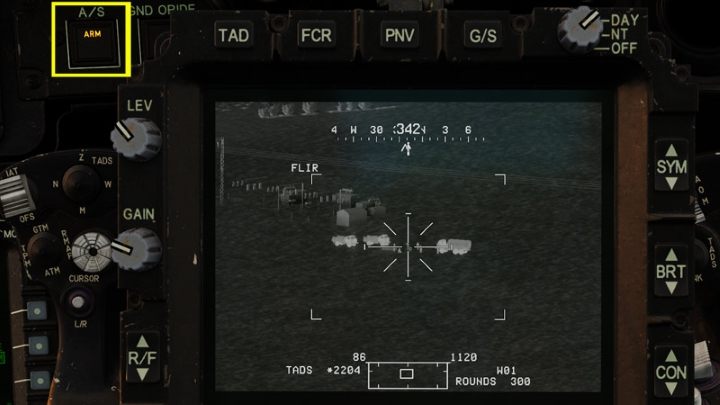
Hold down the LRFD 2nd Detent laser trigger button on the RHG to lase the target. The distance to the target will appear at the bottom, allowing you to evaluate the possibility of using the weapon. The laser is treated as a weapon on board the helicopter, therefore the arming button must be on - ARM. Otherwise the laser won't turn on.
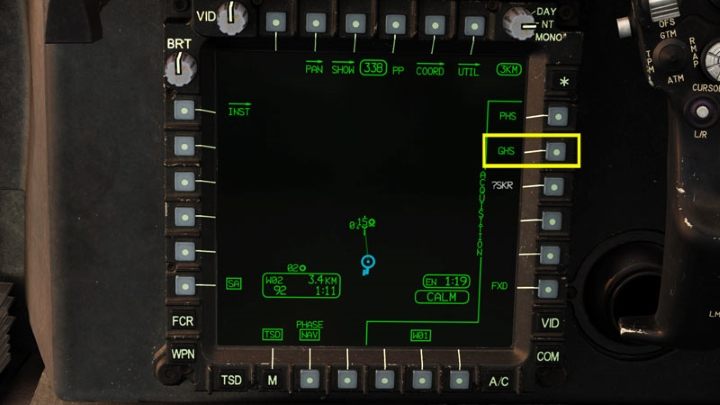
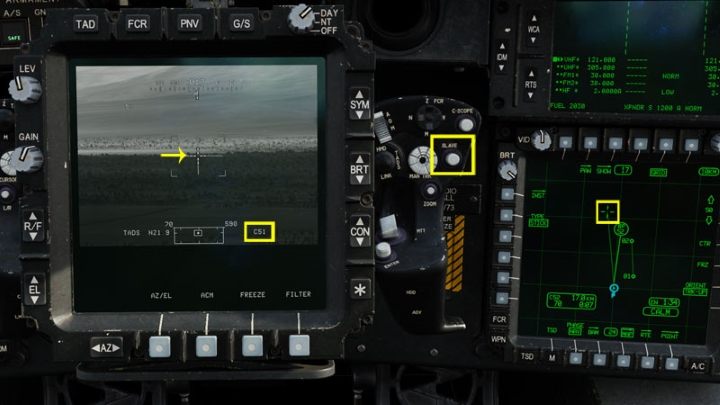
SLAVE function
The SLAVE function is extremely important. It allows you to quickly direct the camera to the selected acquisition source, that is, a point in the map that requires attention. Such a point could be:
- ?00 - waypoint, point marked as a destination on the map
- PHS (Pilot Helmet Sight) - the point at which the pilot looks through his helmet sight
- GHS (Gunner Helmet Sight) - direct control of the camera with a helmet, i.e. with the gunner's head movements
- FXD (fixed) - 3 km fixed point directly in front of the helicopter
- ?SKR (seeker) - Hellfire missile sensor when illuminated with a laser by another unit
- TADS - the point at which the TADS camera is currently aimed (source only for the pilot)
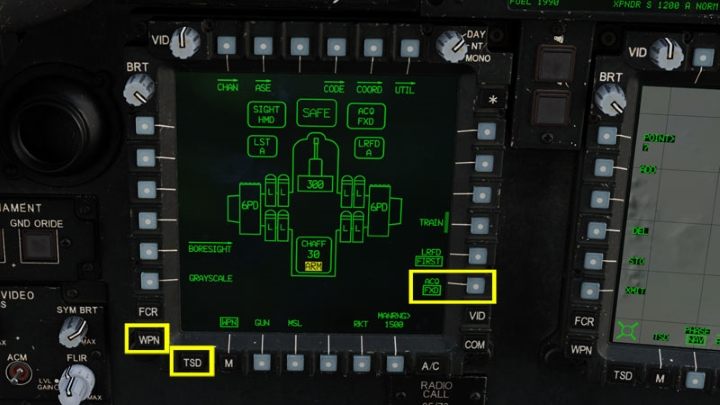
On the TSD or WPN screen, select the ACQ (acquisition) function.
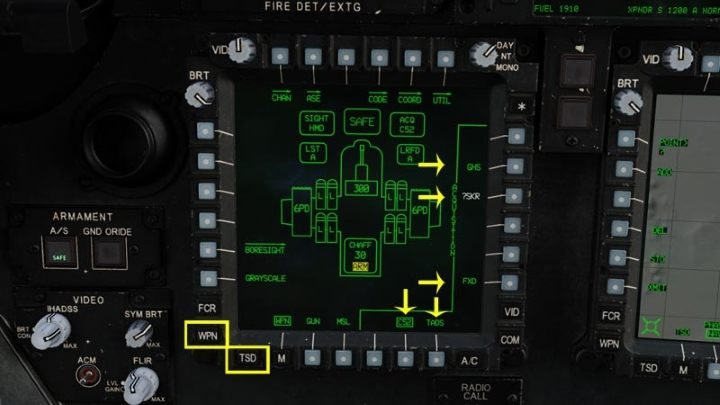
Select one of the sources from the available options.

Press SLAVE on the RGH. Dots will appear on the cross. The camera will rotate to the selected point. A line with a cross will appear on the TSD map showing where TADS is looking on the map. With the SLAVE function active, the camera cannot be manipulated with the knob. Press SLAVE again to regain control of the camera.
TADS camera controlled by the gunner's head movements

Select TADS as the active Sight crosshair with the Sight Select Right - TADS button on the RHG.

Select ACQ on the TSD or WPN screen to display the acquisition source list.
Select GHS (Gunner Helmet Sight) from the options on the right.

With TADS and GHS sources as "sight" and "acquisition" press SLAVE on RHG to blend and combine camera with helmet.
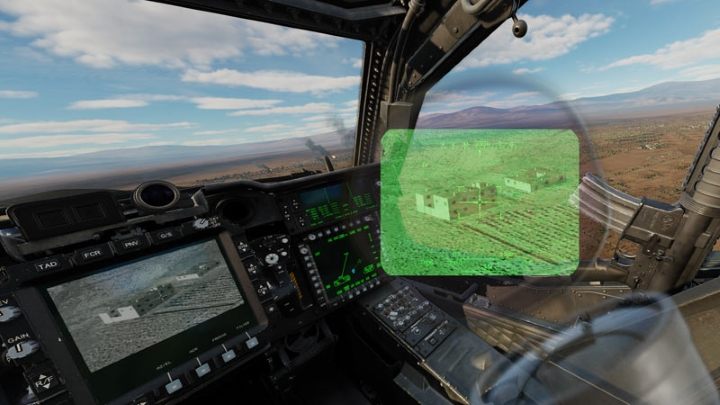
From now on, wherever you look, the TADS camera will rotate there (after some delay). Click SLAVE again to free the camera and leave it pointing at the selected point. By default, the camera image will be imposed on the IHADSS. This is especially useful at night.

By using the LEV, GAIN, BRT, CON screen buttons and knobs, you can try to adjust the image to erase the camera feed while leaving the rest of the information on the IHADSS. Note - depending on the lighting conditions, it is not always possible to get the perfect effect.
You can also turn off IHADSS with the "I" key, if the camera image remains on the display and it cannot be adjusted or is annoying at the moment. However, this is not a good practice as it deprives you of access to a lot of relevant information.
How to save targets and their positions for later
Detected targets can be quickly added as map points to have quick access to their positions later on.
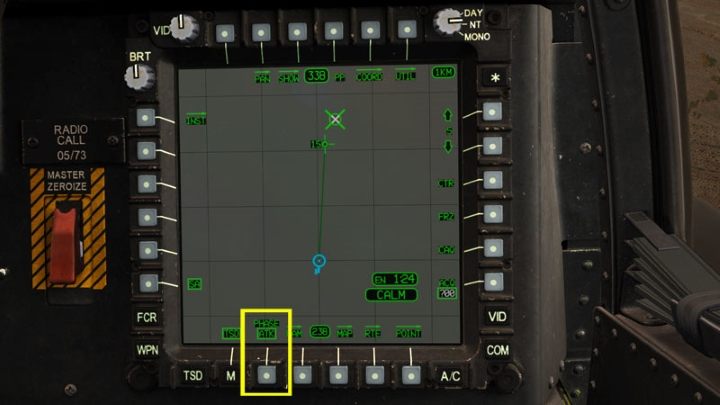
Make sure you are in the attacking phase (PHASE ATK) on the TSD map.
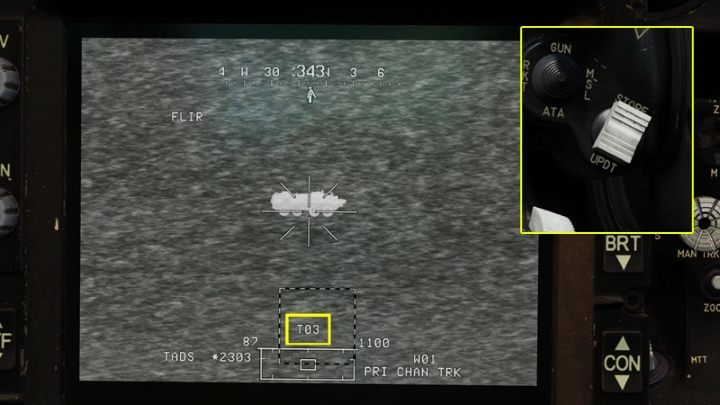
Search for a target. Point it with a laser using the LRFD 2nd Detent (RHG) trigger. While using the laser, press the STORE button on the LHG to save the target's position. The text Txx will appear on the screen for 4 seconds with the next available destination number. Also, the point will appear on the map and the list of targets.

To return to your target later, select the acquisition sources ACQ on the WPN or TSD screen.
Then ?00 as the map point category.
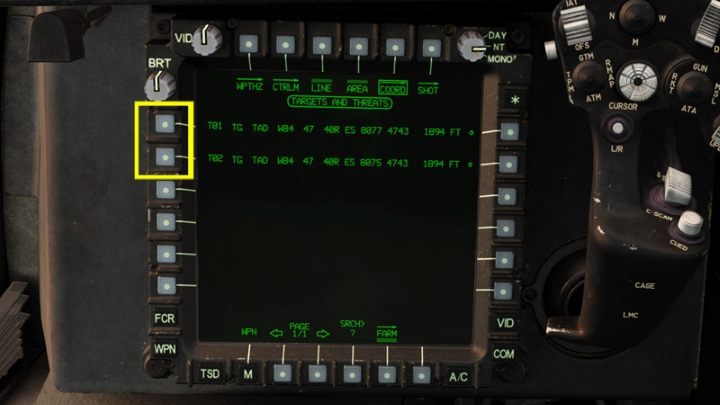
From the displayed target list, select the target number you want the TADS camera or the Cued LOS Reticle to point again at.
Press SLAVE on the RHG to point the TADS camera at the target.
How to save waypoints on the map
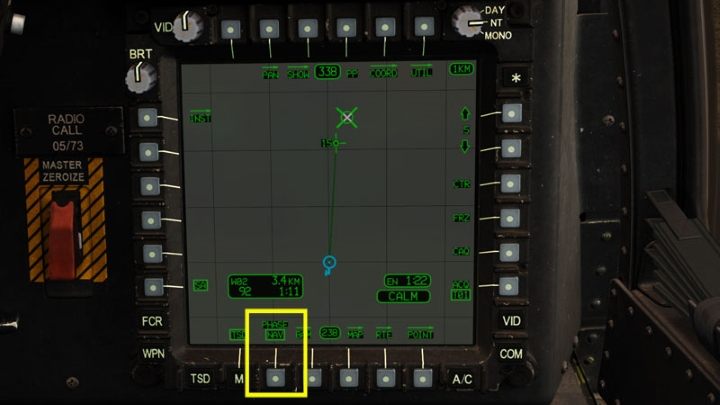
Saving points other than destinations & objectives on the map by using TADS (Waypoints by default) is done in the same way as above, except that the active phase of the TSD map must be PHASE NAV (navigation).
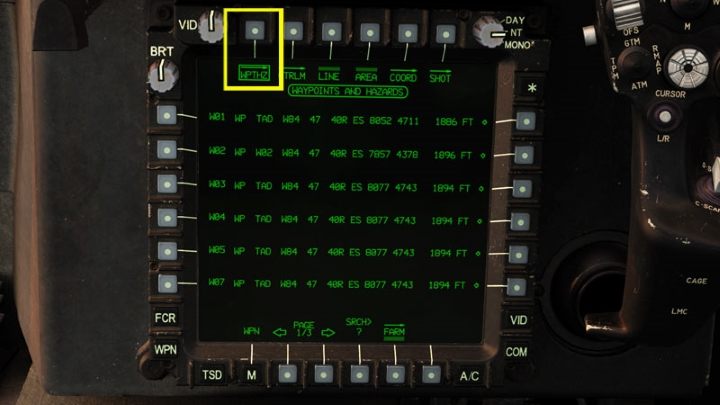
The points to be selected as acquisition source will be marked as Wxx in the Waypoints and Hazards (WPTHZ) category.
LMC - Linear Motion Compensator
Linear Motion Compensator is helpful in tracking a moving target with a laser beam. It allows you to keep the camera moving smoothly at a constant speed in a selected direction or stabilizes the camera on a stationary target when the helicopter is hovering.
After aiming the camera crosshair on the target, press the LMC button on the LHG. Small horizontal lines will appear at the ends of the crosshair to indicate that the LMC system is operating. The gentle tilt of the camera controller will allow you to smoothly and stably follow the moving target. Pressing the LMC again disables the function.
TADS in the pilot's seat
The pilot has very limited possibilities of using the TADS system. The pilot has just the following options:
- possibility to display the TADS image on one of your MPD monitors to see what CPG is doing on it
- in special situations, use the TADS as a night vision device instead of the primary PNVS system. The TADS camera is then combined to its IHADSS display to which the image from the FLIR camera is being transmitted. The pilot cannot make any target locking, marking or laser tracking like the CPG. The TADS dome also rotates much slower than the PNVS.
Displaying the TADS image in the pilot's cockpit
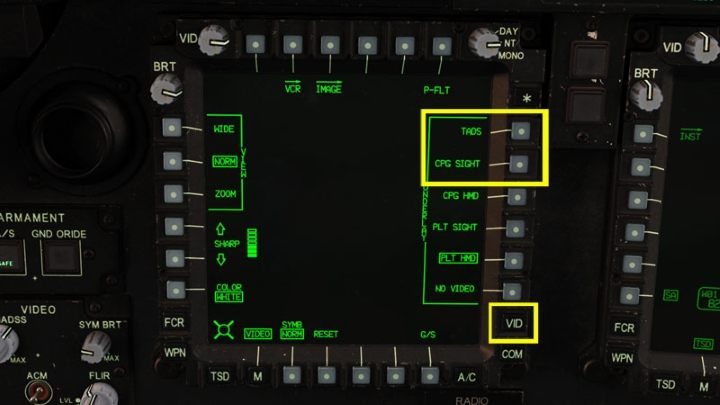
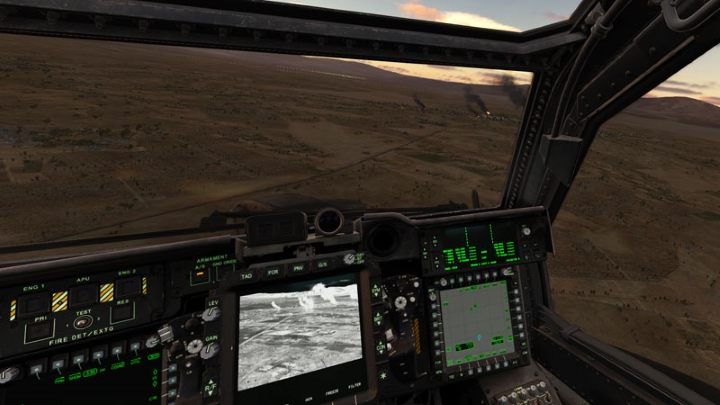
Press the VID button on one of the MPD monitors. Then select TADS or CPG SIGHT if the gunner is currently using TADS as his sight.
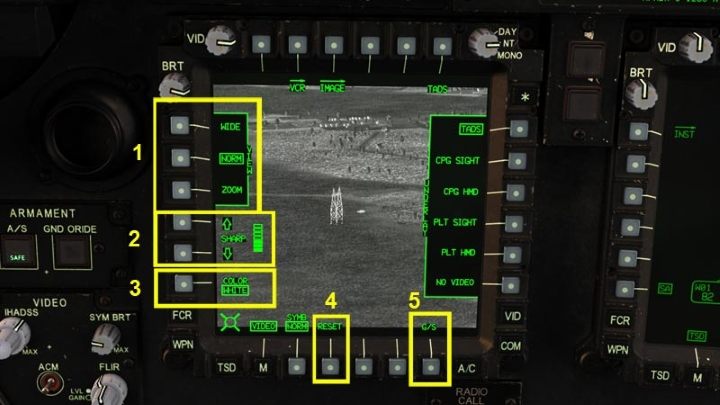
After the appearance of the video image, the following options are available:
- (1) The degree of image zoom: WIDE - wide angle, NORM - normal zoom, ZOOM - maximum zoom
- (2) SHARP - image sharpness
- (3) COLOR - switches between black and white and green images
- (4) SYMB-NORM / BOOST - stronger contrast of text / symbols on the screen
- (5) RESET - reset settings
- (6) G / S - greyscale - displays grayscale
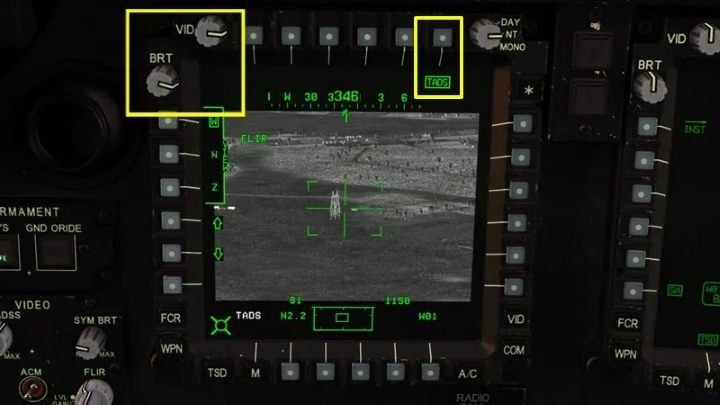
Use the VID and BRT knobs to adjust the image to the current lighting conditions. Press the TADS button on the top to exit the image adjustment menu.

The screen will show CPG who is seeking and locking targets. Also, you will be able to see any messages and symbols that appear on TADS.
TADS as a NVG night vision device
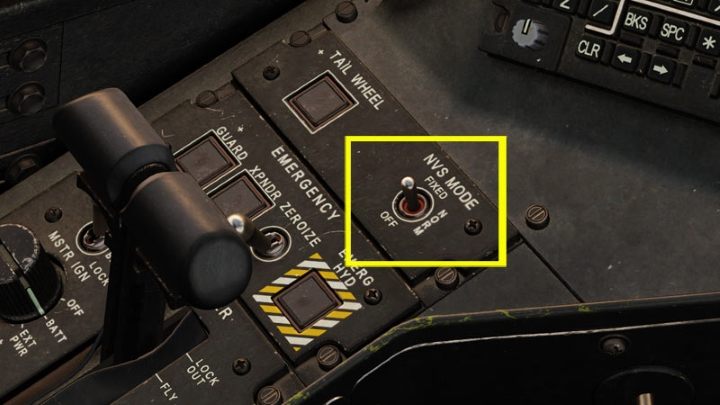
Turn on the night vision goggles on the left console by setting the switch to NORM.
Press the NVS SELECT SWITCH - TADS button on the collective lever. The night vision source will change from PNVS to TADS. Use the FLIR and SYMB BRT knobs next to the left MPD monitor to adjust the quality of the image transmitted to the IHADSS.
The image from TADS will now be a source of night vision. Then it is worth turning off the video on the MPD monitor so that the images do not overlap.
RHG - right grip - button list
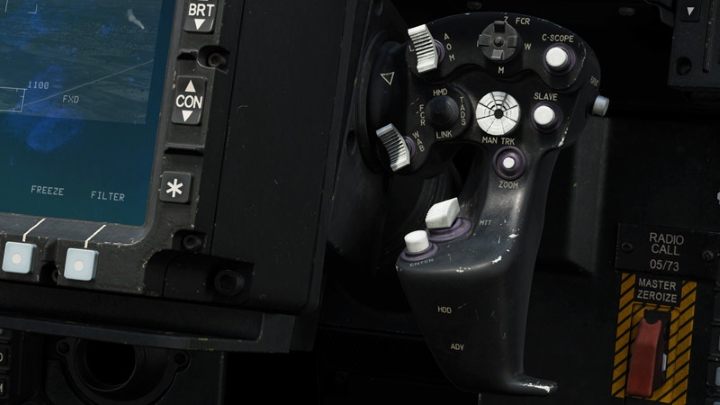
- FCR ZOOM - changes the targeting format of the FCR radar
- SIGHT SELECT - changes the active sight: HMD, TADS, FCR, LINK (connects the radar aiming line with TADS and vice versa)
- SLAVE - directs the camera or FCR to the acquisition source
- SIGHT MANUAL TRACKER - a knob that controls the position of the TADS camera or the FCR antenna angle
- MTT TRACK PROMOTE - switches the MTT (Multi Target Tracker) between the primary and backup IAT contact
- FLIR POLARITY - switches the polarization of the infrared camera: BHOT, WHOT
- IAT - Select polarity for Image Auto Tracker
- LST MODE - Select the Laser Spot Tracker function mode
- LRFD TRIGGER - laser beam trigger: 1st DETENT (releases a short beam), 2nd DETENT (illuminates as long as the trigger is being pressed)
- FCR SCAN SIZE - radar's FOV
- FCR C-Scope - displays the radar range of operation (azimuth over elevation) on HMD and TADS
- Missile Advance - manual switching of the next Hellfires to be launched
- TADS SENSOR SELECT - FLIR or DTV camera selection
- WEAPON ACTION SELECT - selection of active weapons: G - cannon, R - rockets, M - Hellfire missiles
- STORE / UPDATE - saving the position of a target / waypoint on the map
- FCR SCAN - enables radar scanning: Fwd - single S-Scan, Aft - continuous C-Scan
- FCR CUED SEARCH - quickly rotates the antenna to the source of the threat detected by RFI
- LINEAR MOTION COMPENSATOR - activates the LMC mode that facilitates manual laser tracking and targeting of a moving target
- TADS FIELD OF VIEW - selection of the zoom level (W-wide, M-medium, N-narrow, Z-zoom)
- IMAGE AUTO TRACK / OFFSET - enables auto tracking and offset tracking mode
- VIDEO RECORD - enables video recording with TADS (does not work in DCS)
- FCR MODE - switch the radar operating mode
- CURSOR CONTROLLER / ENTER - knob that controls the MPD, press to confirm the selection
- CURSOR DISPLAY SELECT - switches the cursor between MPD monitors and centers it on the screen
- WEAPONS TRIGGER - fire active weapon
Xbox controller as right and left TEDAC Hand Grip
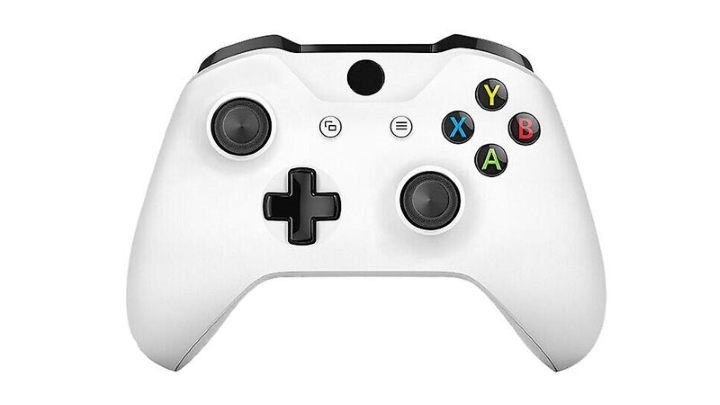
The number of buttons on the TEDAC grips may be a bit overwhelming, especially since there are no dedicated controllers on the market just for this role. That what is possibly left for use on the cyclic stick, which is rarely used for CPG piloting, is certainly not enough. You can save yourself with a throttle, which generally provides a few buttons present on hand grips, but an even more interesting idea is to use a PC gaming controller to control the TADS, by holding it similar as CPG holding his hand grips.
We won't be able to assign all the buttons in this case either, but the good news is that not all are necessary right at your hand, especially in a period where a functional FCR radar is still missing. Unfortunately, at least in case of the Xbox controller, there is no simple option to use the triggers as a regular trigger button. They are considered by the DCS as axles and basically cannot be used in hand grips. You will also need to spend one button on a Shift / Alt style modifier to double the number of available combinations.
The list of commands presented below is only an example. You can assign each function to your liking.
Assign a modifier
In this example, the modifier (like Shift, ALt, etc) is the left bumper, which is easy to press along with the other buttons of the controller. Note - it may happen that you have to reassign a modifier when restarting the game.
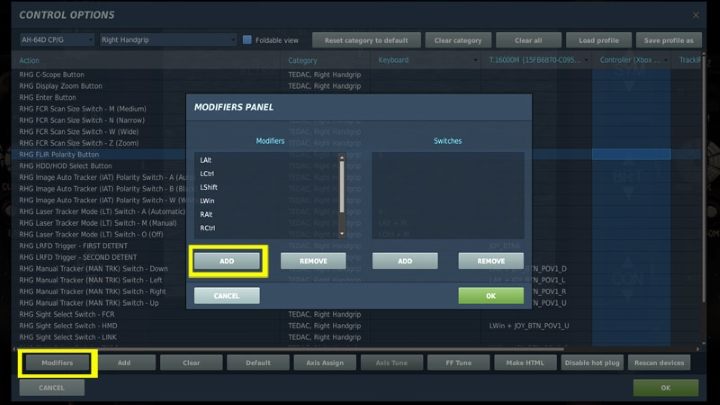
Select the control settings and enter the MODIFIERS option. Then, in the modifiers panel, click ADD.
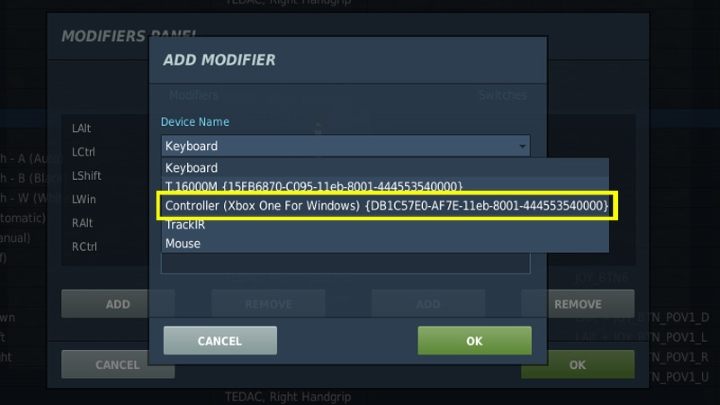
Select your controller name from the list of devices.
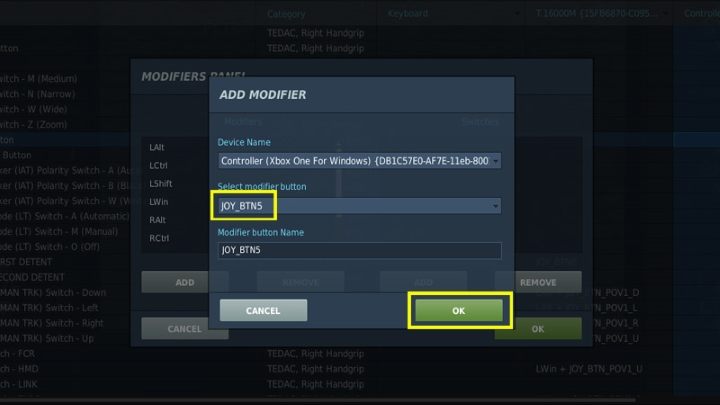
Press the button on the controller that is going to be binded as the modifier and click OK.
Assign axes to analog sticks
When assigning the correct axes and keys, make sure you do it in the correct CPG AH-64D category, otherwise you won't find many items.
It is worth starting with assigning analog axes that require some modification.
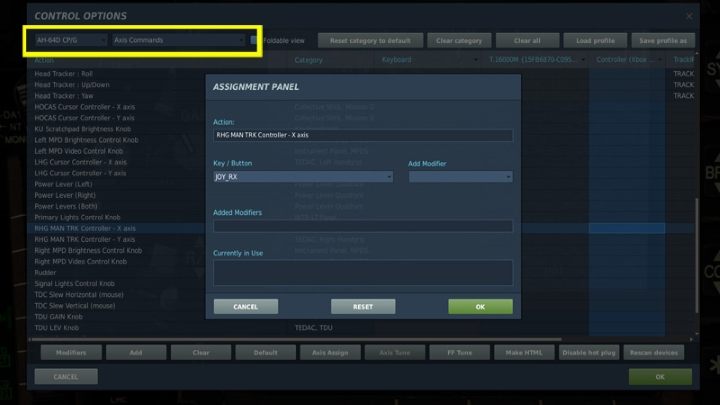
Select the CPG AH-64D category and the AXIS COMMANDS subcategory. Find the RHG MAN TRK Controller - it's the camera / radar antenna shift knob on the right grip. Assign its X axis to the analog stick of the controller - in this case the right stick, as JOY_RX by simply moving the knob up and down a few times. Confirm your action by selecting OK.
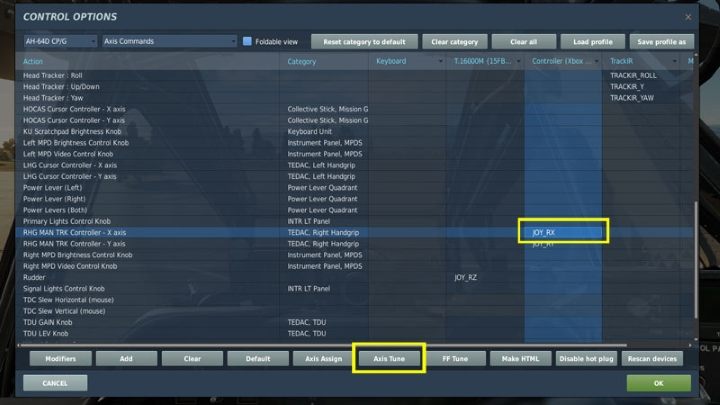
By having it marked on the list, select AXIS TUNE to improve its performance in the game.
Axis Curves - Curvature Tuning
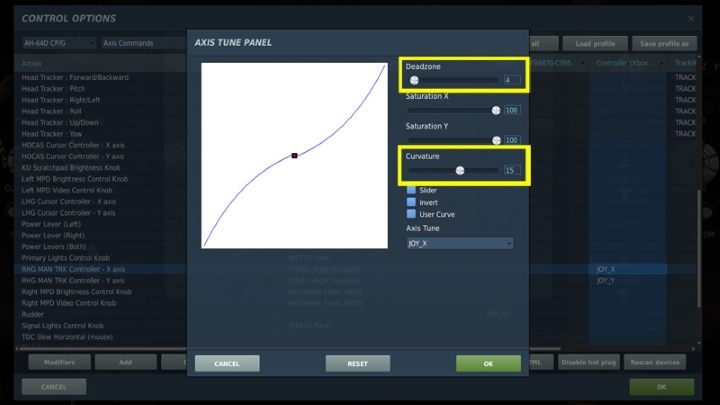
In the default settings, the camera can drift in different directions by itself without moving the knob. The best solution for this is to set a little DEADZONE to 2-4. The next necessary step is to set the CURVATURE for approx. 10-15. Thanks to this, the camera will move slower with small deflections of the knob than with larger ones, which ensures greater precision. Confirm your action by selecting OK.
Perform the same steps for the left / right axis, i.e. RHG MAN TRK Y-Axis by assigning JOY_RY and for the second CURSOR CONTROLLER knob on the left hand grip, used to move the cursor on MPD screens.
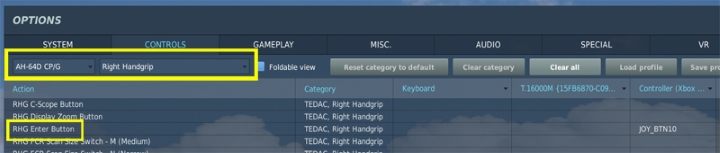
In the case of the left knob, it is worth adding the CURSOR CONTROLLER ENTER action to the analog knob button so that it works like in real life. You can find it under CPG AH-64D category and subcategories:
- Right Handgrip - as RHG Enter Button
- Left Handgrip - Cursor Enter Trigger
They both have the same effect.
Other buttons
All the rest of the other buttons are just an example of assigning the most necessary ones. They are all in the CPG AH-64D category and in the RIGHT HANDGRIP and LEFT HANDGRIP subcategories.
Without modifier:
 | Weapons Action Select GUN |
 | Weapons Action Select ROCKETS |
 | Weapons Action Select MISSILES |
 | Weapons Trigger First Detent |
 | TADS FOV SWITCH Z-ZOOM |
 | TADS FOV SWITCH W-WIDE |
 | TADS FOV SWITCH M-MEDIUM |
 | TADS FOV SWITCH N-NARROW |
 | TADS SENSOR SELECT SWITCH FLIR (FLIR camera) |
 | TADS SENSOR SELECT SWITCH TV (DayTV camera) |
 | LRFD TRIGGER 2nd DETENT - laser trigger (in DCS 1st detent it is not useful) |
 | STORE / UPDATE SWITCH - STORE (saving points on the map) |
With the LEFT BUMPER modifier:
| SIGHT SELECT SWITCH HMD |
| SIGHT SELECT SWITCH TADS |
| LMC LINEAT MOTION COMPENSATOR |
| SLAVE BUTTON |
| FLIR POLARITY BUTTON |


