DCS AH-64D Apache: Pilot/CPG Cockpits and Controls DCS AH-64 Apache guide, instruction
In this chapter of the DCS AH-64D Apache guide, we describe the location of the instruments in the cockpit and explain what the buttons on the controls are for.
Last update: 14 April 2022
This page of the DCS: AH-64D Apache simulator guide describes in detail the instruments and button panels in the cockpit of the pilot and CPG. We also explain the role of all buttons on the cyclic stick and the collective lever.

The AH-64D Apache attack helicopter has a two-seater tandem cabin. The pilot (PLT) is sitting in the back, co-pilot/gunner (CPG) is in the front. Their cockpits duplicate most of the on-board instruments. Both of them can also perform almost all the duties of the other crew member, although this is usually the case in emergency situations. In practice, the CPG only pilot the machine when the pilot is incapable of doing so, e.g. due to sustained wounds. The pilot operates the 30mm gun and Hydra unguided missiles, and the CPG operates the Hellfire guided missiles and the TADS target identification and targeting system, as well as the FCR radar.
- Pilot's cockpit
- CPG gunner's cockpit
- IHADSS
- Apache controls
- Collective
- The most important axes and buttons to assign
Pilot's cockpit

The pilot's cockpit is the main place where the helicopter's flight systems are operated. Here you can perform a Cold Start, access more engine switches, an exterior lighting panel and a flare system.
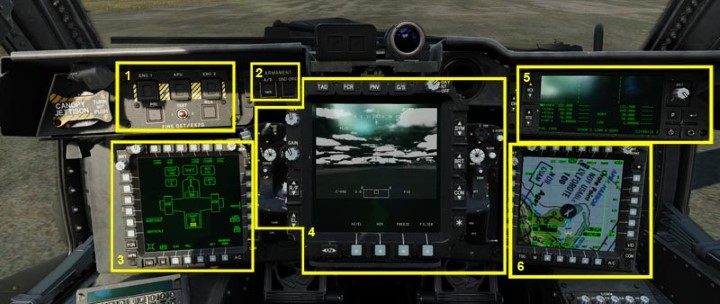
Front instruments panel

- 1. Fire Detection/Extinguishing Unit;
- 2. Enhanced Up Front Display (EUFD) - shows various system and emergency messages, radio settings, etc.
- 3. Two Multi Purpose Displays (MPD);
- 4. Armament Panel;
- 5. Adjustment panel for IHADSS helmet's display (also known as Helmet Display Unit HDU or HMD - Helmet Mounted Display);
- 6. Front windshield wiper switch;
- 7. Standby Instruments (Attitude Indicator, Airspeed Indicator, Barometric Altimeter)
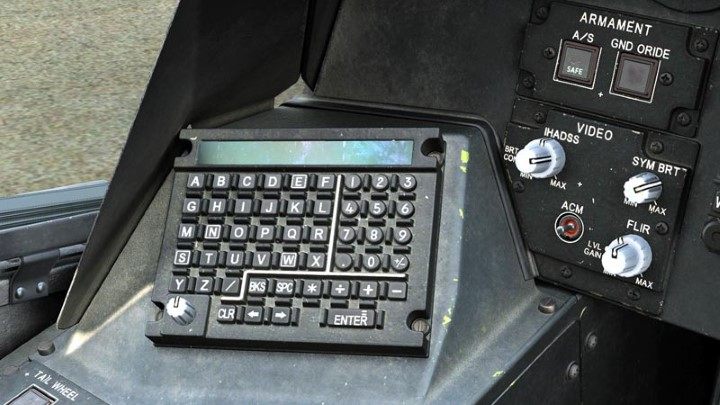
On the left side of the instrument panel, you have a keyboard for entering data for many systems - the effects will usually be seen on MPD screens or the EUFD display.
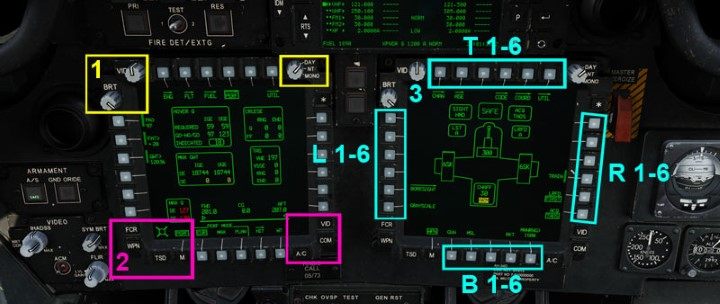
The two MPD multifunction monitors are identical and operated in the same way:
- 1. The VID and BRT knobs adjust the image to some extent, the DAY/NT/MONO switches are for: day/night/monochrome (only green color);
- 2. The described buttons are permanent shortcuts to the most important helicopter systems;
- 3. The multi-function buttons around the monitors are for changing settings according to the active screen/system. In the instructions, the rows are described according to the position: T - top, R - right, B - bottom, L - left.
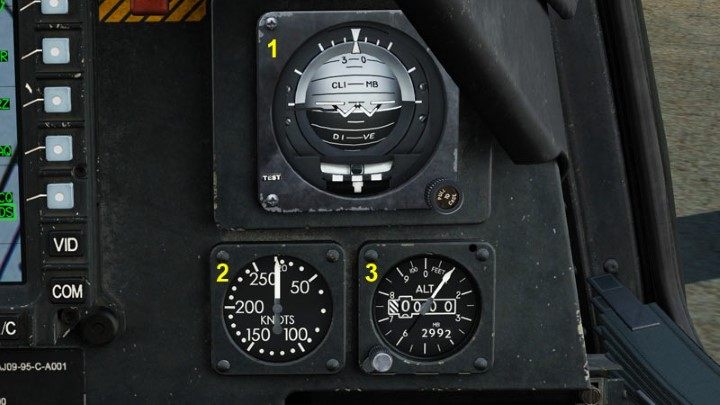
If the HDU helmet display fails, you will be able to use traditional analog on-board instruments:
- 1. artificial horizon 2;
- 2. speedometer in knots;
- 3. altimeter in feet.
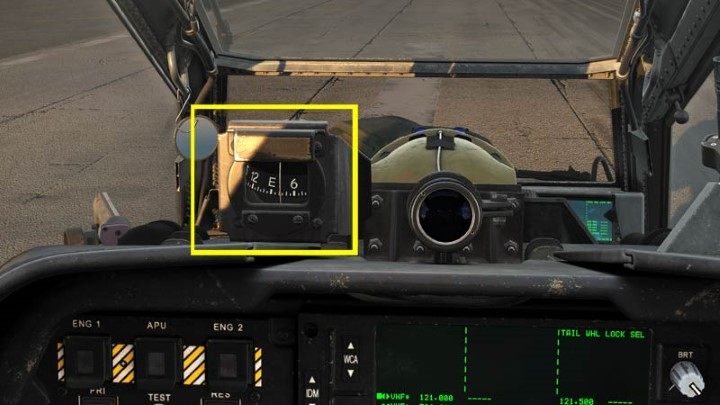
There is also a spare compass at the top. The round visor next to it is for calibrating the helmet sight.
Right console
On the right side, there is a panel for radio communication and a compartment for the monocle eyepiece with an HDU helmet display.
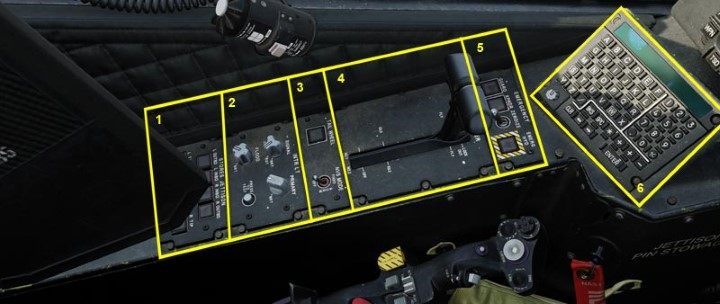
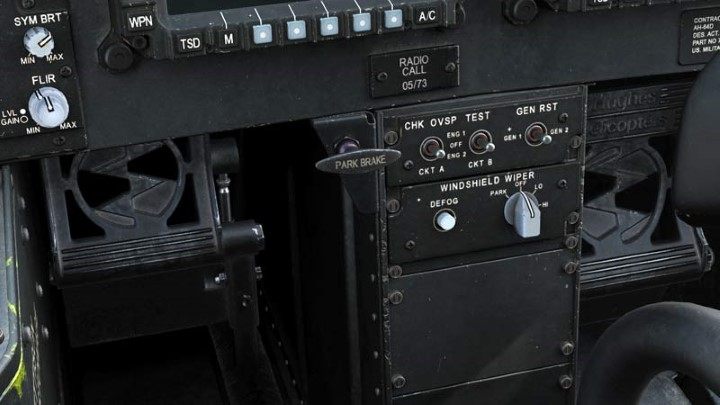
Left console
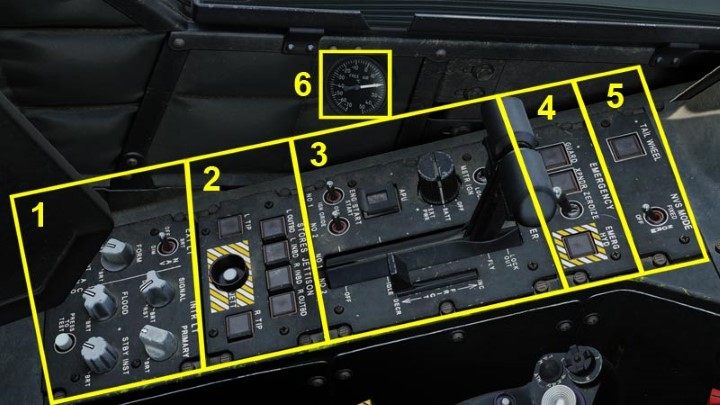
- 1. Exterior/Interior Lighting Panel;
- 2. Stores Jettison Panel;
- 3. Engine and APU control panel;
- 4. Emergency systems panel;
- 5. The switch to turn the rear wheel and the switch for changing the mode of the NVS night vision goggles;
- 6. Outside temperature indicator
CPG gunner's cockpit
The default key for switching to the CPG gunner's cockpit is "2" on keyboard. Press key "1" to return to the pilot's seat.

The CPG gunner's cockpit is distinguished by a third screen in the center, which is intended solely for the TADS (Target Aquisition and Designation Sight) system. It is operated by a dedicated set of buttons on both sides called "Hand Grips" (Left Hand Grip and Right Hand Grip). Everything else is almost identical to the pilot's seat, with a few exceptions in the engine and lighting sections.
Front instruments panel
- 1. Fire Detection/Extinguishing Unit;
- 2. Armament activation panel;
- 3. Left Multi Purpose Display (MPD);
- 4. TEDAC - screen and hand grips for operating TADS system;
- 5. Enhanced Up Front Display (EUFD) - shows various system and emergency messages, radio settings, etc.
- 6. Right Multi Purpose Display (MPD).
Left console
- 1. Stores jettison panel;
- 2. Interior Lighting Panel (no exterior);
- 3. The switch to turn the rear wheel and the switch for changing the mode of the NVS night vision goggles;
- 4. Power lever quadrant;
- 5. Emergency systems panel;
- 6. Keypad for entering data for multiple systems.
Right console
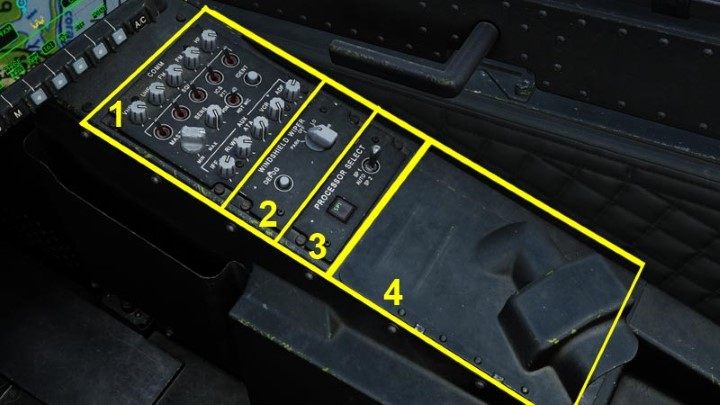
- 1. Radio communication control panel;
- 2. Front windshield wiper switch;
- 3. System processor panel;
- 4. HDU helmet display compartment.
IHADSS
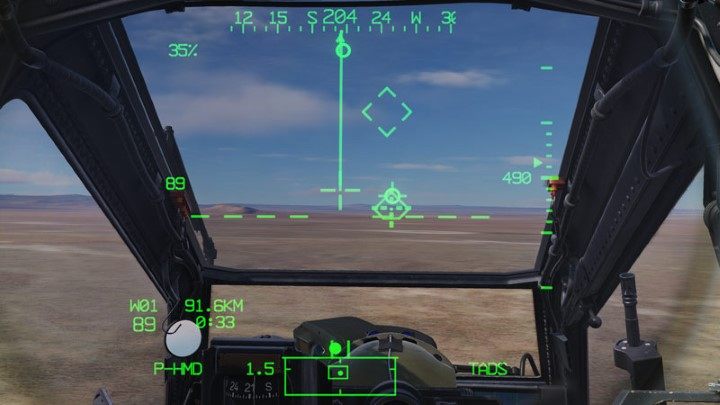
The AH-64D Apache does not have a traditional HUD display like in modern fixed wings aircraft. Instead, crew members have an optional eyepiece - a monocle that displays IHADSS (Integrated Helmet And Display Sighting System) information.
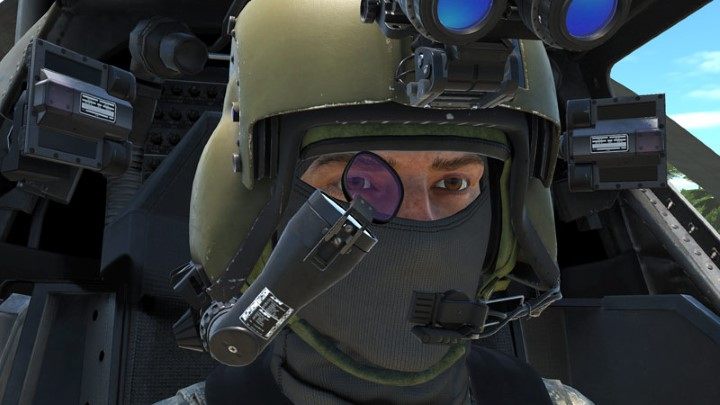
The Helmet Display Unit is a small tube with a glass, which is attached to the helmet only in front of the right eye.
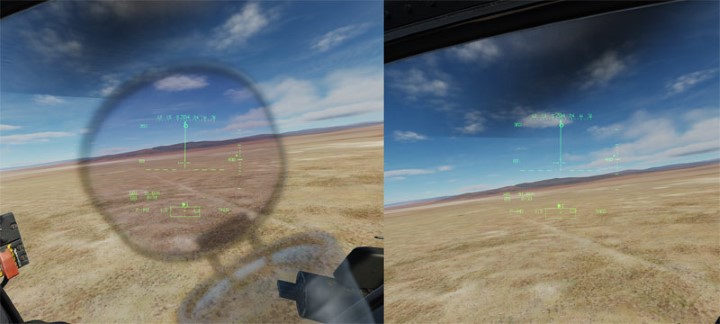
In DCS World, you can choose whether the outline of the monocle should be visible or not. In the case of the first option, it does not look very realistic on traditional monitors, according to Apache pilots. When flying in a real helicopter, you forget about the monocle - the eye focuses only on the displayed information. You can disable this effect, especially when learning to fly - its absence helps in focusing a bit more on what is important. This is completely different when using VR goggles. There, the monocle effect is much more realistic and immersive - it is definitely worth keeping it. However, the HUD rendering effect for the right eye only can be tiring. It is much more convenient to set Render Both Eyes. It may not be that realistic, but your eyes will be much less tired - although, of course, this can be very subjective.
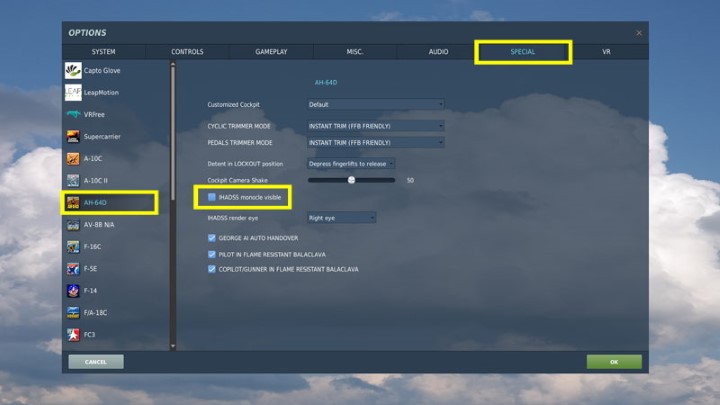
The monocle options can be found in the Settings and the SPECIAL tab for the AH-64D. IHADSS monocle reticle - enable/disable the monocle outline IHADSS render eye - select the eye for the HUD (left, right, both)
IHADSS - basic information
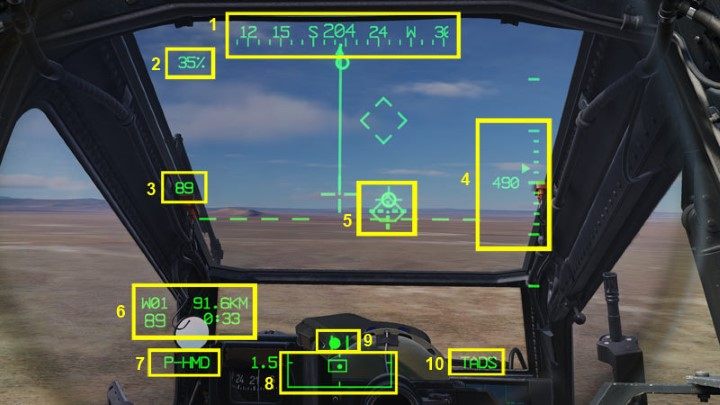
The HUD may contain different information depending on the selected mode and weapon. They are described in more detail on other pages. In general, you always see various basic information:
- 1. Heading tape with the current heading;
- 2. Current torque of the engines;
- 3. Current speed in knots;
- 4. Current radar altitude in feet and vertical speed indicator;
- 5. Flight path vector and waypoint symbol;
- 6. Current waypoint data with distance in kilometers (optionally in miles);
- 7. Sight source - active sensor for targeting;
- 8. Filed of View and Field of Regard - indicator showing the current directions of sensors, such as TADS, NVS, HDU;
- 9. Trim Ball - the indicator of the current pedal trim/aerodynamic trim;
- 10. Aquisition source - active source for automatic targeting of the sight sensor
Apache controls
Basic information

The HOCAS kit, i.e. Hands On Collective and Stick, is used to operate the helicopter systems. The "stick" is also called differently - it's "cyclic". Cyclic controls position of the rotor mast and works similarly as when piloting a jet. In DCS World, assign its PITCH and ROLL axes to your joystick.
Collective, on the other hand, regulates the angle of the rotor blades, so that the helicopter can go up or down. Assign COLLECTIVE, not Throttle, to your throttle lever.
Both Cyclic and Collective have various buttons, providing quick settings of various flight systems and weapons. It is worth noting that Collective has the shape of a stick, but it is mounted horizontally - in this position, some buttons are hidden underneath.
Based on the diagrams and description in the guide, it is worth setting the most important buttons on your joystick/throttle - regardless of the model you have. These buttons are marked "important" - their complete list is at the bottom of the page.
The third element is the Power Lever for the engine, which is the equivalent of the throttle in airplanes. In helicopters, it is only moved to the FLY position before take-off. It absolutely must not be moved during the flight, unless it is a serious emergency. It is also not worth assigning it to the throttle, the default keyboard keys will suffice here.
Last, but equally as important as Cyclic and Collective, are the RUDDER PEDALS. They play a key role while flying a helicopter - they are necessary to counter the operation of the rear propeller. While in the case of airplanes, you could still use the buttons to operate the rudder, a helicopter will require an analog axis - if you don't have dedicated pedals, then you should at least have a twist handle.
Note
The description below does not cover the TADS. It has a separate page. All functions described below apply mainly to the pilot's seat.
Cyclic

- WEAPON ACTION SELECT - four-way switch (3 options are enough) for selecting the active weapon: G - Gun, R - Rockets (unguided), M - Missiles (Hellfire missiles), A - Air to Air (no function in AH- 64D)
- SYMBOLOGY SELECT - two-way switch for information display modes on the HUD: Fwd (forward) - modes: Cruise, Transition, Aft (backward) - modes: Hover, Bob-Up
- FORCE TRIM MODES - a four-way button for locking the trim settings as well as the altitude and tilt modes. This is the most important button in flight and it is used all the time! Fwd R Release Mode - locks the new settings of the stick and pedals, Aft D Disengage - turns off the altitude and tilt hold modes, Left AT Attitude Hold - the current tilt hold mode, Right AL Altitude Hold - the current altitude hold mode (currently not working)
- CHAFF DISPENSE - button for releasing foil strips working against radar guided missiles
- FLARE DISPENSE - a button to deploy flares working against infrared guided missiles
- PTT RTS/ICS - Three-function radio button: Left - turns on the microphone of the selected radio, Right - turns on the intercom to talk to another crew member, Depress (press) - switches to the next radio
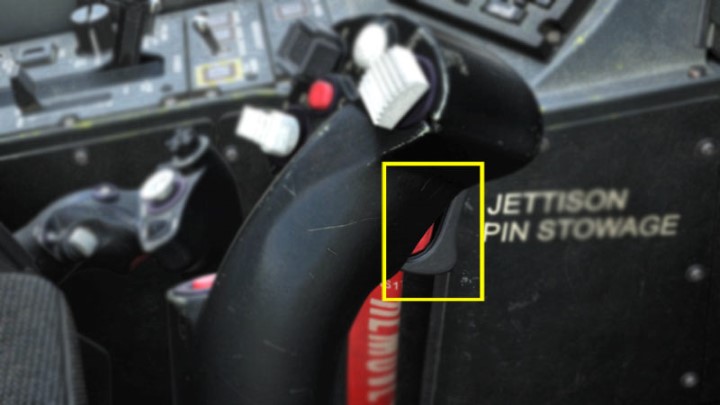
Note: In the AH-64D Apache, the stick has a TRIGGER GUARD cover. In the current version of the game, it is closed by default - you cannot use any weapons until you click the button to raise the cover! In the control options, find the TRIGGER GUARD OPEN/CLOSE function and assign a button to it. Just click it once before the mission and the trigger will always be available.
The trigger itself is a two-stage trigger, similar to the A-10C, but only the FIRST DETENT is used for shooting. The 2nd DETENT is used to bypass the restrictions, e.g. for shooting above the set limit of the gun's range.
Collective
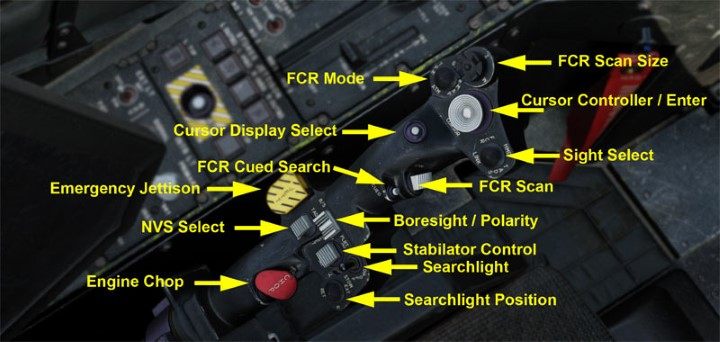
- FCR Mode (currently not working) - four-way switch to select FCR radar modes: Fwd - GTM mode, Aft - ATM air target mode, Right - Radar Map Mode RMAP, Left - Terrain profiles mode TPM;
- FCR Scan Size (currently not working) - four-way field of view switch for FCR radar: Fwd - Zoom FOV 15 degrees, Aft - Medium FOV 45 degrees, Right - Wide FOV 90 degrees, Left - Narrow FOV 30 degrees;
- Cursor Controller/Enter - axis/analog stick with a button that controls the cursor on the screens, pressing confirms the choice;
- Sight Select - four-way active sensor switch for targeting or connecting the sensor to the FCR radar: Fwd - HMD - IHADSS as an active sensor, Aft - connecting the TADS sensor with FCR Next-to-Shoot, Right - CPG ONLY! - select TADS as active sensor, Left - FCR radar as active sensor;
- FCR Scan - two-way switch for the FCR radar transmitter: Fwd - S-SCAN - single scan, Aft C-SCAN - enable/disable continuous scans;
- Boresight/Polarity - two-way switch (only one function works) for the IR camera image mode: PLRT - switches FLIR between Black-Hot and White-Hot, B/S - no function;
- Stabilator Control - two-way switch with a button for manual control of the tail: Fwd - Nose Up, Aft - Nose Down. Depress - pressing returns to AUTO mode;
- Searchlight - three-stage searchlight switch: ON - turned on, OFF - turned off, STOW - hidden;
- Searchlight Position - four-way switch that controls the position of the headlight;
- Engine Chop - emergency button reducing engine speed to idle - IDLE. Pressing it again restores normal engine speed;
- NVS Select - choosing the image source for night vision between PNVS and TADS. Selecting one source by the pilot automatically selects the second source for CPG;
- Emergency Jettison - emergency ejection of all cargo on pylons;
- FCR Cued Search - quickly directs the FCR radar antenna to a source detected by RFI (Radio Frequency Interferometer);
- Cursor Display Select - switches the cursor to the second MPD monitor and centers it on the screen.
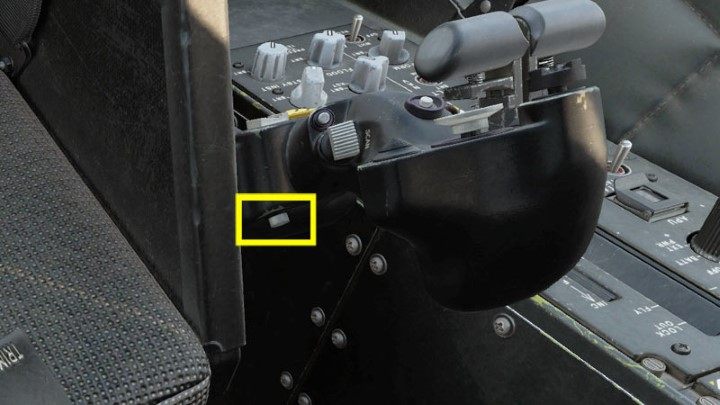
The AH-64D Apache also has buttons on the underside of the Collective lever, which cannot be shown here with DCS cameras. One of them is especially important and it is worth assigning it somewhere on the stick/throttle:
- Tail Wheel Lock/Unlock - disables turning of the rear wheel during taxiing;
- Missile Advance - manual switching of the active Hellfire missile between Cursor Enter pylons - additional button for selecting options marked with the cursor on the screen;
- MPD BUCS Select (CPG ONLY) - switches the failover Back Up Control System to the CPG cockpit.
The most important axes and buttons to assign
In the current version, without the FCR radar, the most important buttons for assigning cyclic, collective and rudder pedals are:
AH-64D Pilot category
- Pitch (cyclic axis);
- Roll (cyclic axis);
- Collective (collective axis);
- Rudder Pedals (pedals axis or joystick twist handle axis);
- Force Trim (cyclic);
- Weapon Action (cyclic);
- Symbology Select (cyclic);
- Chaff (cyclic);
- Flare (cyclic);
- Gun Trigger 1st detent (cyclic);
- Trigger Guard OPEN/CLOSE (keyboard, throttle if available);
- Tail Wheel Unlock (cyclic throttle);
- Cursor Controller/Enter (collective);
- Cursor Display Select (collective);
- Sight Select (collective);
- NVS Select (collective);
- Boresight/Polarity (collective);
- Control stabilizer;
AH-64D CPG category
- Weapon Action (cyclic);
- Symbology Select (cyclic);
- Gun Trigger 1st detent (cyclic);
- Trigger Guard OPEN/CLOSE (keyboard, throttle if available);
- Cursor Controller/Enter (collective);
- Cursor Display Select (collective);
- Sight Select (collective);
- NVS Select (collective);
- Boresight/Polarity (collective).