
Days Gone: Controls Days Gone guide, walkthrough
Last update: 02 April 2021
On this page of the game guide to Days Gone we have listed all of the information on the in-game controls. You will learn how to navigate the main menu (which is done by using the touchpad), and also discover the purpose of all available control buttons, both when travelling on foot and when using a motorcycle.
- How to navigate the main menu?
- Equipment management - Survival Wheel
- Controls in Days Gone - On foot
- Controls in Days Gone - Driving the bike
- Additional control settings
How to navigate the main menu?

In Days Gone, the various windows in the main menu can be opened by using the touchpad (more specifically the touch panel on the pad). In order to bring up a specific section of the menu, you need to make the appropriate move with your finger on the touchpad:
- Swiping up - Storylines. In this menu, you can firstly track your progress in completing missions, which are divided into different Storylines. In addition, you can bring up windows with information about the collectables you have gathered and available trophies.
- Swiping down - Skills. In this menu, you can spend the hero's skill points to purchase skills from three different categories (Melee Combat, Ranged Combat, Survival). In addition, you can view the current values of the hero's main statistics here (Health, Stamina, Focus).
- Swiping left - Inventory. In this menu, you can view the equipment that Deacon currently has at his disposal (weapons, additional supplies), as well as open up tabs connected to crafting and the crafting materials you have gathered.
- Swiping right - World map. In this menu, you can view the map of the area. Use the left analogue stick to move the cursor.
After selecting a menu, you can also press the L1 and R1 buttons to switch between the available tabs.
Equipment management - Survival Wheel
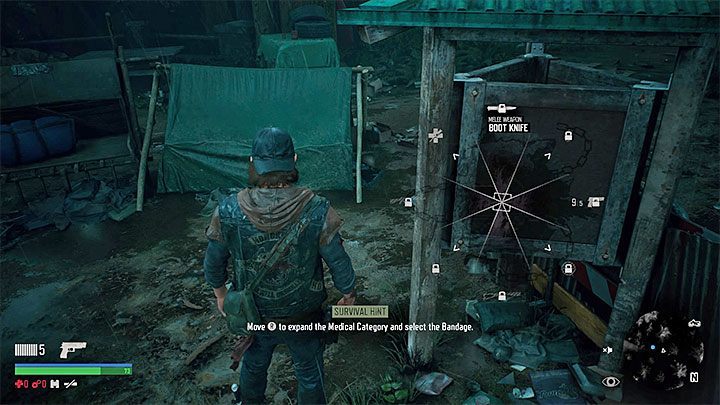
In Days Gone items from the inventory are selected by using the Survival Wheel. You can bring up this crucial piece of the UI by holding the L1 button. Here are its most important applications:
- You can select melee weapons from the inventory.
- You can create new melee weapons (crafting), provided that you know the recipe and have the relevant materials at hand.
- You can select a throwable object from the inventory.
- You can create a new throwable object (crafting), provided that you know the recipe and have the relevant materials at hand.
- You can select a sidearm from the inventory.
- You can attach a suppressor to a sidearm (if you have one in the first place).
- You can select a trap from the inventory.
- You can create a new trap (crafting), provided that you know the recipe and have the relevant materials at hand.
- You can select a special weapon from the inventory.
- You can attach a suppressor to a special weapon (if you have one, and if the weapon in question is a firearm).
- You can create crossbow bolts (crafting) if the crossbow is your designated special weapon, and provided that you know the recipe and have the necessary materials at hand.
- You can select a distraction item from the inventory.
- You can create a new distraction item (crafting), provided that you know the recipe and have the relevant materials at hand.
- You can select a main weapon from the inventory.
- You can attach a suppressor to the main weapon (if you have one at your disposal).
- You can select meds from the inventory.
- You can create new meds (crafting), provided that you know the recipe and have the relevant materials at hand.
Controls in Days Gone - On foot
 | Character movement. |
 | Sprint. Note - It drains your Stamina. You cannot sprint indefinitely. After you exhaust the Stamina bar, you will have to wait for your hero to regain his strength. |
 | Camera movement. |
 | Survival Vision. This mode allows you to "scan" your surroundings. You can find, e.g. footprints or interactive objects that can be looted. Survival Vision has a short duration by default, but thanks to various skills you can extend it. |
 | Survival Wheel - hold down the button. The wheel has been described in detail in the Equipment management - Survival Wheel section. |
 | Aiming (hold down the button). In the case of using a throwable object, the game will display its expected flight trajectory. You can press X while aiming to change the placement of the camera, which will then be located over the hero's opposite shoulder. |
 | Crouch (stealth mode). Slide (while running). |
 | Reloading weapons. Interacting with elements of the environment. |
 | Switching between main weapons and sidearms. Hold down the button to select a special weapon from the inventory. |
 | Climbing (works only on specific objects). |
 | Firing your weapon. Throwing an object. Attacking with a melee weapon. The hero will automatically use a melee weapon if you are not holding down the button responsible for aiming. |
 | Combat roll (dodge). It is best to use these movements while the character is moving. |
 | Touching the panel - main menu. Swiping up - Storylines. Swiping down - Skills. Swiping left - Inventory. Swiping right - World map. The use of the touchpad has been described in detail in the How to navigate the main menu? section. |
 | Binoculars. You can change the magnification level by pressing the analogue stick. |
 | Healing up. You must hold down the button and additionally have a first aid kit or bandages at your disposal. |
 | Detonator. You will acquire this item in the later stages of the game. |
 | Flashlight. You can use it to illuminate a target area, e.g. while travelling at night or while exploring caves. |
 | Pause menu. |
Controls in Days Gone - Driving the bike
 | Controlling the bike. |
 | Camera movement. |
 | Survival Vision. This mode allows you to "scan" your surroundings. You can find, e.g. footprints or interactive objects that can be looted. Survival Vision has a short duration by default, but thanks to various skills you can extend it. |
 | Switching between targets. The game allows you to lock your crosshairs on opponents located within a short distance away from the motorcycle. |
 | Brake/Reverse. |
 | Drifting (hold down the button). This can be very useful, e.g. when you want to quickly turn the machine by 180 degrees. |
 | Get on/off the bike - If you are in a hurry, you can press this button while running in order to jump onto the motorcycle. Reloading your sidearm (hold down the button). |
 | Nitro (hold down the button). You must have the relevant motorcycle upgrade installed. The hero temporarily "loses" access to nitro after completing the game's prologue. |
 | Throttle. |
 | Firing your sidearm. This is possible after you lock onto a target (L1). Additionally, it is worth waiting until your crosshair is focused on the target, this will make your shots much more accurate. |
 | Touching the panel - main menu. Swiping up - Storylines. Swiping down - Skills. Swiping left - Inventory. Swiping right - World map. The use of the touchpad has been described in detail in the How to navigate the main menu? section. |
 | Healing up. You must hold down the button and additionally have a first aid kit or bandages at your disposal. |
 | Detonator. You will acquire this item in the later stages of the game. |
 | Turn the bike light on/off. It is on by default, but you can turn it off if, e.g. you want to reduce the risk of being detected by opponents. |
 | Pause menu. |
Additional control settings
In the game options, you can find several additional control settings. They can be helpful in adapting the game to your personal preferences. The most important of these available settings are:
- Aiming sensitivity - Reduce it if you have problems with aiming accurately. Increase the setting if you want to target enemies faster.
- Camera sensitivity - Set a higher value if you want to rotate the camera faster or a lower one if you prefer for it to move more slowly.
- Camera axis - You can reverse the Y-axis.
- Secondary camera - You can turn it on while travelling on your motorcycle.
- Aim assist - You can turn this option on in order to make it easier to aim at opponents.
- Sticky crosshair - After enabling this option, the camera will begin to subtly "stick" to the enemies that you are aiming at.
- Vibrations - You can turn the controller's vibrations on/off.