
Irithyll Dungeon Dark Souls III Guide
Last update: 01 June 2016
Irithyll Dungeon is a large location connected with the Profaned Capital. Exploring this location completely won't be possible without returning here through a different path from the Capital. In addition to that, there you will find keys that open cells in the dungeon.
Road to Irithyll Dungeon

A passage to the location can be found in the bottom part of Irithyll of the Boreal Valley. When under the bridge (the swamp area), go towards the sewers and then slightly further. In the building shown on the picture you will find the Distant Manor bonfire. Further road leads to the dungeon.
Walk downstairs from the bonfire. Notice the enemies that seem to be running away - when you get close, one of the ice knights will jump from behind the wall on the left and the escaping opponents will quickly return. Below you will find one more opponent, watch out for the fireball casted by him. Use the torch after clearing the place that is deeper on the right in order to lighten up the area and notice the two opponents hiding in the darkness. Here you will find a Large Titanite Shard. Go back upstairs before walking outside, but this time don't use the stairs - instead of that, jump on the platform below. At the body you will find Rusted Gold Coin.

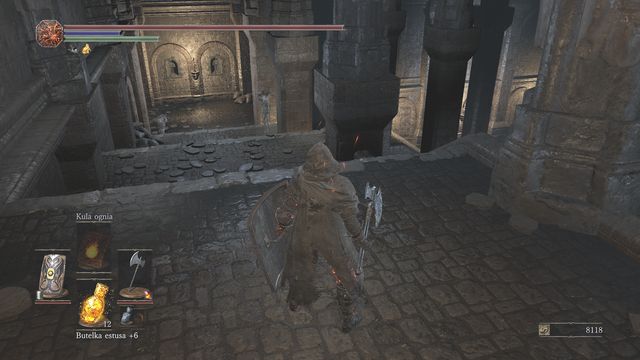
Just after leaving the building you will be attacked by Alva, Seeker of the Spurned. He has a large sword with long reach and a crossbow. You will have a good opportunity to attack when the crossbow will be reloaded - it is best to jump then towards the opponent and perform an aerial attack. Watch out for his deadliest attack, three consecutive sword hits - the first one is signaled with a preparation of the swing, so when you see it, move back or prepare yourself for few dodges. During the battle you can try pushing the opponent towards the cliff. For winning the battle you will receive Murakumo.
Note: If you don't defeat the opponent, you won't find his set in the lower part of the dungeon.
Prison
Slightly further you will find the first bonfire that is located in the Irithyll Dungeon. Go forward and collect the Rusted Coin from the cell on the left side (watch out for the skeleton that will appear soon after). The next cell on the left side (you can pick up the bar) contains a Large Titanite Shard. The door on the right side are temporarily closed (go back here with the Jailbreaker's Key), so leave the corridor using the road ahead.

Watch out for the new opponent which is very dangerous. In addition to the regular attack - burning the iron to the ground - that deals large damage and slows you down, the opponent can raise his lamp. If he does it, you have no choice, you must kill him very quickly since escape won't save you from health bar reduction (you would need to get very far away or hide behind a wall so that the enemy won't leech you and won't see you). Your health will drop until the enemy drops his lamp or dies. In addition to that, you must wait until everything gets back to and then heal with the Estus Flask. Because of that, kill every opponent of this type as fast as possible and before going further wait for your health to be regained.

In the corridor you will find a Fading Soul and a skeleton jumping from the cell on the right side. When going further watch out for two opponents who can leech your life - wait for one of them to walk deeper in the chamber by walking through the bridge. Only after that you should move forward, quickly kill one of the opponents and then focus on skeletons and the remaining enemy.
Walk to the end where you will find a Large Titanite Shard and go down.
Note: In the place with the shard there is a window that can be opened with the Key. A shortcut that allows bypassing the prison in the future will allow you to do it.

Notice another guard behind the stairs. In order to fully utilize your advantage, jump on him from the stairs and perform an attack from above. This should greatly reduce his health and knock him to the ground, allowing you to quickly finish him. Then take care of the cages, one after another. Inside you will find opponents known from the Undead Settlement. Turn right behind the passage to the lower part of the corridor in order to collect Large Soul of a Nameless Soldier (watch out for the undead waiting behind the pillar).
Note: The cage that is here can be also opened after obtaining the key in the Profaned Capital.

At the end of the corridor you will also find a cell with few undead - kill them quickly so that they won't infect you (toxic bugs) and collect the Old Sorcerer Set. Open the cell at the end and quickly jump away from the monster. Release it to the corridor where you will have more space and kill it (it's vulnerable to fire) in order to receive a magic shield.
Now go back above and walk through the bridge to the second part of the dungeon.

Once on the other side, turn to the right and sprint towards the prison guard so that he won't leech your life. Then quickly turn around and kill the skeletons walking from the cells. Here you will find a Large Titanite Shard.

The nearby cell contains a hole in the wall (screen). Walk towards the next room, pick up the Pale Pine Resin and bypass the weird creature. In the corridor, still above, walk to one of the cells (pick up the bars) where you will find a Jailbreaker's Key.
It will allow you to open the window in the first part of the prison (turn right from the bonfire at the entrance, bypass the two prison guards and run to the end). After opening the window you will be able to use a shortcut that allows bypassing part of the prison.

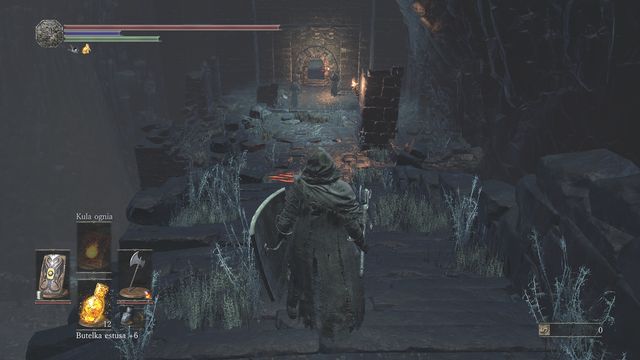
Then be careful in the place shown on the picture. There you will find three guards with whom you definitely don't want to fight simultaneously. Luring them one after another is hard since they are near each other. Try killing (by jumping from above) the one closest to the stairs in such way that the others won't see you. Then, after regaining stamina, sprint towards the closest opponent and eliminate him as fast as possible. With a bit of luck only one opponent will remain and you will still have full health. After defeating him, go to the cell on the left where you will find a deformed creature similar to the one previously bypassed - only this one will be less friendly. Run into the cell and attack it immediately. Then collect the Simple Gem.

Walk to the next part of the corridor while watching out for two cages that guard the entrance (remember that you can lock and check which cages are enemies). In the corridor you will notice a lizard - by running behind it you can receive the Titanite Scale, but you must hurry and watch out for the monster jumping from the left. After killing the lizard focus on that monster. Then you can optionally open another cell nearby and kill another monster.
Finally walk outside through the open passage.
Outside
Pick up the Homeward Bone after leaving the prison. Notice the rocks on the right side - it is the place you can reach by leaving through the window (opened with the Jailbreaker's Key, you will find a Bellowing Dragoncrest Ring there). Slightly further there are three opponents standing in front of an entrance to the building - watch out especially for the one that will try to surprise you from behind.

Walk inside and attack the chest - it's a mimic. For defeating it you will receive valuable Estus Shard. Slightly further watch out so that you won't get to the end of the corridor since few opponents will walk from there. If previously you cleared the entrance to the building, lure some opponents below and leave the crossbow users for later. At the body on the right side you will find a Soul of a Weary Warrior. Jump below there.

You'll find yourself in the place shown on the screenshot. There's a giant there; you could approach him from the other side, climbing down a ladder located in the corridor that you've just jumped off of (the giant blocks the road where a lizard and a Soul of a Crestfallen Knight are; you can collect these items by striking the giant and thus waking him). You will get to the upper part later, going there from the Profaned Capital.
Canals

In the meantime, turn left, and pick up the nearby Pickaxe. Enter the canals and kill a few rats. For the time being, ignore the right branch and go straight to the end. Pick up the Soul of a Weary Warrior on the way.

You will find yourself near a wall with two chests. The one on the right is safe and contains the Old Cell Key (required to open Siegward's cell in the Profaned Capital). The chest on the left is a mimic, a bit more dangerous than those known before. He won't try to catch you, but rather jump towards you, knocking you over (the damage is equally high). For this reason, try to do a quick dodge when the mimic gets ready to jump. You will receive the Dark Clutch Ring when you kill the enemy.
Warning: You should act quickly here, as a number of basilisks will show after the opening of the chests, releasing poisonous fog (if you stay too long within its reach a curse will cause instant death). For that reason, take the item, focus all of your attention on the mimic, and run away as fast as you can, because you can be easily poisoned in the narrow corridor.

Now enter the rats hideout, which is on the right from the entrance to the canals. Once you enter, quickly run to the big tunnel again, baiting the two big rats that are chasing you. The small passageway you are in doesn't enable dodging, which is much easier in the main tunnel. After dealing with the danger, return to the tunnel, take the Dung pie, and open the gate
Road to the Profaned Capital

You will find yourself in the place shown on the screenshot. Pick up the Large Titanite Shard on the left. The room is full of life-syphoning guards, which is why a frontal assault on their patrols would be suicide. Instead of attacking, skirt around the middle of the room and turn left, following the stairs to the upper level.

Near the bodies of the knights, you can find a Dragon Torso Stone and an elevator further ahead. While riding the elevator, take a look at the body on the window (you can jump off during the ride in order to pick up the Lightning Blade). On the top of the elevator, pick up a Large Soul of a Nameless Soldier and unlock the gate. This shortcut will lead you to the other part of the prison.
If you return to the bonfire, cross the bridge, and then jump down on the left.

Afterwards, go down again and avoid the center of the room for a while longer. Instead, go to a dark room on the left. You will find 5 monsters there. Try to focus your attack on one of them in order to kill it and move your focus to the next one (it's a good idea to use a ranged weapon; it can make it easier to clean out the room). You will find Profaned Coal near the body. Finally, open the gate on the right.

This is a great place for luring single enemies to the center of the room. They cannot diminish your health when they are behind the wall, and the attracted enemies will enter the room one at a time. Using this method, you can kill every one of them, or at least the number that will allow you to clear the room. To draw the enemies out, use Throwing Knives or a spell, so you don't have to risk your health.

When you clear the hall, start looking for items, which are plenty here. In the middle, you can find an Ember, and further on the right, a full Alva Set (near the urn; you can find it here only if you defeated him during the invasion before entering the dungeons). Further on the right, you can find another Ember. The cell on the left holds Desert Ashes and Dusk Crown Ring (and a small surprise...) In the corridor before the cell you can notice a chest, or should we say a mimic that imitates it. Kill it to gain 2 Titanite Scales. On the other side, there is a cell, whose unlocking will release an enemy with a cross on his back. Watch out - he is fast and strong (you can also choose to leave the cell closed). Finally, you can face the last guard in the corridor, and see a cell that is closed for now (as with the other closed cells, return with the key acquired in the Profaned Capital).

Finally, go outside, in the direction of the Profaned Capital. In order to gather all the items and finish some tasks, you will have to return here, but you will do that by backtracking from the Profaned Capital.