Catacombs of Carthus Dark Souls III Guide
Last update: 11 May 2016
Catacombs are a location in which you will find many traps and new opponents. In addition to that, you should look closely at the walls and notice parts that are different from the rest - some of them are illusionary walls. In the bottom part you will also find a flaming demon.
Beginning
Push the altar ahead of the fireplace in the place where you fought the Abyss Watchers in order to enter the catacombs. A stair passage leading to the catacombs will be revealed.
Note: You don't need to go left immediately after entering. On the right side you will find a place where jumping few times below will allow you to reach a platform with a skeleton archer. If you die consider this road as a shortcut that leads straight to the stairs from which a ball consisting of undead rolls down.

Turn to the left. Watch out for the skeletons that will respawn here - it is easy to miss the bones rising from the ground and receive a hit to the back. Make sure that their health bar equals zero before you move forward. Otherwise the enemies will rise again with perfect health. At the body at the end you will find Carthus Rouge.
Then walk through the bridge. Watch out for the slightly stronger opponent which can throw you from the bridge after performing his attacks. Prepare the shield and perform a dodge when the enemy will start running at you for the first time. This should allow you to easily perform a series of attacks at his back. Slightly further two regular skeletons will come from the room ahead. The archer shooting at you from above will be an additional impediment. Quickly run from the bridge and in the chamber first turn left, thus walking upstairs.
Note: The opponent is able to disappear for a while and roll at you. Watch out with side dodging at the bridge, you can accidentally fall. Just after appearing the enemy performs a quick attack which can be very dangerous. Prepare yourself and jump away preemptively, preferably to the back.

Before going deeper into the corridor go to the end on the left while you're above. Two skeletons guarding the Soul of a Nameless Soldier will attack you there. Then go back into the corridor. Kill two new opponents and the archer that was previously shooting at you.

You will reach the place shown on the screen. Go to the ladder while watching out for the button on the ground - stepping on it will activate a trap and a bullet will shoot at you from the wall ahead. Then walk down where near a ladder you will find the Soul of a Nameless Soldier.

The further corridor will lead you to a room in which a stronger version of the skeleton awaits you. Watch out during the battle as fast attacks of the opponent can give you a negative bleeding effect. Don't depend on your shield too much as your guard can be easily broken. It is best to focus on dodging and avoiding the opponent in order to attack him after he ends his series. At the gap in the wall you will find a Sharp Gem - take it quickly as an archer will be shooting at you from the platform on the other side.

Before going to the next room find the wall shown on the screen - it is located in the corner of the room. It is actually an illusory wall which will disappear after hitting. Walk into the corridor and surprise the skeleton from behind and, on the left, the previously mentioned skeleton. Take the Carthus Pyromancy Tome from the body and go to the next chamber.
Note: You can also jump here from the first bridge through which you will pass in this location.

You will reach the same room to which you would get after selecting the road to the right after passing the bridge. However, from this side your position is better as there are two stronger skeletons in the middle. Slowly walk to the first one and lure him to the previously cleared room where you can take care of him uninterrupted. In the corner you can find 2x Titanite Shard. After defeating the opponents you will have two main paths to choose from. One of them leads down through the open bridge (stairs) and the other through the corridor and then also below. First enter the corridor ahead.

Turn around immediately after passing and attack the respawning skeletons. Do it before the opponents are fully formed so that you gain advantage at the start or so that you even kill them immediately. Walk down the corridor where you will meet Anri. Talk to her and go to the balcony slightly further.
Collect the Bloodred Moss Clumb and kill the lizard. Go back up, towards the stairs that connect two sides of the catacombs.
The road through the stairs

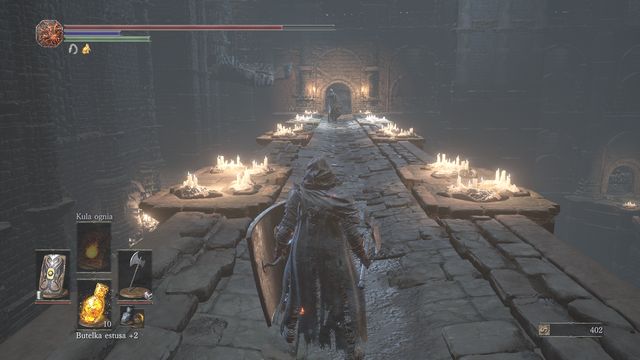
Immediately after entering the bridge quickly run below while passing by the skeletons. Stop in front of the door, from the right or the left side. The reason for all that is a ball thrown at the stairs just after you enter them. While escaping from it you must watch out as it moves here and there few more times. Get out of its way in order to avoid damage or being dropped into the abyss. At the right time you can collect an Ember.
Note: After a while the ball will break on a lamp. You can wait for it so that you are able to collect an Undead Bone Shard.

Run into the corridor when the ball is above (or when there is no ball anymore at all). The path to the bonfire leads through many enemies. First there will be few skeletons one of which is able to throw special projectile bombs. Try bypassing the other opponents and killing that one in first order.

Turn to the right, between the urns, slightly further. Watch out as breaking any of them will free projectiles similar to the ones created by some skeletons. Destroy the dishes that are blocking the path to the item, but do that from safe distance. This will allow you to avoid most of the projectiles. In addition to that, watch your steps when walking towards the Carthus Milkring - stepping on a button on the ground will activate a trap.

In the next part you must once again watch out for the trap, two skeletons and one stronger opponent. The last corridor contains again two fast enemies. Let one of them see you while the other is turned in different direction - this will make completing this part much easier. Collect one Large Soul of an Unknown Traveler and Ember at the end (walk around the hole and watch out so that you won't fall down).

Finally enter one more corridor (watch out, there will be another ball consisting of undead rolling in here). Collect the Large Titanite Shard from under the wall and before going further enter the niche on the left side in which you can rest at the bonfire (Catacombs of Carthus).
Bottom part of the catacombs
Now you must go down from the Catacombs of Carthus bonfire, to the "sewers". Wait in the corridor with the ball until it rolls to the right side - it bounces back below very fast and in the narrow path you won't be able to avoid it. Once in the sewers, first kill few rats and the larger one in the corner. Then go to the corridor on the right side.

At its end you will be able to notice the opponents. However, the path to them will be blocked by gelatinous monsters hanging from the ceiling. You can try bypassing them or dropping them down (for example with the Throwing knife). If you don't do it, they will fall on your head, hurting and immobilizing you. Collect 2x Titanite Shard on your way. Under the wall at the end (it is the place where you could have jumped to the hole below before you reached the bonfire) you must carefully observe the movements of the skeletons - they will be rolling the wheel towards you. Position yourself under the wall so that after the dodge the opponent will be stopped near you, allowing you to quickly kill him. In the small niche on the left you will find the Carthus Bloodring - watch out for new batch of monsters hanging from the ceiling.

Now go back to the place where the ball consisting of undead rolls. Select the small passage ahead of the stairs where under a large locked gate you will find Ember. If you have used other Ember before, you will be attacked by Knight Slayer Tsorig. It will be hard to avoid his attacks in the narrow corridor, so you should quickly bypass him and escape to the larger room.

Here you can fight more freely. The duel is hard because Tsorig has a large sword with which he deals great damage. Most of all you must watch out for jump attack after which he pushes and creates a whirl (the enemy signalize the attack). Remember that his weapon has long reach.
The traditional way of dealing with the enemy can be combined with the help of the rolling ball. If you manage to lure the enemy in such way that the ball crushes him at least once you will gain a great advantage in damage and in chance to finish the enemy with few fast attacks. In order to use the ball you can move near the stairs and listen carefully to the noises. Bounce to opposite direction when the ball will be near. The cat and mouse play can be also done around the nearby pillar. Just remember to "catch" the opponent when the ball rolls from above as it bounces from the wall so fast that you might fail dodging it. For failing the battle you will receive the My thanks! Gesture. For winning it you will gain Knight's Slayer Ring and large number (about 10 000) of souls.

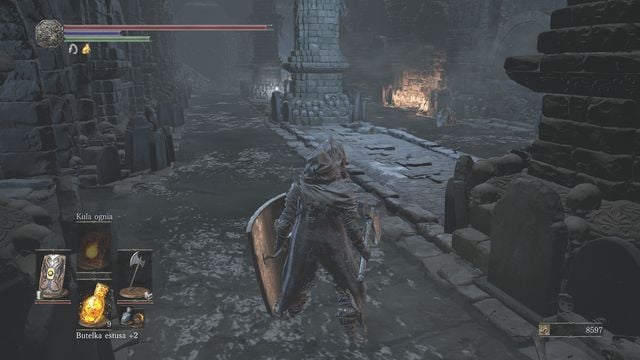
Slightly further after the place where you fought the knight you will find a small niche with stairs leading up. Go up and quickly fall back after examining the situation. This should allow you to lure to the main corridor the opponent that will surprise attack after walking up. Killing him will make it easier for you to eliminate the remaining opponents. First kill the mage, then the archer (hide behind the pillar or strafe run towards him). Here you will find the Carthus Rouge (watch out for the trap).

Finally go to the opposite side from the stairs through which you entered. Watch out for another guard and his fast attacks. Here you can collect the Carthus Rouge and Grave Warden's Ashes. Passage below will lead you to a wall. Hit it and it will disappear.

Go towards the final exit while collecting 2x Titanite Shard on your way. The enemy you encounter here can throw knifes at you from distance, so if you're far from him (for example in order to heal) you should stand behind a pillar. You can also play cat and mouse with him and attack him from behind a corner. You can also go to the middle of the room and position yourself in such way that the ball of undead rolls over him.

The catacombs will change their look once you walk through the cave. Kill the lizard quickly and you will receive a Fire Gem. If the lizard manages to escape to the rock, you must risk being detected if you want to get this item - the lizard will lead you to another one, stronger skeleton. If you took the gem previously or you haven't chased the lizard, you will have an opportunity to sneak up on the enemy from behind and perform a powerful attack. With a bit of luck two fast hits will be enough to make the opponent fall down. Read the note and collect the Yellow Bug Pellets from the body on the left.

Further path leads to room filled with skeleton bones. Unlock the shortcut by raising the gate and kill two opponents. Then collect the Large Soul of an Unknown Soldier and the bug pellets and go towards the wooden bridge. Before you enter it turn to the right path where you can again encounter Anri. She is still looking for Horace. After going back towards the bridge all the skeletons from the previous place will rise and start attacking you. Run through the bridge and quickly attack the poles on the other side in order to drop the bridge with all the enemies down.
The last straight leads to the door behind which you will face this location's boss. Before going there you can walk down the destroyed bridge by using it as a ladder. Go further where a pleasant surprise awaits you - the demon known from the Undead Settlement.
Battle with the demon

Don't be counting on Siegward's help this time. The fight with the demon is very hard, he attacks with fire, jumps and crushes or deals great number of damage with his weapon. If you want to try fighting him in regular way, then remain close to enemy's legs while constantly on the move and avoiding jumps. In addition to that, perform a dodge immediately when the enemy raises his weapon as this attack is one of the strongest ones.

During the battle you might notice skeletons that are rising. Using them for your advantage can make the duel much easier. Run down from the place where the demon is to the place where many skeletons will rise. Don't attack them, instead of that keep avoiding the attacks and try running around the demon so that the skeletons will attack him as well. This will lead to a battle between the boss and the enemies. You must simply stay alive and keep running around. The skeletons aren't resistant, but if you awake all of them at once they might even kill the demon or at least seriously wound him. If you combine this strategy with attacking when the enemy is focused on killing the skeletons you will have a great chance to quickly get rid of the demon - let him be your priority target.

In addition to that, if you have some stronger spells that aren't related to pyromancy, you can run to the corridor through which the demon won't be able to pass (screen). In that case attack the boss from distance for as long as you can. Just watch out so that he won't use a powerful fire attack at the tunnel - keep close to the exit so that if needed you can hide behind a wall. With a bit of luck you can lure the skeletons and then escape to that location. Use the battle between the enemies to your advantage. After the battle you will receive Soul of a Demon and about 5 000 souls. In addition to that below you will find a Large Soul of an Unknown Soldier and Large Titanite Shard. In the next corridor near the body at the end there is an Old Sage's Blindfold and a Witch's Ring waiting to be collected. Slightly further you will find a bonfire and path leading to an optional location, the Smouldering Lake.
Note: You can go back to the bridge now, towards the door behind which you will find the boss. However, if you beat him before meeting Horace and killing him, Anri's quest will end prematurely. Horace can be found in the Smouldering Lake.

No matter where you go, there is one more thing to do in the place where you encountered the demon. You must try opening the chest... which will prove to be a mimic. You don't have to check it - attack immediately with your strongest attacks. Watch out so that you aren't captured by the enemy. If you defeated the demon you can remain above and risk being set on fire together with the mimic. After defeating him you will receive the Black Blade.