Appendix - First location and boss Dark Souls III Guide
Last update: 11 May 2016
Cemetery of Ash
Cemetery of Ash progress route:
Beginning

When the character you've chosen awakens, take a while to get to know your equipment and the controls. Notice the red spots on the path, where you can read various hints. You can also find notes from other players. In this area, you will mostly find hints about controls.

In a while, you will have your first chance to attack an opponent. Learn how to lock the target (the white dot on the opponent will move in such a way that you won't lose sight of the enemy). Then, learn how to attack, to block and to perform strong attacks. After defeating the enemy, turn right. You will find a Soul of a Deserted Corpse.
Note: Don't be mislead by the enemy. Despite it being the weakest kind of opponent, it can perform several quick attacks that deal a lot of damage.

Go back to the path and continue. Near a body, you will find the same type of enemy and an Ashen Estus Flask. This item allows you to restore Focus Points (points that you need to use skills and cast spells - like mana). Regular Estus Flasks restore Health Points. Remember that you can find these items in various places or refill them near Bonfires. Use them only when you really need them.

Notice the enemy standing with his back to you. You will find him on your right (screen). Try backstab on him. Approach the enemy slowly (walk) and attack him. A bit higher, you will find two more enemies. One of them is using a crossbow (if you have a shield, you can block the bolts). From here, you can go straight or turn right.
The path leading right

If you chose to turn right, you will wake up two enemies. Eliminate one of them quickly (do not fight them both at the same time so that you don't loose HP). At the end of the path, you will see a hint on the ground that will tell you to go back. You will encounter the first really strong enemy.

Notice how he performs his attacks. He can attack after a forward dash, roll and shoot ice spikes, create a mist around the hero and shooting spikes from it or swing his arm. The dash attack and the roll attack are the best for you to dodge them and perform a counterattack. The miniboss always prepares himself before an attack (for example by raising his body), therefore you have some time for dodging.

During this fight, dodging is crucial. You cannot just stand in one place and attack, because you will die very quickly (2 enemy attacks are enough). Observe the boss carefully and make your move after the monster ends his attack and faces his back at you. If you manage to get close to the target, aim at his belly, which is more vulnerable. Moreover, avoid the mist and the attack from above, because they deal the most damage. Use Estus Flask if you need to heal your hero.
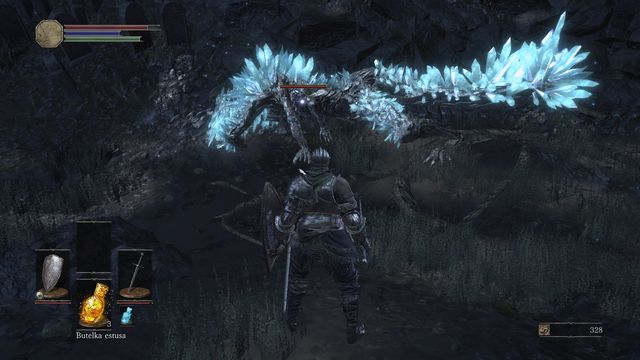
This is an optional fight, so if you have troubles defeating the boss, you can go past him. However, if you are patient, perform quick dodges and counterattacks. You should be able to defeat the enemy. You will receive a Titanite Scale and you will be able to collect the Soul of an Unknown Traveler lying in the corner. You will also obtain 4000 Souls. If you die, remember that you can go back and retrieve the Souls that you lost (the floating green orb).
The path leading straight

Go straight behind the enemy with a crossbow and you will reach a Bonfire. If you decided to defeat the ice monster, you are safe now. You won't encounter any enemies all the way to the Bonfire. Remember to rest (you will obtain an appropriate gesture here), restore HP and refill Flasks. However, remember that every time you rest at a Bonfire, your enemies respawn.

From the Bonfire, you can take two paths. No matter which one you choose, take some time to clear the area and collect items. You will meet a few enemies when going down. Be careful, because they carry better weapons and can be deadly in group. Locate a hint on the left (on the ground) and try to jump after sprinting to get to a tomb located below (you will find a Titanite Shard). Next, you will have an opportunity to practice air attack. If you go straight from here, you will reach a boss arena. However, don't go there yet.

Instead, turn right and approach the edge. From here, you can see a crossbowman and an enemy with a spear. You can easily eliminate the first one by jumping on him (screen).It will make fighting the spearman easier. Collect 5 Firebombs that will help you during the boss fight. Head up and watch. out for two enemies. You can now go to the boss (Iudex Gundyr), or if you want, you can restore HP and refill Flask near a Bonfire. When you are ready, enter the arena.
Iudex Gundyr

To begin the fight, approach the boss and pull the sword out. Start attacking him before he gets up. During the first phase, the boss will attack mainly using his weapon by swinging it or performing jump attacks. Watch out for the long range of his attacks and the speed with which he performs them. Try to avoid hits by rolling. You can also try to block some of the attacks using a shield, but if you fail, you will receive a lot of damage. Rolls are safer.

The second part of the fight will start when the boss's HP bar is brought to a half. He will transform, obtaining a huge head and claws. Now is the perfect time to use Firebombs, because the boss is vulnerable to fire.

Watch out for the "diving" attacks, when Iudex Gundyr's head will try to hammer you into the ground. Don't try to block the attacks, just perform dodges. During this phase, the opponent is slower and his attacks are signalized more clearly. As a melee fighter, try to stay close to the boss and attack quickly. Rotate with the enemy. This way, you should be able to avoid most of his ranged attacks and dodge melee attacks if needed. If you're a ranged fighter, run around the arena and cast spells or throw Firebombs (remember that the boss can jump - the best way is to throw a bomb right after he lands).

To sum up: during the first phase, you can block some of the hits, but remember to dodge. A good strategy is to get away from the enemy and make him jump towards you. Dodging in the right moment will allow you to blow several strikes before he gets up. During the second phase, use Firebombs, try to stay close to the enemy and attack his back.
Location: Cemetery of Ash
Reward: Curved sword, 3000 souls
The path to Firelink Shrine

After the boss fight, open the door on the other side of the arena. Behind the door, you will find a single enemy on the left. A bit further, you will see a narrow path guarded by a spearman an a crossbowman (screen). If you have trouble eliminating the first one, try to kick him (move forward and attack) to lower his shield. At the end of the path, you will find Homeward Bone that allows you to return to the last Bonfire that you visited.

Be careful - there are several enemies near the entrance to Firelink Shrine.
Head up. On your right, you will see an enemy that you can easily throw off the edge. You will encounter two more enemies higher. Watch out for another spearman and crossbowman pair upstairs. Remember that you can block bolts and arrows if you have a shield. Otherwise, stay on the move and perform dodges. After defeating the two last enemies, you can go straight to Firelink Shrine.
You will find full walkthrough of Dark Souls III at gamepressure.com and in our second guide "Secrets and Bosses of Dark Souls III" (available soon).