High Wall of Lothric Dark Souls III Guide
Last update: 11 May 2016
After teleporting to the location, open the door in front of you and go down. You will see a Bonfire from which you can take two paths. For now, it is better to head right and clear that area from enemies.
Path leading right
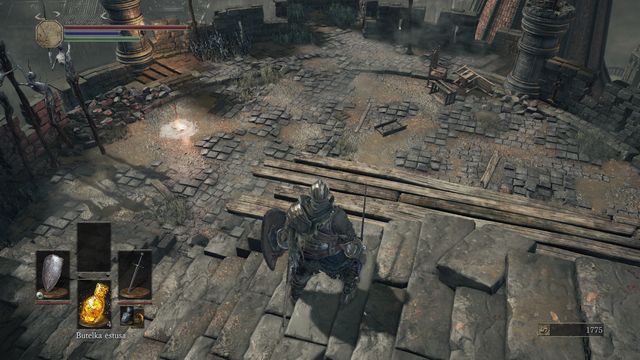
Before heading to the wall, try to see a hole in the battlements from where you stand now. You will see a crossbowman on a platform that would bother you on the way if you don't eliminate him now. When on the wall, deal with the dogs first and then with the rest of the enemies (the praying undead are rather harmless, but watch out not to be surrounded by them).

After a while, two very strong opponents will appear on the wall. One will come fro them side and one from the other end of the wall. Deal with them separately by luring one towards the Bonfire that you came from. These enemies are slow, but their attacks deal a lot of damage. However, it is easy to dodge their attacks by performing dodges. If you're using a shield, be careful, because the attacks can break your block and a quick burst of blows will ensue.
After clearing the wall, go lower, to the left. You will see a single enemy and a Soul of a Deserted Corpse. The door is locked for now, but you will later unlock a shortcut here.

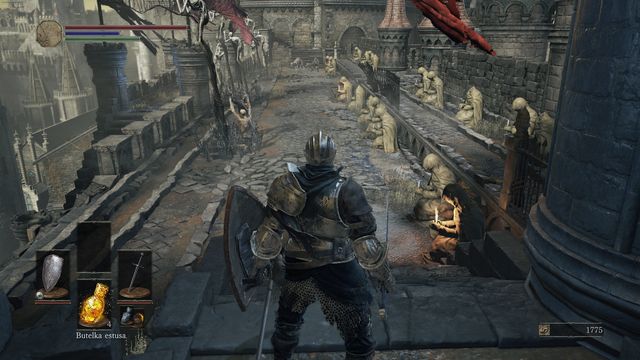
Lastly, go to the tower located on the other side. Don't go close the praying undead on your right. Instead, lure the crossbowman closer to you, eliminate him and go past the undead. You should do so because one of the undead is a mini version of the boss that you met and will start to transform when you approach it. If you kill the undead during the transformation process, you will avoid a very difficult fight.

If you don't approach the enemy quickly enough, you will have to face his transformed version. The strategy is the same as during the previous boss fight. Also the attacks are the same. Use Firebombs to weaken the mini boss and then finish him. with standard attacks, keeping close to the beast. After clearing this area, pick up the Long Bow and 12 Standard Arrows. Go back to the Bonfire. Rest if you need to and then take the remaining path.
Path leading left

On this part of the wall, you will find more praying undead. At the end of it, watch out for an enemy with a lamp. He can call reinforcements. When he begins to shout, quickly interrupt him or wait for the enemies and eliminate them one by one. Don't allow the opponents to surround you, because it will be impossible for you to block every attack. Near the body in the middle, you will find a Soul of a Deserted Corpse.

Now, go higher and you will meet another summoner near a dragon's body. Watch out also for the enemy throwing bombs at you from above. Try to lure the enemies one by one, towards the stairs. This will make it easier for you to dodge their attacks. After clearing this area, go upstairs and you will find Binoculars near a body.

Approach the dragon's body (screen) and go around it. You will find a path leading down. When going there, you will be able to collect some Resin.

When inside, watch out not to be ambushed by the enemy hidden behind the crates on the right. Eliminate another enemy and take two Firebombs from the body. You can now use the ladder to go downstairs. You will find a Soul of a Deserted Corpse and a way outside.

Outside, you will encounter an enemy with a spear and a crossbowman. Try to eliminate them as fast as you can. Upstairs, you will see a large group of enemies. Another group is coming towards you along the balcony below. You will receive help from a... dragon. First, he will burn the whole group located upstairs, clearing the way for you (don't go when the dragon is breathing fire - go forward a little and then go back).

To clear the corridor, run to the half of it and then go back. The dragon will attack, burning the enemies.

Your next objective is to go upstairs. You need to find a moment during which the dragon is not breathing fire. These attacks are cyclical, so you need to wait for the right moment. You can also move when the tower is on fire, but you will often get stopped by fire damage. Your destination is the entrance on the other side. However, collecting all the items located here is worth the risk. You will find an Ember, a Club, a Soul of a Deserted Corpse and a Claymore. The last item may cause you more trouble, because you have to run in the opposite direction to obtain it. It is good to collect all the items, even if you should die a while later (you can also run when the tower is on fire and avoid the next attack - use rolls to get to the item).
The tower with a Mimic

When in the building, go downstairs. If you want to avoid a demanding fight, go past the chest located downstairs and go up the ladder. Otherwise, approach the chest, but don't open it (if you do so, you will probably die right away).Instead, attack it and you will see that it is a Mimic.

Enemies of this type are very difficult to defeat. Most importantly, you should be careful not to get caught by the Mimic. If you get to close, you will be caught and bitten by the chest, which will probably take all of your HP. If you manage to avoid this type of attacks, the rest of the fight will be rather schematic. Watch for the Mimic's long jumps, stay on the move and dodge. You can also try to run upstairs and throw Firebombs. If you manage to defeat this enemy, you will obtain a good weapon - Deep Battle Axe.

Note: you can try to wake the Mimic up with an attack and then run up the ladder (screen).It will not follow you and you will be able to throw Firebombs. it is difficult to do, because the enemy will be running almost directly below you, but if you have a lot of bombs, you can make the fight easier this way.
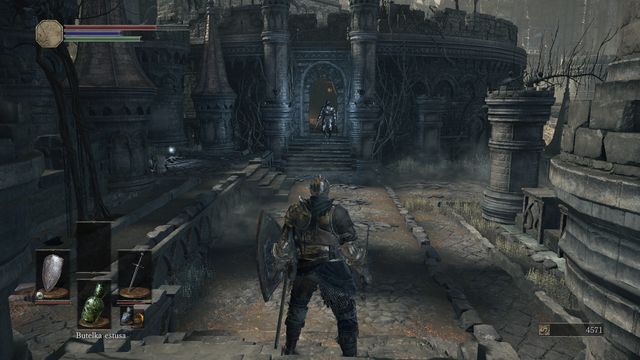
No matter if you attack the Mimic or not, you should go outside using the ladder. On the other side of the passage, you will see a knight coming your way. Instead of standing in one place and looking at him, kill the two enemies on the sides right after entering the wall. They will no longer interrupt you as you fight the knight. The enemy is strong, but rather slow. Try to perform dodges or quickly get behind his back. If you have troubles, lure him inside the building. You can then try to attack him when he is on the ladder, or circle him when he goes down and attack him from above. After defeating the knight take the Soul of a Deserted Corpse from the body on the wall and head to the next tower.

When inside, be very careful, because a quick enemy will jump out from between the chests on the left. After defeating him, take Firebombs from the body (slowly walk along the beam) and then leave the building through the passage on the right (don't go downstairs yet). The path will take you to another Bonfire. You will find a Titanite Shard in the corner.