Mission 10: CORDIS DIE | Missions: Walkthrough CoD: BO II Guide
Last update: 11 May 2016

Objective: Get POTUS to the 'Prom Night' Bunker
Objective: Use the SAM turret to shoot down the drones
As soon as you are able to move, as quickly as possible rush ahead holding the sprint button. If you don't move, you'll die. Run up to the vehicle cab (picture above) and jump down on it. You'll watch a short cutscene during which your character will mount the SAM turret.

Your task is to shoot down six groups of drones and there are six in each group. Similarly to the fifth mission, all you need to do is to point the target with the cursor and after the rocket is launched it will get to the target itself. This time, you can simultaneously mark six targets (picture above) and fire the same number of rockets at one time. The explosions and drones' shots cause interference for the turret and if it gets destroyed, you will lose the mission. Mark the six targets, shoot and then search for the next group but don't wait till the rockets hit the former group. You can pass a challenge here - see the "Challenges" section.

Objective: Regroup with protection detail
Objective: Choose to provide sniper overwatch
After you've destroyed the sixth group Mason will leave the turret. Watch a short cutscene and then move ahead. You can take two positions (picture above) - "CHOOSE SNIPER" means that you will stand at the end of the torn-away highway and you'll be aiming from above, while "CHOOSE REPEL" means that you will repel down with the President and her bodyguards. The first option is definitely better (all the more so because you can get another challenge here), so go to the end of the storn-away highway and wait until Mason takes out a new weapon.

Objective: Protect POTUS
Storm PSR Gun is a wonderful weapon. Not only does it highlight enemies, it also allows you to shoot through the walls - to do so, hold the fire button till five rectangles to the right will be filled. Then release the button. Sometimes you do not even have to charge the shot, you can normally shoot through thinner covers and you will hit anyway (although you'll probably need to repeat the shot). The only drawback of this weapon is too much zoom-in, but that's something to get over. Right after you've taken out the weapon look to the right, at the parking lot situated above. A sniper will run out of there, from behind the car. Take him out quickly (picture above).


Optional objective: Save all MRAPS
Immediately, look at the opposite right upper highway exit. Three soldiers will run out of there (first picture above). Right next to them, on the left, a truck with a heavy machinegun will come out. First of all, try to take out the rifle operator (second picture above) or, after killing the previous three enemies, charge the shot to the fifth level and shoot at the truck, which will make it explode. After a while another two will go down from the right wall. Do not try to kill everyone one after the other, because your allies may have bigger problems on the left side.


If during the fight one of the agents (MRAPs) dies, you won't carry out an optional mission objective. It is therefore important to protect them and to focus on the biggest dangers, namely on the next rifle operator on the truck, which will come out to the left road (first picture above). Also, look through the columns at a few enemies standing side by side and quickly kill them (second picture above). Remember to charge the shots. Look around again to check if you haven't missed any enemies hidden behind the vehicles on the left and right.


When you hear a message about the snipers, immediately look at the upper highway, perpendicular to yours (there are green signs on it). On the left side you will see a truck with three snipers and a heavy machine gun operator (first picture above). The snipers can place themselves in two spots: next to the truck (to the left of it and by the green sign) and also on the building to the right (second picture above). Kill them and watch the cutscene.

Objective: Get to the MRAP vehicles
Objective: Repel down and meet up with group
Hide to the right, by the red truck and explore the area from right to left using the Storm PSR Gun. Kill everyone you see (we hope you remember that you can shoot through any cover). Then go near the bus on the left. Behind the bus there is a motorbike, and behind it there's a car on fire. Near the driver's seat you will find intel (1/3) (picture above).

Get back on the right path and run straight ahead. You must be careful, because the fact that you haven't noticed any enemies does not mean that they can't suddenly appear. And it will be so - one soldier will run out from behind the white car (picture above). Run up to the President and her security unit.

Objective: Head for the 'Prom Night' bunker
Then, hide by the second MRAP vehicle. Again, use the Storm PSR Gun to get rid of a few enemies in front of you, including one heavy machinegun operator on the car (picture above). When you get the abovementioned mission objective, walk up to MRAP door (with a word Drive) to get in.

Drive forward, ramming cars and enemies. You do not have to worry about anything, your vehicle is virtually indestructible. When you see the falling rubble and signs in front of you (picture above), turn left to the opposite lane and continue driving along this path. After a while, go back to your lane and go where the plane was flying. Drive sticking to the right wall all the time. You will turn right, and then left along with police cars and you'll drive out of the network of flyovers. Drive straight ahead. You'll watch a cutscene, and then you'll move to the next part of the mission.

Objective: Regroup with POTUS
Objective: Destroy the C.L.A.W.s
As soon as you regain control over the character, immediately crouch, take out the Storm PSR Gun, turn on the scope, charge the shot to the fifth level and shoot at the enemy CLAW, which will be exactly in front of you (picture above). If you do not destroy it with a single shot, repeat the action. For now, ignore the word Access.


Hide by the rear wheels of the truck on the left and look at the street. It's a real war zone and perhaps the most besieged area in the whole single player campaign. Enemies are virtually everywhere. First, start by taking out the snipers. They're hiding on the balconies on the left (first picture above), as well as on the buses on the right (second picture above). Of course, you must be careful all the time and not let any opponent come running to you. It is worth noting that you will have the support of the local police.

Then, locate the other CLAW, walking in the distance (picture above) and start shooting at him. Charge each shot to the fifth level. Since you'll probably be shooting through the covers, you will need more shots to destroy the robot. However, there are some ammo crates nearby, so you can shoot as much as you like. In the meantime, new enemies will come in a car from afar, but don't do anything about them for now.

Only now can you go to the place where the first CLAW was. Right to the left there is a trailer you can enter. Do it and cut the grate at the end (picture above) to get support from one rocket firing quad-drone. Start the mark the targets with it, and when it is destroyed, just look at the road from right to left using the Storm PSR Gun scope and finish off all visible enemies - not only in the street, among the cars, but also in the building on the left.


Locate the door through which you can see a wall glowing in blue (first picture above) and run inside. Be careful! There may be enemies here, so hide behind the desk and explore the area. Additionally, new enemies opposite the building, who are hiding in the buses and lying on their roofs, can fire at you. When you have a moment of peace, pick up intel (2/3) lying on the abovementioned desk (second picture above). Again, examine the next rooms and then go back to the street.

Move forward from one column to another. When you see a truck at the intersection be prepared to kill four enemies who will get off its trailer. Next, retreat and from a safe distance, behind and from behind cover kill the third and the last CLAW (picture above). The allied police officers should have moved in the vicinity of the mall.

The entrance to the shopping center is on the left. It is better not to push your way towards the square on the right, as it is under enemy fire. But before you get inside, take a look even further to the right - you should notice an overturned MRAP with a word Access (picture above). Open the locked exit on the truck roof to free the two agents, who will support you from now on. You will also get the next quad-drones support. Make sure to refill your ammo - there are ammo crates in the truck trailer, out of which four enemy soldiers came.

Go inside the mall and hide behind the right side, between the columns. Find the opponents using the Storm PSR Gun and be careful - you won't see all of them at once. However, with the help of the agents and quad-drones you should quickly clear the hall, just don't act recklessly. In the end, you will get to the stairs (picture above). The enemies will roll a big pot down them. Finish off the opponents at the top of the stairs and then climb them.

Stop right near the top of the stairs and use the Storm PSR Gun to locate the enemies in the next corridor (picture above). There will be a lot of them here. Mark one for the quad-drones to make them fly here and then go back to your own extermination. Right on the left there is a double door with a word Access, which leads to a challenge (see the "Challenges" section for a more detailed description). Scan the area after moving a few meters ahead each time. New enemies will appear on the terrace on the right and in front of you, behind the windows.

Before you go out, look for a stand with T-shirts with the words "WES-S FAVORITE T-SHIRT". Here, on the left, on the shelf near the floor, you'll find intel (3/3) (picture above).

Hide behind the ads and by the walls, slowly move to the front, and eventually you'll go out to the terrace. Hide, and again, to be sure, check if there is no one who could shoot you in a moment. Finally, find the stairs leading down from the terrace (picture above), run down them and stick to the left wall. Turn left and run between the buildings to the G20 vehicle.

Optional objective: Save the G20 Leader
Immediately aim with the Storm PSR Gun at the roof of the building, in the background of which there's the front part of the vehicle. There will be two enemies with RPGs (picture above). Take them out and you'll carry out the objective and also pass a challenge. Then simply start hiding behind the cars on the right, search for enemies, kill them and move further. When the big building falls over, you'll go to the last part of the mission.

Objective: Get to the FA-38
Objective: Follow Anderson's ambulance
Objective: Protect the President's vehicle
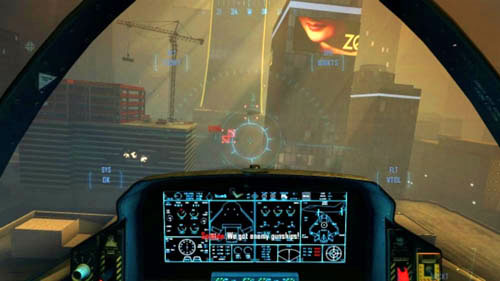
Run to the plane, there will be no enemies here. Get on and you'll receive a new mission objective. Use both rockets and a rifle - in the case of the former, again, all you need to do is to mark the target and the rocket will hit it itself, however, you can only mark one target at one time. Fly straight ahead. When you get to the intersection, fly left and then straight ahead all the time. Keep above the vehicles all the time and simultaneously examine the area around. At the intersection, where the vehicles will turn left, two jeeps will come out from the left. In front of you, a little to the left, the next two will come out. Also, a helicopter will appear on the left (picture above).

Soon after that, at the next intersection, by the square with the palm trees enemy vehicles will come out from the right. A helicopter will fly from behind the tall building to the right. Another one will fly out from the left, behind you. Take out the helicopters and then quickly take care of the big trucks that are blocking the opposite way (picture above), there will also be new helicopters.
The vehicles will turn back and go right. Go back and, this time, destroy the cars with machineguns on the roof of the building, to the right of the abovementioned trucks. Follow the vehicles. From behind the building on the right two helicopters will come out (picture above) - deal with them but be careful not to fall into the big crane that will turn over in a moment. Follow the vehicles and wait for a while - you will get the last mission objective.

Objective: Destroy the drones
As soon as a group of drones flies past you, begin to follow them, mark them and take them out (picture above). The drones will not attack you, so you can lose in three ways - by damaging your plane if you collide with buildings, by flying out of the battlefield and by letting the drones destroy the vehicles you're supposed to protect (the least likely option of the three). You turn on the boost by pressing the sprint button, while the Skyburst rockets by the secondary grenade throw button (the bug in the game can prevent you from having them, but they are not necessary to complete the mission).

Probably the biggest problem will be the fact that is very easy to get lost here. Therefore, pay special attention to one of the two allied aircrafts, which has a word Follow on it (picture above). If you lose sight of it, look for an arrow that is pointing at it on the plane windscreen. Of course, your allies will aid you in battle. Use the boost to catch up with both enemies and allies.

The drones will always attack the convoy in the same way - flying between the buildings and shooting at it (picture above). Taking all the above tips into consideration simply fly, search for targets and destroy them until Mason ejects from the plane.