Guides & Walkthroughs New Guides Popular RPG Action Strategy Adventure YouTube Guides Mobile App

Call of Duty: Black Ops Game Guide & Walkthrough by gamepressure.com

Call of Duty: Black Ops Game Guide & Walkthrough

Table of Contents

S.O.G. - p. 2 CoD: BO Guide

Last update: 11 May 2016

1 - S.O.G. - p. 2 - Walkthrough - Call of Duty: Black Ops Game Guide & Walkthrough
Follow your teammates and soon you will reach the place #1, where furious fights take place - S.O.G. - p. 2 - Walkthrough - Call of Duty: Black Ops Game Guide & Walkthrough

Follow your teammates and soon you will reach the place #1, where furious fights take place. First try to eliminate the enemies who are the nearest #2. Keep in mind that the enemies will "reborn", so you won't be able to occupy one place forever waiting for the whole team to die.

2 - S.O.G. - p. 2 - Walkthrough - Call of Duty: Black Ops Game Guide & Walkthrough
After clearing the area, follow your team down #1, and you should reach a machine gun position which is worth using - S.O.G. - p. 2 - Walkthrough - Call of Duty: Black Ops Game Guide & Walkthrough

After clearing the area, follow your team down #1, and you should reach a machine gun position which is worth using. I suggest you to head toward the bunker on the left #2.

3 - S.O.G. - p. 2 - Walkthrough - Call of Duty: Black Ops Game Guide & Walkthrough
Get inside the bunker and here you will also find a machine gun position #1 - S.O.G. - p. 2 - Walkthrough - Call of Duty: Black Ops Game Guide & Walkthrough

Get inside the bunker and here you will also find a machine gun position #1. Start eliminating enemies who are situated near your team from this spot. Again you can't stay here too long because the enemies will reborn anyway. After eliminating most enemies, go back to your teammates #2.

4 - S.O.G. - p. 2 - Walkthrough - Call of Duty: Black Ops Game Guide & Walkthrough
Quickly come up to the barrel situated on the right side of your enemies #1 and press the F key to kick it - S.O.G. - p. 2 - Walkthrough - Call of Duty: Black Ops Game Guide & Walkthrough

Quickly come up to the barrel situated on the right side of your enemies #1 and press the F key to kick it. Notice that it caused the fire in the left part of trenches. Quickly hide behind bags with sand and eliminate enemies who have come up to your team #2.

5 - S.O.G. - p. 2 - Walkthrough - Call of Duty: Black Ops Game Guide & Walkthrough
The second barrel is situated a bit further #1 and you should behave in the same way as you did before - S.O.G. - p. 2 - Walkthrough - Call of Duty: Black Ops Game Guide & Walkthrough

The second barrel is situated a bit further #1 and you should behave in the same way as you did before. After setting all trenches on fire, immediately run after your team and come near the bunker you hid in some time ago. Find the entrance presented on the second screen #2 leading to a bigger underground bunker.

6 - S.O.G. - p. 2 - Walkthrough - Call of Duty: Black Ops Game Guide & Walkthrough
After getting inside the bunker find new secret service data #1 - S.O.G. - p. 2 - Walkthrough - Call of Duty: Black Ops Game Guide & Walkthrough

After getting inside the bunker find new secret service data #1. Now you can get back to the surface and choose a path leading to another location (you will head toward a destroyed part of a forest) #2.

7 - S.O.G. - p. 2 - Walkthrough - Call of Duty: Black Ops Game Guide & Walkthrough
You are going to perform a difficult task - you have to take over a hill occupied by the enemy - S.O.G. - p. 2 - Walkthrough - Call of Duty: Black Ops Game Guide & Walkthrough

You are going to perform a difficult task - you have to take over a hill occupied by the enemy. Head toward your destination #1 and start shooting enemies #2. Remember to be hidden. It is worth taking your time. Allow your allies to eliminate some of the enemies.

8 - S.O.G. - p. 2 - Walkthrough - Call of Duty: Black Ops Game Guide & Walkthrough
First of all you have to watch out for the enemies hiding in trenches while you are climbing #1, because there is a risk you wont see them soon enough - S.O.G. - p. 2 - Walkthrough - Call of Duty: Black Ops Game Guide & Walkthrough

First of all you have to watch out for the enemies hiding in trenches while you are climbing #1, because there is a risk you won't see them soon enough. Always check the area around you #2, making sure you didn't miss anyone.

9 - S.O.G. - p. 2 - Walkthrough - Call of Duty: Black Ops Game Guide & Walkthrough
I suggest to stay in the left part of the hill #1, although it is not necessary to succeed - S.O.G. - p. 2 - Walkthrough - Call of Duty: Black Ops Game Guide & Walkthrough

I suggest to stay in the left part of the hill #1, although it is not necessary to succeed. The most important thing is to eliminate enemies one by one and not leaving anyone behind. When you reach the top #2 the main hero will get dazed by the grenade - don't worry, this scene is fully directed.

10 - S.O.G. - p. 2 - Walkthrough - Call of Duty: Black Ops Game Guide & Walkthrough
Prepare because you will have to save Woodss life soon - S.O.G. - p. 2 - Walkthrough - Call of Duty: Black Ops Game Guide & Walkthrough

Prepare because you will have to save Woods's life soon. Wait till the game allows you to shoot and aim at the head of a man standing in front of you #1. You can get inside a nearby bunker #2.

11 - S.O.G. - p. 2 - Walkthrough - Call of Duty: Black Ops Game Guide & Walkthrough
While you are exploring the building, stop in a room with many appliances #1, because the you will find the last in this mission secret service data - S.O.G. - p. 2 - Walkthrough - Call of Duty: Black Ops Game Guide & Walkthrough

While you are exploring the building, stop in a room with many appliances #1, because the you will find the last in this mission secret service data. Now you can head toward the surface #2.

12 - S.O.G. - p. 2 - Walkthrough - Call of Duty: Black Ops Game Guide & Walkthrough
Run up to a parked jeep #1 - S.O.G. - p. 2 - Walkthrough - Call of Duty: Black Ops Game Guide & Walkthrough

Run up to a parked jeep #1. You can use grenade launcher during the drive #2. It is worth knowing that ammunition is limited so aim at bigger groups of enemies.

13 - S.O.G. - p. 2 - Walkthrough - Call of Duty: Black Ops Game Guide & Walkthrough
This time you will have to destroy six hostile tanks - S.O.G. - p. 2 - Walkthrough - Call of Duty: Black Ops Game Guide & Walkthrough

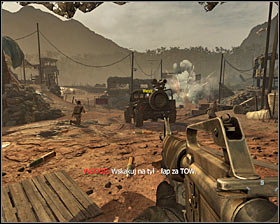
This time you will have to destroy six hostile tanks. Every time when you get closer to a tank or a group of tanks, you will be automatically asked to use a controller #1.Trace the tank you have chosen #2 and fire the missile.

14 - S.O.G. - p. 2 - Walkthrough - Call of Duty: Black Ops Game Guide & Walkthrough
If the shot is not precise enough, you can make amends before the missile hits the aim #1 - S.O.G. - p. 2 - Walkthrough - Call of Duty: Black Ops Game Guide & Walkthrough

If the shot is not precise enough, you can make amends before the missile hits the aim #1. Don't worry, if you miss the game will let you try again. Destroy all six tanks in such a way and the mission will be over #2.

See/Add Comments

You are not permitted to copy any image, text or info from this page.

This site is not associated with and/or endorsed by the Activision Blizzard or Treyarch. All logos and images are copyrighted by their respective owners.

Copyright © 2000 - 2024 GRY-Online S.A. for gamepressure.com, unofficial game guides, walkthroughs, secrets, game tips, maps & strategies for top games.