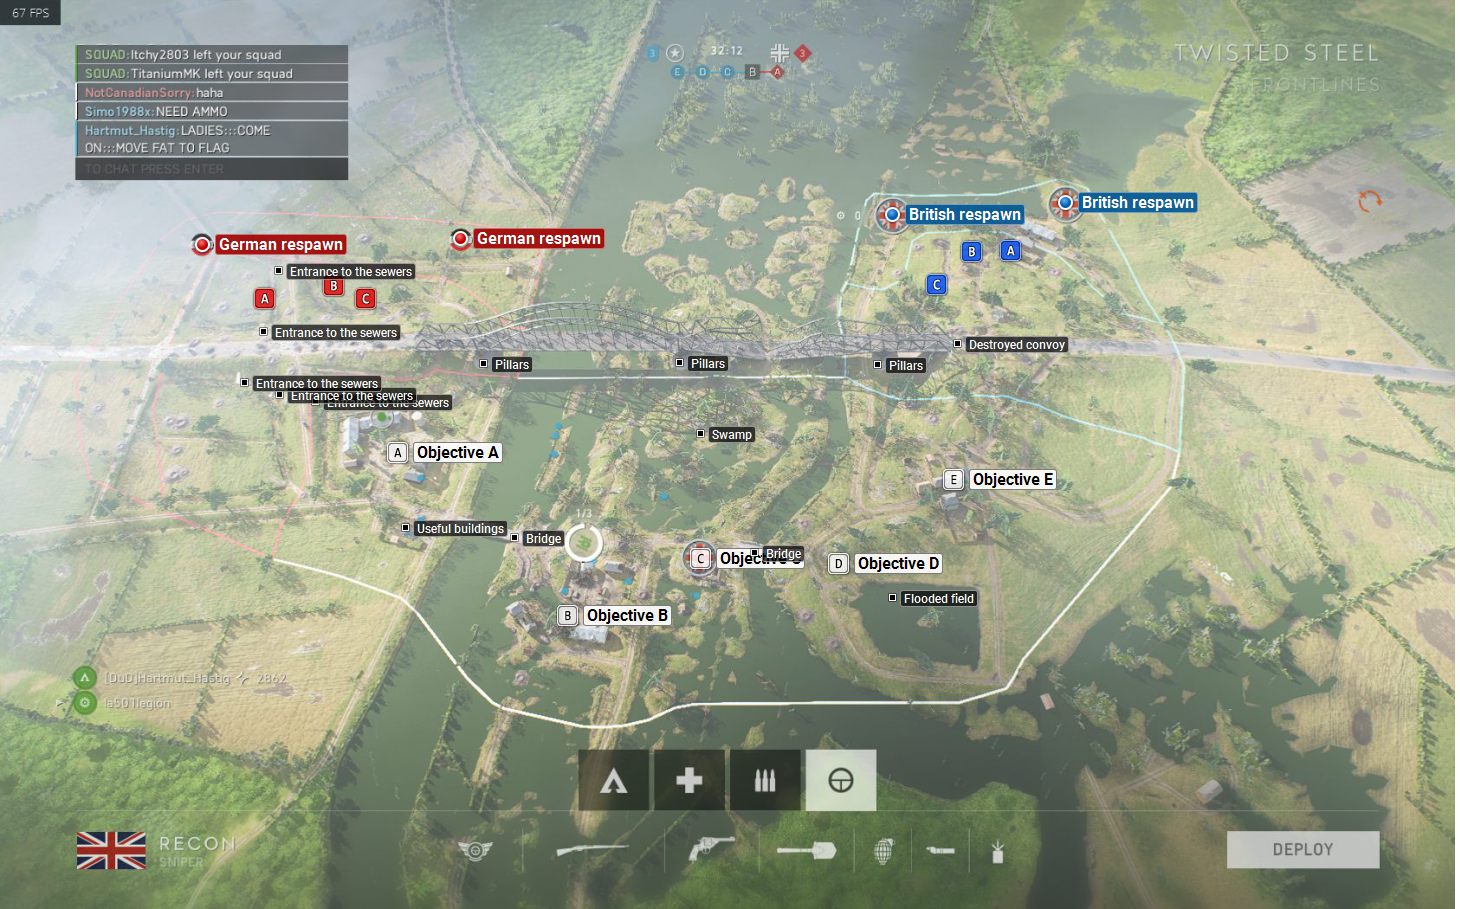
Twisted Steel Map - Frontlines Mode Battlefield 5 Guide and Tips
Last update: 14 May 2019
Key points of Battlefield V - Twisted Steel Frontline
Useful and helpful places
German respawn
British respawn
Objective A � You can find here a few buildings, these are good as a shooting positions. From there, you have view of the bridge near objective C. You can also reinforce surroundings by building fortifications such as sandbags or barbered wire.
Objective B � The flag is located between buildings. You can find nice cover such as barns, they will help you while attacking and defending this objective. You also have a nice view of bridges from A and C objectives.
Objective C � It can be heavily fortified - you can build even trenches. Next to this flag, there is bridge, which also can be fortified. There are often heavy fights between C, D and B, so it's recommended to build some fortifications - it can be very useful when the enemy attacks (from D and B).
Objective D � It can't be fortified that much, like near C - you can only dig the earth to create cover. Hard to attack and defend, because this flag can be easily flanked from any direction. Use fire support from tanks.
Objective E � You can find plenty of cover and buildings. Between this and D objectives, it is hard to find suitable cover, especially near E objective.
Hard to defend, easy to attack. It's the farthest one. Between A and B objectives you can find the route on a hill - be careful when you cross it. You can also use canal to get to A point from B.
This target is located next to C, it is easy to defend it - you can find here trenches, use them as a cover. You can also find little brook, it's a nice shooting position. As attacker, it is recommended to constantly change your target to attack between C and B. This tactic should do the trick.
This target is located next to B, it is easy to defend it - you can find here trenches, use them as a cover. You can also find little brook, it's a nice shooting position. As attacker, it is recommended to constantly change your target to attack between C and B. This tactic should do the trick. You can also attack from the passage under the bridge.
There are 2 buildings and fortifications. If you want to go there, it will be hard, because of small amount of cover.
Hard to attack, because it's fortified, what's more, it is located next to target A - enemies can shoot from there. It is worth to try to flank it from west.
This target is easy to attack. Hard to shoot from target B. You can easily get to this target - use the path under the bridge.
In this chapter you will find the map of Twisted Steel in the Frontlines mode. The chapter contains a general characteristic of the map, map legend, as well as descriptions of flags in terms of available covering spots. The Battlefield 5 game guide will guide you on the battlefield.
Characteristic of the map
The map for the first day is very similar to the one from the Conquest mode - the only difference is that the points must be captured in order, one after another, pushing the frontline. The game in this mode can be very long, lasting up to an hour. Generally a good idea here is to fortify the previously captured points in case the storm on the further ones is unsuccessful.
Point D is the most difficult to fight at, due to the small amount of cover spots. The point is located close to the road, near trees and swamp. The rest of the points - E, C, B and A - can be heavily fortified. There is no golden mean here - play smart, fortify, use all of the available means to exterminate the enemy. Points E, C, B or A have a lot of buildings and barns, allowing you to find a good shooting position quite easily. Between points E, C, B and A you will find bridges that can be destroyed and rebuilt. You can even construct anti-tank blockades. Be careful when near the Bridges, as players like to wait (mainly underneath the bridge) and wait for the enemy. The same applies to places near the river.
After capturing 5 flags by your team, your task will be to destroy 3 points near the enemy base. In the scenario in which the enemy captured 5 flags, your team will be forced to defend its own points near the base. Regardless of the side controlling the flags, the attacking side has a limited amount of tickets to perform the assault. The game ends once all of the points are destroyed or when at the end of the map one of the sides has more defensive points. Playing as part of a team is crucial here - if you do not have it or there is no one alive at the moment, you will need to travel back to the battlefield from the last captured point.
The easiest point to destroy from the German side is A, due to the fact that it is divided from the rest of the by a bulwark. Points B and C are located close to one another, making them difficult to attack. Points to destroy on the British side are also quite difficult, as cover here is scarce - you need to use the terrain and trenches.

