Batman trophies (01-10) | Museum
TROPHY 1
Gadgets used: Explosive Gel, Batarang
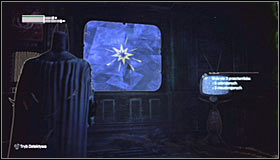 |  |
Use the Explosive Gel on the hole north of the Trophy (Trophy Room) #1. After detonating it, enter the small room and stand in front of the Trophy cage #2.
 |  |
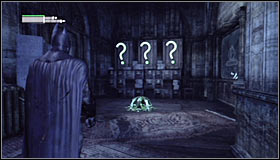
In order to solve this riddle, you have to throw three Batarangs by quickly tapping the left trigger (don't hold it down!) in a short period of time #1. If you mange to switch off all three question marks at the same time the cage will open #2.
TROPHY 2
Gadgets used: Batclaw, Line Launcher
 |  |
Take a look around north of the Trophy for a higher ledge which you can access using the Grapnel Gun #1 #2.
 |  |
After getting upstairs, turn around to the south and use the Line Launcher #1. Wait for the ride - during which Batman will automatically break through a couple obstacles - to end #2. You should land inside the Trophy room, so all that's left is just taking it.
TROPHY 3
Gadgets used: Batclaw, Line Launcher


Start off north-west of the Trophy's location, i.e. on the northern balcony adjoining the passage leading to the War Room. Search for scaffoldings and reach its upper part using the Grapnel Gun.
 |  |
Now turn to the south-east, equip the Line Launcher and shoot into the wall on the other end of the Torture Chamber #1. Right after the ride begins, hold down the left trigger to slow down the process as you will have to change direction. Turn the camera left and shoot at the ledge located in the north-east corner of the room #2.
 |  |
Patiently wait for Batman to reach the mentioned ledge #1. Carefully land on it and pick up the Trophy #2.
TROPHY 4
 |  |
Start exploring the lower level of the War Room and search for grates in the wall into which you can jump #1. Inside one of such shafts, the Trophy has been hidden #2.
TROPHY 5
Gadgets used: Remote Electrical Charge
 |  |
Stand by the locked gate north of the Trophy, equip the Remote Electrical Charge and shoot at the engine #1. After the gate raises, enter the small room and collect the Trophy #2.
TROPHY 6
Gadgets used: Explosive Gel
 |  |
Explore the southern part of the upper floor of the Torture Chamber. You should find a destructible wall fragment there #1 and you of course have to use the Explosive Gel. Afterwards jump onto the crates, finding the Trophy on one of them #2.
TROPHY 7
Gadgets used: Remote Electrical Charge, Explosive Gel
 | 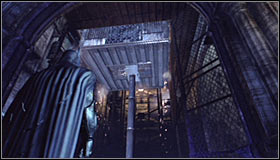 |
Start off in the southern part of the Gladiator Pit, i.e. standing in front of the elevator #1. Use the Electrical Charge to send the elevator up #2.
 |  |
Note that you can now approach the wall on the right - which has been previously covered by the elevator #1 - and destroy it with the Explosive Gel. Enter the newly unlocked area and collect the Trophy #2.
TROPHY 8
Gadgets used: Freeze Blast, Batclaw
 |  |
Start off by reaching the balcony north of the Trophy #1 #2.
 |  |
Prepare the Freeze Blast and aim at the fenced part of the tank #1, causing an ice float to be created. Glide towards the ice and start pulling yourself towards the frozen Trophy by using the grapple points. After you reach the Trophy, the game will let you pick it up #2.
TROPHY 9
Gadgets used: Cryptographic Sequencer + Cryptographic Sequencer Range Amplifier, Batclaw
 |  |
Start exploring the lowest level of the War Room, taking a look around the Mammoth #1. You should note a control panel on one of the walls #2 and you have to use the Cryptographic Sequencer to remotely hack it.
 |  |
Create the password to solve the mini-game #1. Afterwards equip the Batclaw and grab the Trophy attached to the wall using it #2.
TROPHY 10
Gadgets used: Remote Controlled Batarang
 |  |
Start off in the central part of the Gladiator Pit and turn north. Take out the Remote Controlled Batarang and throw it at the hole with discharges in front of you #1. Turn the Batarang around after it gets electrified (making it fly towards Batman) #2.
 |  |
Lead the Batarang onto the partially raised grate in the south-west part of the room #1. If for some reasons it's not raised, check out the walkthrough of Rescue remaining undercover GCPD officers in the Museum to learn how to do it. After the Batarang flies beneath the grate, turn it slightly right #2.
 |  |
Wait for the Batarang to reach the big water tanks and this time turn right #1. Afterwards make it fly though the small hole #2.
 |  |
Turn the Batarang right for the last time #1. You need to make it hit the fuse box #2.
 | 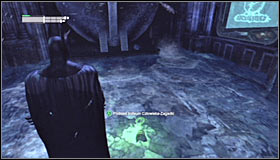 |
Note that destroying the box has led to the middle (western) grate getting partially raised #1. Slide underneath it and find the Trophy in the partially flooded room #2.
You are not permitted to copy any image, text or info from this page. This site is not associated with and/or endorsed by the Warner Bros Interactive Entertainment or RockSteady Studios. All logos and images are copyrighted by their respective owners.
Copyright © 2000 - 2025 Webedia Polska SA for gamepressure.com, unofficial game guides, walkthroughs, secrets, game tips, maps & strategies for top games.
