
Collectibles - Botanical Gardens - part 3 BAA Guide
Last update: 11 May 2016
 | ![[#7] Location: Titan Production Facility (Botanical Gardens) - Collectibles - Botanical Gardens - part 3 - Collectibles - Batman: Arkham Asylum Game Guide & Walkthrough](/batmanarkhamasylum/gfx/word/312449187.jpg) |
[#7] Location: Titan Production Facility (Botanical Gardens)
Requirements: Line Launcher
Soon after you've acquired the Line Launcher use this gadget to reach a small ledge located to the right of the exit from the facility.
 | ![[#8] Location: Flooded Corridor (Botanical Gardens) - Collectibles - Botanical Gardens - part 3 - Collectibles - Batman: Arkham Asylum Game Guide & Walkthrough](/batmanarkhamasylum/gfx/word/312449218.jpg) |
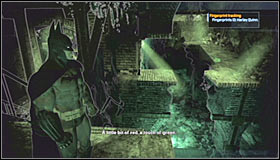
[#8] Location: Flooded Corridor (Botanical Gardens)
Requirements: Line Launcher
You'll find this trophy almost automatically, because you can't miss it while trying to get to Poison Ivy's hideout.
 | ![[#9] Location: Botanical Glasshouse (Botanical Gardens) - Collectibles - Botanical Gardens - part 3 - Collectibles - Batman: Arkham Asylum Game Guide & Walkthrough](/batmanarkhamasylum/gfx/word/312449250.jpg) |
[#9] Location: Botanical Glasshouse (Botanical Gardens)
Locate movable floor panels while visiting this area. One of the tunnels contains a trophy.
 |  |
 |  |
 | ![[#10] Location: Abandoned Chamber (Botanical Gardens) - Collectibles - Botanical Gardens - part 3 - Collectibles - Batman: Arkham Asylum Game Guide & Walkthrough](/batmanarkhamasylum/gfx/word/312449343.jpg) |
[#10] Location: Abandoned Chamber (Botanical Gardens)
Requirements: Ultra Batclaw, Line Launcher
Start off near the doorway to the next room (screenshot #1). You should be able to notice a new platform in the distance and you'll have to glide towards it. Once you've landed make a few steps forward and press the action key to grab the ledge (screenshot #2). Move to your left until you get to a small waterfall. Climb up, turn around and perform a jump towards a metal balcony. From there you should move to your right. Use a Batarang on a nearby rope (screenshot #3) which will allow you to use a new metal platform. Remain where you are and grab the ledge located to your left (screenshot #4). Move to your left until you'll be able to climb up to a new platform. Turn right here and use the Ultra Batclaw to rip off a weak section of the wall (screenshot #5). All there's left to be done is to get to the trophy using the Line Launcher.
Messages
 |  |
 |  |
 | ![[#1] Location: Abandoned Chamber (Botanical Gardens) - Collectibles - Botanical Gardens - part 3 - Collectibles - Batman: Arkham Asylum Game Guide & Walkthrough](/batmanarkhamasylum/gfx/word/312449437.jpg) |
[#1] Location: Abandoned Chamber (Botanical Gardens)
Requirements: Batclaw
Start off near the doorway to the next room (screenshot #1). You should be able to notice a new platform in the distance and you'll have to glide towards it. Once you've landed make a few steps forward and press the action key to grab the ledge (screenshot #2). Move to your left until you get to a small waterfall. Climb up, turn around and perform a jump towards a metal balcony. From there you should move to your right. Use a Batarang on a nearby rope (screenshot #3) which will allow you to use a new metal platform. Remain where you are and grab the ledge located to your left (screenshot #4). Move to your left until you'll be able to climb up to a new platform. Move forward here and don't forget to press the crouch key to get past the brick wall (screenshot #5). Once you're on the other side jump forward, grabbing a nearby ledge (screenshot #6). All you have to do right now is to move to your left in order to climb up. The secret object is now right in front you.
 | ![[#2] Location: Glasshouse Entrance (Botanical Gardens) - Collectibles - Botanical Gardens - part 3 - Collectibles - Batman: Arkham Asylum Game Guide & Walkthrough](/batmanarkhamasylum/gfx/word/312449468.jpg) |
[#2] Location: Glasshouse Entrance (Botanical Gardens)
Once you've already talked to Poison Ivy (for the first time) you'll want to return to Arkham East. Notice that you won't be allowed to use the main entrance. Instead drop down to a dark tunnel and turn around to find the tablet.
 | ![[#3] Location: Titan Production Facility (Botanical Gardens) - Collectibles - Botanical Gardens - part 3 - Collectibles - Batman: Arkham Asylum Game Guide & Walkthrough](/batmanarkhamasylum/gfx/word/312449500.jpg) |
[#3] Location: Titan Production Facility (Botanical Gardens)
Requirements: Ultra Batclaw, Line Launcher
You'll have to start off by returning to the large arena where you've defeated two mutants. Turn around and this time aim your Ultra Batclaw at a weak section of the wall seen to your left. You can then reach the secret using the Line Launcher.