
Sabotage the bunker's defense systems | Mission 12 - Site F Splinter Cell: Blacklist Guide
Last update: 11 May 2016

Continue down the shaft with lasers and note that there is a new collectible in the area. Try and make it to the metal balcony shown in the screenshot that you can observe both the collectible and the room with terrorists from. Hang down from the balcony's ledge and shimmy to the right, i.e. in a clockwise direction. The Dead Drop can be acquired after you reach the right, lower ledge (the reward is the regular 10 thousand dollars).

Fortunately, you don't need to make it back to the shaft with lasers because, equally well, you can go ahead to the right and stop only after you reach the wall. Start jumping here to the consecutive ledges below, thanks to which you will eventually reach the lowest level. . You need to be careful here to prevent being spotted. To the left of the main exit from the central room, there is a ventilation shaft grate but, before you open it, you need to make sure if it is safe here.
During your passage through the shaft, you will receive an update on your objectives. You will learn about the necessity to sabotage three computer terminals. Carefully, approach the shaft's exit and don't lift the grate too soon, because the area is being patrolled by an armored enemy. Wait for the enemy to start moving away, exit the tunnel and go towards the passage to enter a whole new location with the terminals mentioned above.

Before you move on, you should know two crucial things. First of all, although the terminals can be visited in any order, I recommend that you follow the below order. Thanks to this, you will not need to backtrack and, at the end, you will be able to leave the bunker without any problems. Secondly, it is crucial that you avoid, at all costs, attracting the enemy attention with door opened ajar or unnecessarily destroyed lighting because, this will encourage them to increased vigilance and will make performance of the sabotage considerably more difficult, in all points marked by the game. Start by moving to point B. Approach the fork ahead of the starting point . Hide here behind the left cover, wait for the enemies to go left AND until the reconnaissance drone hovers by Fisher.

Position yourself as close to the fork as possible and make sure that you can safely go left. If necessary, wait until the enemy that you can see in the distance, turns away and goes right. Walk over to the very end of the left corridor , turn left and locate the ventilation shaft grate. Open it and ABSOLUTELY shut it behind. This way you will prevent putting the nearby terrorist at an unrest somewhere in the future. Walk through the very short shaft and enter, carefully, the room with terminal B and hide behind the nearest cover.

This time around, apart from Fisher, there should be two guards. Wait until the enemies stop their conversation, because one of them should soon leave and go towards the starting point. Quickly, approach the other of the enemies . wait for the terrorist to move away towards terminal B, approach the computer and interact with it to upload the virus.

After the successful operation, return to the side shaft, while avoiding detection and remember about shutting all of the grates. Make sure that you can now walk out of the ventilation shaft and wide behind the cover to the left shown in the screenshot. You need take here a longer stop to wait for the guard on the left to go the opposite direction and make sure that the reconnaissance drone, which you have seen before, isn't coming.

Now you should go to point A. As soon as it is safe, walk out from behind the cover and grab onto the red pipe above the corridor located to the left. Shimmy over that pipe to the other end, thanks to which you will end up over an active security camera. You need to wait for the guard to go towards the cover that you earlier hid at, and for the camera to turn away into position which will allow you to drop down from the pipe safely. Enter the nearby room, as quickly as you can, and approach the press conference room.

Don't enter the main hall because this would be very risky. Instead, go right, walk into a smaller, darkened room. Turn left and start by destroying the glow tube in the neighboring room. Position yourself next to the door to the left, open it and locate the high-value target shown in the above screenshot. Use decoy to encourage the target to go and check the area. In wait for this person's arrival, get back a little. You can attack the high-value target only when he enters the room with the smashed glow tube because, otherwise the moment that you capture the target may be noticed by the drone operator. Knock down the target and tie him up but, also don't forget to shut all the doors around.

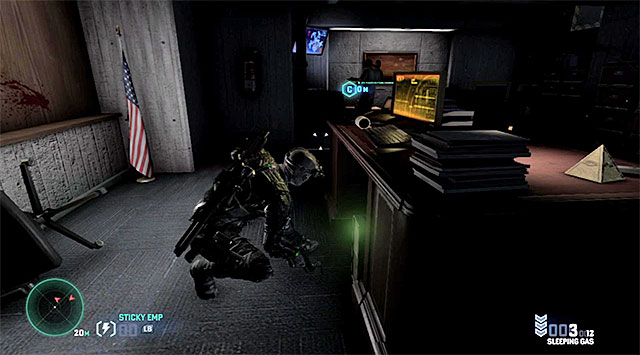
Remain in the room with the target that you have just knocked down and note that there is an entrance to the venting shaft to the right. Walk through the shaft but don't exit it straight away because, there still is the drone operator to the left. The best way to solve the problem of this enemy's presence is it make use of the non-invasive methods like the sticky noisemaker or the sticky EMP. the most important thing is to make this terrorist stop observing the area where the exit from the shaft is located. Quickly, go right and interact with Terminal A.

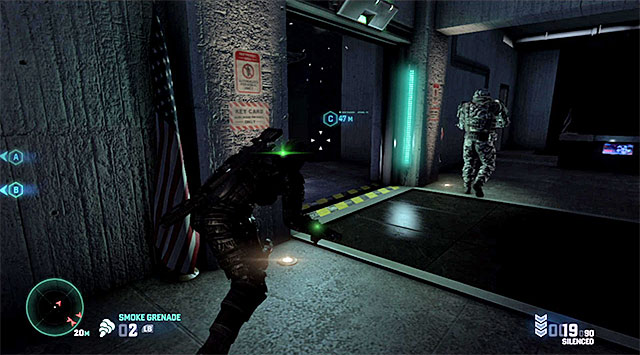
Try to return to the ventilation shaft as quickly as possible because, if you don't make it., you will again have to distract the drone operator. On the list of the places to visit there is only point C left. Once again, walk into the darkened area that neighbors with the room with the glow tube smashed and the high-value target. Locate the manhole here, open it and start your march along the ventilation tunnel. The shaft will take you to the region of the corridor of the central bunker.

Don't hurry to exit the shaft because the nearby corridor is patrolled by a heavy armored enemy. Wait for him to appear close to the shaft and follow him carefully, while keeping a safe distance. After you reach the final part of the corridor, enter another ventilation shaft, which will take you to a room adjacent to the one with terminal C inside.
You need to be careful, because the region of terminal C is patrolled by a single terrorist. Wait for him to go right and, only then, approach the terminal to hack into it. Also, don't to let the armored enemy, who you have also been avoiding, see you.