
Disarm the third bomb | Mission 7 - Transit Yards Splinter Cell: Blacklist Guide
Last update: 11 May 2016

Before you do anything, get acquainted with the warning about a new threat that lurks for Fisher. I mean the mines that have been deployed all around the place. To recognize mines, you could theoretically use the sonar pulse goggles suggested by the game (the above screenshot), but to all intents and purposes, this isn't required at all, because the mines aren't buried underground, and they come with the blinking lights on top. As a result, it is enough to take a good look and not to hurry too much.

Start by using the drain pipe to the left to get to the balconies above. Starting with this point, you need to watch out, because the area is monitored by an enemy sniper that is staying in the control tower that you can see in the distance. Fortunately, this enemy should be observing a different part of the station at first so, you will be able to step into action without any problems. Turn left and jump onto the roof of the first railcar. Hang down but do not drop straight away because the area under you is probably being checked by an armored enemy at present. Drop down only after the man turns away and walks the other direction.

Approach the next car, pull up and make sure that the enemy sniper isn't observing this area. Just like earlier, you need to grab onto the edge of the car and wait for the armored enemy to walk away, and jump down then. Set out for the third car and watch out for the mines that are quite plentiful around.

After you make it to the roof of the third car, go quickly to the right and try to make it before the sniper starts checking this place. At the same time, notice that walking over the roofs of the cars allowed you to walk around two standard enemies that are patrolling the space between the cars. Drop down right after they go away and climb the fourth car.
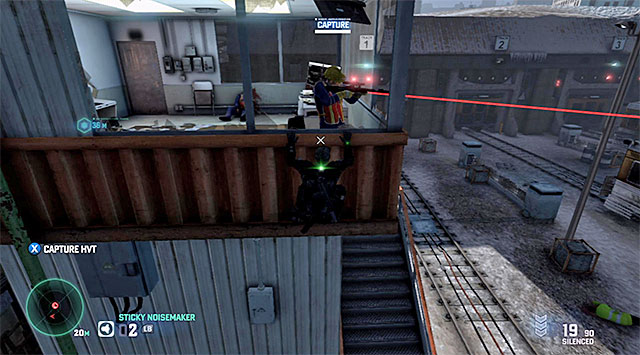
Hide behind the black metal cover and note that you are now near the control tower with the enemy sniper inside, who is also the high-value target. Jump down for the last time and approach the tower carefully. Do not step on the mines. Start climbing. I recommend that, over the drain pipe, you reach the window shown in the screenshot and press the melee key/button which will make Fisher catch the enemy. Knock the sniper down and tie him up.

The best way to leave this location is through the door in the control tower. Jump over the balustrade, jump down and approach the van that you can see in the distance, while receiving the reward for neutralizing the high-value target (up to 30 thousand dollars). Soon, you will determine that the enemies have already managed to unload the third bomb, which means that finding it is your new priority

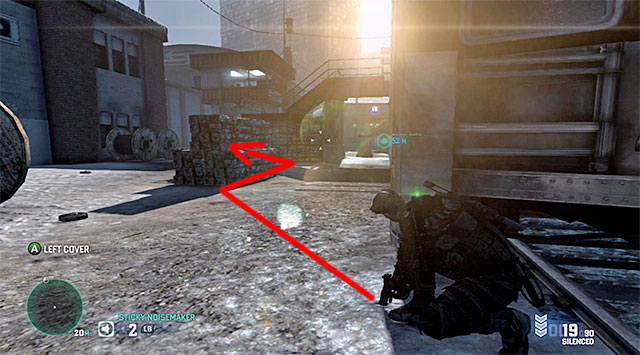
The best way to approach the car with the third bomb is by crossing the left part of the new transit station, because this will make it easier for you to visit the next control tower, where there is the last collectible. Of course, do not hope for an easy approach to the mission target, because this area is monitored by two snipers and, what is more, you will also run into armored enemies and mercenaries equipped with goggles. Turn left at the first opportunity, walk among the orange containers and go towards the passage located to the left of the cars.

You need to watch out on your way, for mines that are quite well hidden. Furthermore, I recommend that you stop in the spot shown in the screenshot. This is so, because soon, one of the mercenaries will appear here. Wait for the merc to pass Fisher by and remember not to lean from behind your cover. Resume on your path and jump over a small obstacle between two mines.
Eventually, you should reach a bit bigger square located to the left of the tower with one of the snipers. I recommend against being in too much of a hurry, because the sniper checks this area every now and then and, for obvious reasons, you need to wait until further passage is safe. Keep moving towards the control tower gradually but, also keep an eye on the enemies that patrol the bridge to the right.
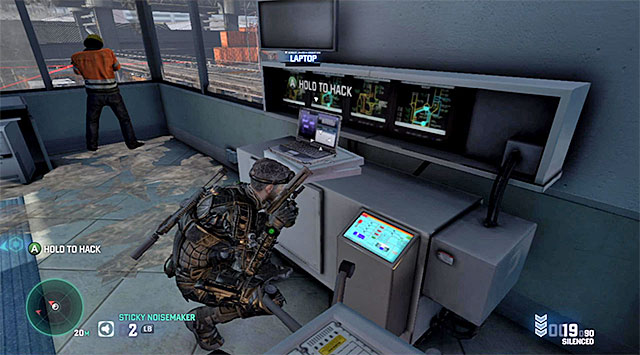
Inside the tower mentioned before, there is a Blacklist Laptop, although you should not hurry to acquire it because one of the standard enemies keeps visiting the tower and looks out through the side-window. Wait until the enemy walks out of the tower and climb the green drain pipe to the top, sneak behind the sniper's back and hack into the laptop (the screenshot). The reward for hacking into the laptop amounts to 40 thousand dollars.

You can return down by returning to the drain pipe, or through the tower's main exit. In both cases, make sure that you aren't spotted. You can now set out for the car located in the yet unexplored part of the station to the right. Wait for the enemies that are staying inside, to stop far away from the bomb, move quickly inside and interact with the bomb to start disarming it.
Additional tips for the Panther/Attack playing style: If you plan on killing the terrorists, you'd better ignore walking over the roofs of the cars so that, in case of alarm, you aren't in the line of the terrorist fire. Remember also that you can target mines and detonate them whenever there is an enemy near one.