Campaign - Forces of evil - Mission 5 - Weathertop - part 1 | Campaign - Forces of evil LotR: Conquest Guide
Last update: 11 May 2016
MAP OF THE AREA:
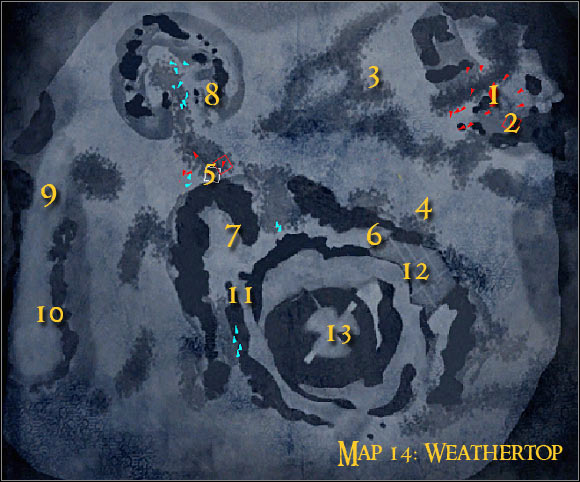
Map legend: 1 - starting area and first checkpoint; 2 - troll; 3 - oliphant; 4 - enemy armories and a checkpoint; 5 - enemy catapult; 6 - passageway leading to the barracks; 7 - enemy barracks; 8 - enemy catapult, checkpoint and a troll; 9 - passageway leading to the outpost; 10 - outpost - area that needs to be secured; 11 - passageway leading to the top of the hill; 12 - checkpoint; 13 - area where Aragorn appears for the first time
Additional info: This is a rather challenging mission. I'm sure that you'll have a lot of problems trying to destroy the barracks and take over one of the outposts. Thankfully you won't have to rely on the standard classes all the time, because you'll be given command of trolls and oliphants. Additionally, you'll play as Saruman near the end of the mission.
First assignment: Destroy Gondor's emplacements
Suggested class: oliphant (armories and the first catapult), scout (barracks) and archer (second catapult)
I would strongly recommend that you divide this objective into three smaller parts. The main reason is that you'll want to command someone else each time in order to get best results. You start the mission in the upper right corner (1 on the map). Notice a troll near the start point (2 on the map), however you should decide to take control over an oliphant (3 on the map). Use a mage to get to the beast, because eventually you'll have to leave it and it's going to be important to be able to heal yourself. Notice that the oliphant has become the main target for enemy catapults, so you'll have to be in a hurry and you won't be allowed to stop. Start off by moving towards two armories (4 on the map). Use oliphant's standard attacks to destroy these structures [#108]. Obviously you can also get rid of a few enemy units, but it won't be necessary.
![[#108] - Campaign - Forces of evil - Mission 5 - Weathertop - part 1 - Campaign - Forces of evil - The Lord of the Rings: Conquest - Game Guide and Walkthrough](/thelordoftheringsconquest/gfx/word/55228750.jpg)
[#108]
You'll have to move the oliphant to your right quickly and this means you'll be travelling west. Keep heading towards one of the catapults (5 on the map). I've already mentioned before that you'll be losing health, not only because of the catapult you want to destroy, but due to attacks made by distant targets as well. Get to the catapult as soon as possible and destroy it with a few standard attacks [#109]. You should now make a decision to leave the oliphant. Go back to the start area to change the class. Be careful, because enemy eagles are circling the area and you may be caught if you make an unnecessary stop. Obviously that would mean losing a life and some time. You should also remember about this later on during the course of this mission.
![[#109] - Campaign - Forces of evil - Mission 5 - Weathertop - part 1 - Campaign - Forces of evil - The Lord of the Rings: Conquest - Game Guide and Walkthrough](/thelordoftheringsconquest/gfx/word/55228765.jpg)
[#109]
You should now focus on destroying the barracks (7 on the map) and the safest route can be found near destroyed armories (6 on the map). I wouldn't recommend choosing offensive classes for this assignment, even a troll. The reason is that you'll be dealing with a lot of enemy units, including very powerful ents. As a result you should decide to sneak past enemy units in the body of a scout. Get to the vicinity of the barracks, activate camouflage and go to the back of the structure [#110]. Use your attacks on the barracks, including scout's satchel bombs (F key). Stop what you're doing from time to time, because single enemy units may arrive here to kill you. Thankfully there won't be too many of them. Destroy the barracks and retreat to the starting area using the same path as before. Don't forget to have camouflage turned on, so you won't have to fight any creatures along the way.
![[#110] - Campaign - Forces of evil - Mission 5 - Weathertop - part 1 - Campaign - Forces of evil - The Lord of the Rings: Conquest - Game Guide and Walkthrough](/thelordoftheringsconquest/gfx/word/55228781.jpg)
[#110]
You only have one more objective left and that's destroying the second catapult (8 on the map), located on top of a small hill. Once again I wouldn't recommend choosing the frontal approach, because you would only get far enough with a troll. The easier way to destroy the catapult will be to use an archer. Make a stop to the east of the target and start using fire arrows to set it on fire [#111]. Make sure not to stay in one spot, because you may be caught by an eagle. There are also going to be single enemy units in the area, however eliminating them should be very easy.
![[#111] - Campaign - Forces of evil - Mission 5 - Weathertop - part 1 - Campaign - Forces of evil - The Lord of the Rings: Conquest - Game Guide and Walkthrough](/thelordoftheringsconquest/gfx/word/55228796.jpg)
[#111]