Campaign - Forces of evil - Mission 1 - Mount Doom - part 1 | Campaign - Forces of evil LotR: Conquest Guide
Last update: 11 May 2016
MAP OF THE AREA:
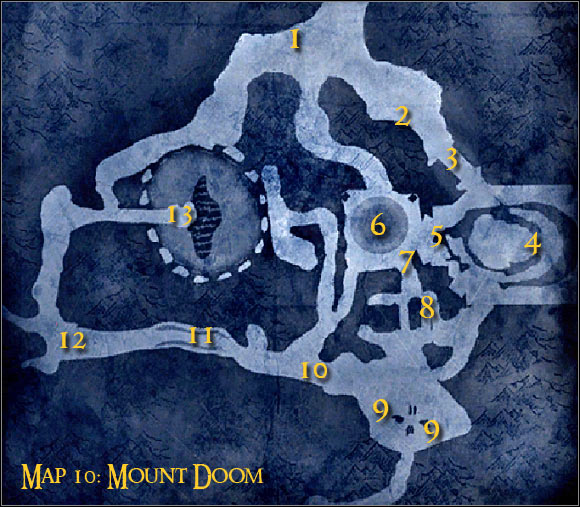
Map legend: 1 - starting area and first checkpoint; 2 - first lever; 3 - passageway leading to the location of the mask; 4 - mask and a new checkpoint; 5 - second lever; 6 - forge and a new checkpoint; 7 - third lever; 8 - passageway leading to the location of enemy captains; 9 - enemy captains; 10 - Sauron's path; 11 - fourth lever; 12 - checkpoint; 13 - area where you'll have to defeat Frodo
Additional info: The first mission of the campaign of the forces of evil is much more challenging than you might have anticipated and this trend will also continue with some of the upcoming levels. The most difficult moment is the battle in the forge. If you win it, you should be able to deal with all of the remaining objectives.
First assignment: Get the mask
Suggested class: Nazgul
Ignore the fact that you won't be allowed to choose a class on your own during the course of this mission, because all will soon return to normal. You start the game in the northern section (1 on the map). Spend some practicing how to steer the Nazgul and how to attack hostile creatures. My recommendation is the attack called "The power of Nine" which can be activated using SHIFT and the right mouse button. There's also a cool Black Breath move, but you must ensure that a lot of monsters are standing in front of you in order to get proper results. You'll meet a few hostile orcs along the way. Kill them only for practice, however it's also possible to avoid them entirely. Keep heading towards the only available passageway (2 on the map). Find the lever [#74] and press the action key to pull it. Now you must travel south-east (3 on the map).
![[#74] - Campaign - Forces of evil - Mission 1 - Mount Doom - part 1 - Campaign - Forces of evil - The Lord of the Rings: Conquest - Game Guide and Walkthrough](/thelordoftheringsconquest/gfx/word/54921875.jpg)
[#74]
Keep heading towards the location of the mask (4 on the map). You won't have to worry about encountering any enemies, because orcs will be stationed only in the vicinity of the object of your desire [#75]. Get closer to the archers as soon as possible and kill them using close combat moves. You could also throw a blade at one of the large bombs and the explosion should be more than enough to kill a few monsters. As for other enemies, you may ignore them and focus only on completing your current objective which is collecting the mask.
![[#75] - Campaign - Forces of evil - Mission 1 - Mount Doom - part 1 - Campaign - Forces of evil - The Lord of the Rings: Conquest - Game Guide and Walkthrough](/thelordoftheringsconquest/gfx/word/54921890.jpg)
[#75]
Second assignment: Deliver the mask
Suggested class: Nazgul
This objective will be added to your list of current assignment after you've collected the mask, but it may be cancelled if Nazgul dies in the meantime. If this happens, you must recollect the mask with a new Nazgul. Like I've already said, you can ignore the orcs along the way, especially since your character doesn't have any healing capabilities and you won't regain too much health from collecting balls of energy. Keep heading east until you've reached a new lever (5 on the map). Press the action key [#76] and enter the forge (6 on the map). Go to the designated area and await further instructions.
![[#76] - Campaign - Forces of evil - Mission 1 - Mount Doom - part 1 - Campaign - Forces of evil - The Lord of the Rings: Conquest - Game Guide and Walkthrough](/thelordoftheringsconquest/gfx/word/54921906.jpg)
[#76]
Third assignment: Kill 20 orcs in the forge
Suggested class: Nazgul
I've already mentioned it's going to be the most challenging objective of the mission. The main reason is because the Nazgul is a difficult character to master. Most of the attacks are weak and some of them have a slim chance of succeeding. In addition to that you only have two minutes to kill 20 beasts, so theoretically you should kill at least 10 monsters after 60 seconds of combat. Focus on attacking the weakest orcs, because mages and skilled warriors have longer health bars and they're more likely to fight back. You'll also have to avoid sustaining major injuries, because the death of your Nazgul would cost you about 20 seconds to get back to the forge. Use the Power of Nine attack whenever possible and focus on attacking larger groups of creatures [#77]. Thankfully there are other Nazguls in the forge, so you won't have to worry about all the orcs focusing their rage only on your character.
![[#77] - Campaign - Forces of evil - Mission 1 - Mount Doom - part 1 - Campaign - Forces of evil - The Lord of the Rings: Conquest - Game Guide and Walkthrough](/thelordoftheringsconquest/gfx/word/54921921.jpg)
[#77]