Campaign - Forces of good - Mission 2 - Isengard - part 1 | Campaign - Forces of good LotR: Conquest Guide
Last update: 11 May 2016
MAP OF THE AREA:
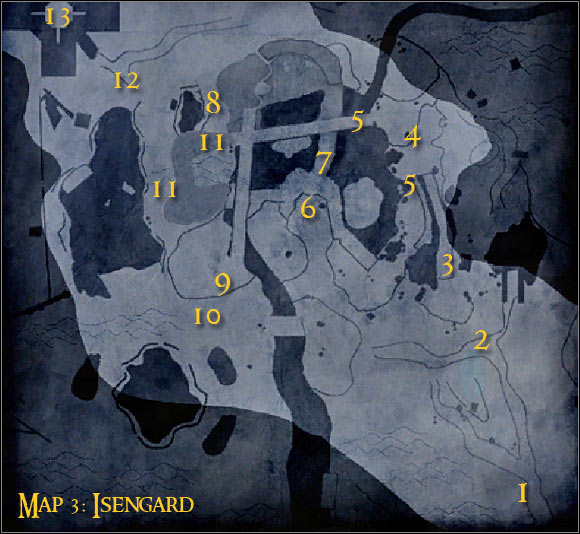
Map legend: 1 - starting area and checkpoint; 2 - checkpoint - area that needs to be secured; 3 - passageway further into the map; 4 - uruk-hai captain and a new checkpoint; 5 - passageways leading to the war machine; 6 - war machine; 7 - passageway leading to ent's campsite; 8 - checkpoint; 9 - Treebeard; 10 - other ents and a checkpoint; 11 - military towers; 12 - gates of Orthanc - area that needs to be secured; 13 - Saruman's tower
Additional info: The second mission is far more challenging than the first one, mostly because a lot will rely on choosing the correct class, depending on the situation on the battlefield. The toughest part is the destruction of the war machine where you'll have to deal with a huge advantage of hostile troops.
First assignment: Capture the checkpoint
Suggested class: mage
In most cases the game will present you with the best character for the first assignment and this isn't an exception. Mage will be an ideal choice for this particular task and you shouldn't change classes, even if you don't like playing as these characters. You start the game near the southern edge (1 on the map) and obviously this means you'll have to begin moving north. Keep heading towards the checkpoint (2 on the map). You'll probably notice some orcs to your left, but you may as well ignore them, because they'll be handled by your allies. Instead focus on eliminating beasts from the vicinity of the checkpoint [#23].
![[#23] - Campaign - Forces of good - Mission 2 - Isengard - part 1 - Campaign - Forces of good - The Lord of the Rings: Conquest - Game Guide and Walkthrough](/thelordoftheringsconquest/gfx/word/3576343.jpg)
[#23]
Prevent the orcs from getting too close to your character. Mage is capable of defending himself, however hostile units may kill him within a manner of seconds if you're not careful enough. As a result it's best to play it safe. You'll soon hear a warning that enemy archers have arrived in the area. Get closer to your troops and hold the CTRL key to include them within the range of your force field, protecting them against arrows [#24]. You'll now have to deal with the remaining enemy troops. When they're gone enter a large circled area and begin taking over this zone. Once this is done get to the flag and switch to a scout.
![[#24] - Campaign - Forces of good - Mission 2 - Isengard - part 1 - Campaign - Forces of good - The Lord of the Rings: Conquest - Game Guide and Walkthrough](/thelordoftheringsconquest/gfx/word/3576359.jpg)
[#24]
Second assignment: Kill uruk-hai captain
Suggested class: scout
There's a very narrow passageway (3 on the map) leading to the location of the uruk-hai captain, so you'll have to be extremely careful from now on. If you fall, you'll not only lose time, but also one "life". Activate scout's camouflage when you're close enough to enemy troops and you'll be allowed to move past them quite easily. As for the enemy captain, he will be standing near a new checkpoint (4 on the map), but he'll probably move south when he sees your allies heading his way. Surprise him from the back and a single attack will be more than enough to kill him [#25]. You should also use this method to dispose of enemy mages, especially since they'll be making things very hard for your colleagues.
![[#25] - Campaign - Forces of good - Mission 2 - Isengard - part 1 - Campaign - Forces of good - The Lord of the Rings: Conquest - Game Guide and Walkthrough](/thelordoftheringsconquest/gfx/word/3576375.jpg)
[#25]
Third assignment: Destroy the war machine
Suggested class: archer, mage or scout
I would recommend that you change classes and that you do this near the area where the captain was standing (4 on the map). If this checkpoint is still under orc's control, try securing pathway leading to it. As for the war machine (6 on the map), you won't be able to destroy it from the upper ledge and a result you'll have to get much closer. There are two distinctive routes leading to that location (5 on the map), but I would recommend that you choose a draw bridge. You now have two options - you can pick an archer or a mage right away and keep attacking the machine [#26] or you can use scout in the first place and clear the area ahead, mostly of enemy mages. Sadly even if you kill a lot of orcs that way, new monsters will eventually appear on the map. There's also a ballista near the war machine, but I'm afraid they'll be too many monsters in the area for you to use it. Either way, you should rely mostly on special attacks made by archers or mages and eventually you'll destroy your primary target.
![[#26] - Campaign - Forces of good - Mission 2 - Isengard - part 1 - Campaign - Forces of good - The Lord of the Rings: Conquest - Game Guide and Walkthrough](/thelordoftheringsconquest/gfx/word/3576390.jpg)
[#26]