Lost Legacy | Side missions - Skaal Village TES V: Skyrim - Dragonborn Guide
Last update: 11 May 2016
Travel to Vahlok's Tomb
Notice! You can begin this mission only after completing A New Source of Stalhrim!
As you end the plot of Baldor Iron-Shaper in Skaal Village, you will be approached by an odd old man - Tharstan. He will describe himself as a historian who has discovered an ancient tomb underneath the island. He's too weak and faint to go there on his own, but if accompanied by a true adventurer... After all, such caves are full of treasures and... hordes of undead.
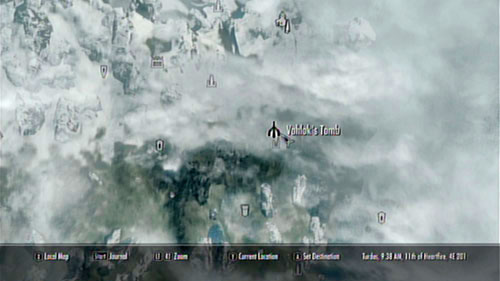
The ancient ruins - Vahlok's Tomb - can be found in the eastern part of the island, north-east of Ashfallow Citadel. Spotting it isn't easy - it can be found in a small ditch in the middle of the plain (screen above). Head inside and speak with the quest giver.
Talk to Tharstan

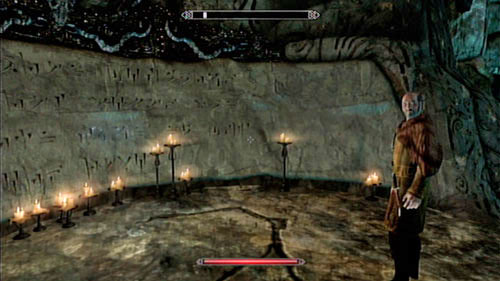
After heading into the cave, you will be approached by Tharstan who will tell you of his discovery. Apparently, the tomb is much bigger that he imagined. But heroes like you are made to face such challenges, aren't they? Head into the main chamber and take a look around - another adventure awaits you, apparently.
Explore Vahlok's Tomb

There is a puzzle to be solved in the main chamber. At the top of the stairs you will see a lonely statue with a switch at its base. Press it to make the altar in the middle to open and flames to start blazing out of it. As you might have figured it out already, you need to bring one of the nearby Draugrs to the very middle of the fire trap and press the button to therefore make a sacrifice. By doing so you will open the gate on the left and will be able to access the further part of the dungeon.

(Don't know how to bring a monster to the altar? On Xbox you need to press and hold the A button, while on the keyboard the E button)

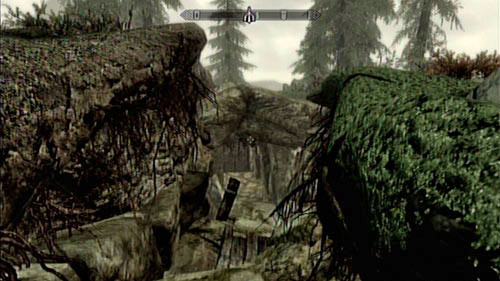
Head into the corridor on the left and go down. Go through the door into the room with four sleeping Draugrs. You could ignore them on your own (by, for example, sneaking by silently), but Tharstan isn't the subtle type and will surely wake them up. Send the monsters back to Sovngard and kill one more in the vestibule beside. Afterwards pull the chain and had through the iron gate.

The next room brings yet another puzzle. In the middle of the room you should see a strange pillar and three pedestals around it. Note that each side of the pillar has a different weapon carved into it - a sword, bow and a mage staff (you will also find the proper weapons below the pillar itself). The solution of this puzzle is rather easy - just use the proper equipment on the right pedestal: sword on one of them, bow on the second and a fire spell on the third. That way you will unlock a passage to the further part of the tomb (screen below).

Head into the next room to make four Draugrs come out of their coffins - including one Deathlord. You shouldn't hope for any help from the scared historian - he will just run away, leaving you alone to face the danger. Defeat the enemies and take half of the amethyst claw from the body of the strongest one. Afterwards search the chests behind the large coffin and read the Word of Power of the Battle Fury Shout from the wall in front of you.

Note that the coffin on the left has a hidden passage in it. Head inside and cross the tunnel to return to the main chamber. Make another sacrifice and take a look into the corridor on the right - you haven't been there yet. Search the treasure chest (on the right) and head into the room with another puzzle.

You need to go across the pressure plates in a given order marked above. Start with the plate on the left and then go round the whole construction, ending with the plate in the middle. That way you will open the gate and come across five Draugrs - including one Deathlord (from whom you should take the second half of the amethyst claw).

Learn the second Word of Power of Battle Fury and familiarize with the treasure found right below the large plate. Afterwards enter the coffin on the left side of the room and - just like before - return to the main chamber.
Find the main burial chamber

After returning to the main chamber, approach the cage in the middle. On both sides of it you should find panels which can be fitted with the amethyst claws. Use them and enter the opened cage. Inside, use the switch found on the pedestal and quickly cross the magical path that will appear before you (look out, as it's a sort of a labyrinth and note a straight road!).

When you reach the other side, a bridge back will be created - using it, Tharstan can join you. Move onwards and use the switch to activate another passage (look out not to fall - there's a whole bunch of monster below!). In the further part of the tomb you will come across two more bridges, with each one being a bit more difficult than the previous (given "blocks" disappear faster).

After crossing all the magical bridges, you will reach a room with a puzzle-door. You have to turn the rings so that the door displays, in order: an eagle, a wolf and a dragon (screen above). After arranging the symbols properly, put both pieces of the amethyst claw into the hole in the middle and open the gate. Inside you will have to face Vahlok.
Defeat Vahlok

Be careful as you step inside the tomb chamber - the floor is covered with pressure plates which activate flamethrowers - you will burn immediately if you're not careful enough. The thing is that if you approach the middle of the room, Vahlok - the lord of the tomb - will jump out of the coffin. The Dragon Priest uses fire spells, so he will probably cover himself with a barrier and summon a Flame Atronach at the very beginning of the fight.

The enemy has surprisingly little health points - at least for a Dragon Priest. If you're a good assassin (with high Sneaking), you can kill the enemy with a few arrows - he will most likely focus on Tharstan, so you can surely fire a few deadly shots (the historian is immortal - don't worry about him). If you prefer other methods of persuasion, you can always use them - just remember to avoid fire-based spells as he's almost completely resistant to them.
Talk to Tharstan
When you defeat Vahlok, approach the wall with the last Wall of Power for Battle Fury. Take a look into the chest beside the wall and afterwards speak with your quest giver. He will give you 1000 gold - which, unfortunately, is the only prize you will receive for this mission.
Note that Vahlok doesn't leave any dragon mask behind - apparently he wasn't as important as one could think.