Mission 2 - Egression | Zerg | Campaign Walkthrough StarCraft: Remastered Guide
Last update: 22 August 2017
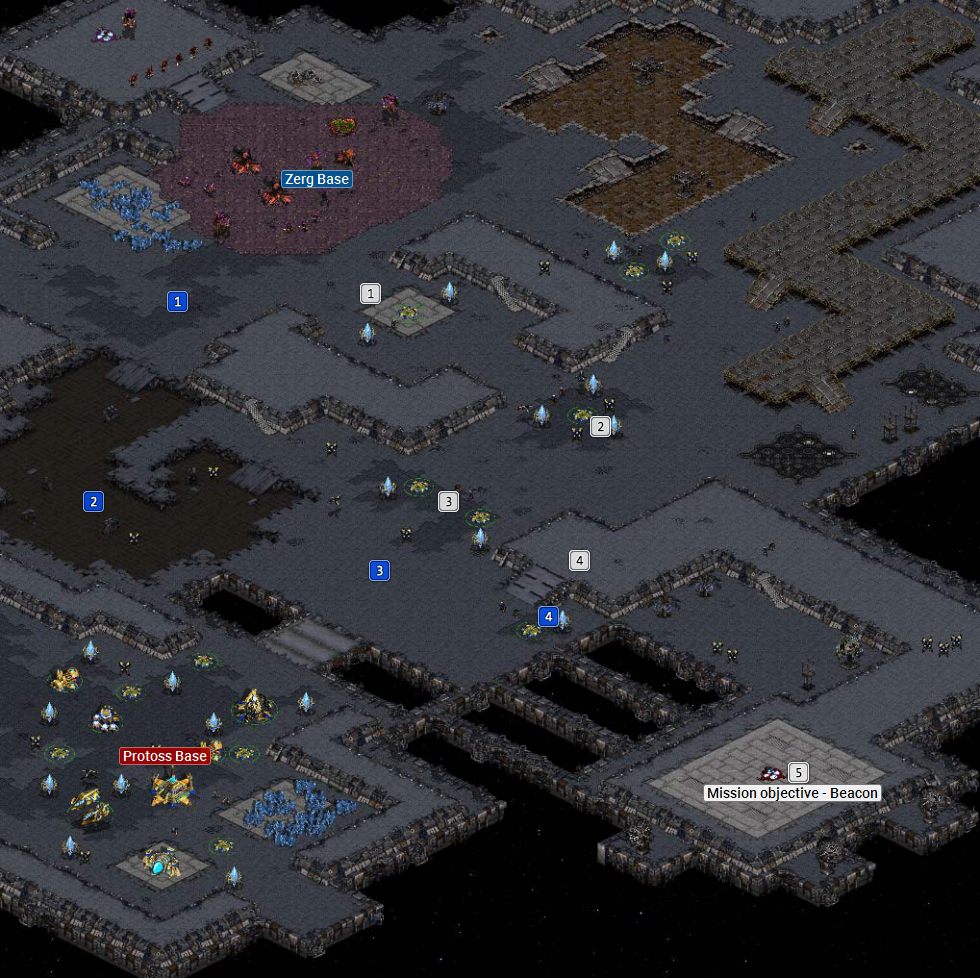
Protoss fortifications #1 � This place is defended by one turret and two Pylons and several Zelotes. First focus on infantry and then destroy the Photon Cannon.
Protoss fortifications #2 � Another Protoss barricade has more soldiers. Watch out for the Scout fighter, have strong anti-aircraft missiles. Focus first on infantry, and then on the turret.
Protoss fortifications #3 � Another big Protoss fortification. It has the same strength as the previous location, but it is much closer to the Protoss base. You have to watch out for counterattacks, especially when transporting a Chrysalis cocoon.
Protoss fortifications #4 � Last line of Protoss defense before the marker. After destroying the turret, place some troops just above the ramp, preferably the Hydraliskis. The rest should clear the way for Drone with the cocoon.
The marker � Your worker, Drone, must come along with Chrysalis from your base and get here. When they come next near the marker, the mission will end with a victory.
Swift attack: starting point � Gather all the soldiers from your base in one place and make a team of them. Follow them with Drone and Chrysalis.
Swift attack: lower levels � The south path has only a few defenders and no turrets. Do not waste your time chasing enemies. Destroy only those enemies who stand in your way.
Swift attack: between the bridge and turrets � Do not go too far from the turrets, because you will be exposed to unnecessary fire. In turn, marching too close to the bridge can lure enemies from the Protoss base. Head to the ramp.
Swift attack: ramp to the marker � You have to destroy the turret and the defenders of this place so that your Drone with Chrysalis does not die on the way. Then send your troops ahead with Drone just behind them. You will meet some Protoss before reaching the designated place.
Mission objectives:
- Bring the chrysalis to the beacon.
Time to leave Tarsonis. However, before you jump to the next system, you have to get rid of the protoss. They block the way for the chrysalis and your swarm. You have to break through their line.
There are two ways to beat this mission: a classic and a fast one. However, in case of a failure, it is best to just start over. The classic way means slow advance to the enemy position. Start expanding your base by increasing the number of workers and Overlords. Your base has a lot of resources. Build an Extractor in the north and start extracting gas. The enemy will be attacking you mostly with small groups of Zealots and Dragoons from the south and from the middle path. Place extra Turrets and keep your troops in these places. In this mission, you gain access to a new flyer, Mutalisk. However, create only land forces because the enemy has a large number of antiaircraft units. The enemy also possesses several minibases on the way to the beacon as well as infantry scattered all over the map. In the bottom left corner of the map, there is a big protoss base, but you don't have to destroy it. Build Turrets around the base and improve them to the version that attacks land units, which is the Sunken Colony.

Start creating assault forces. It's best to attack with two teams of Zerglings and Hydralisks (including the elite Hunter Killers). March to the middle enemy position (1,2). Every line has 1-2 Turrets, 2-3 Pylons, and several soldiers. Start from the Turrets and ranged units to protect Hydralisks. Destroy Pylons the last. While attacking the second defense line, the protoss forces will start attacking your army and your base (3). All you have to do is survive and then go on. Head to the bottom right corner of the map until you reach a ramp (4). Now, send a worker for the cocoon and bring it to the hill. At the same time, send some of your troops to the beacon to make sure the area is safe. All you have to do is to defend yourself and escort the worker to the marked place (5).

The mission can be completed in less than 3 minutes, without expanding your base! Send a worker for the chrysalis and group the rest of your soldiers into one squad - Mutalisks, Hydralisks, and Elite Hydralisks (1). Go the southern way that leads to the lower level and attack the enemies encountered on your way (2). Eliminate Dragoons first, then kill Zealots. Go past the minibase that consists of two Turrets and Barracks, but don't get close to the bridge (3). Approach the ramp. You have to destroy only one Turret, which is protected by several defenders (4). Eliminate the hostiles on the hill and go to the beacon, escorting the worker with the chrysalis cocoon. In the meantime, the enemy will attack your base but it is meaningless at this point.

