
Walkthrough - Jupiter Quests - Part 1 STALKER: CoP Guide
Last update: 11 May 2016
0. Duty Warehouse
Beginning location: points 34, or 35 on the map
Target location: point 42 on the map
Mission description:
In order to receive this mission, you have to give away the PDA found in mission 11 (Transaction) of the Zaton sector to one of the fraction leaders in the Jupiter Stalker base (point 35 - Freedom, 34 - Duty). The decision is quite important, as it defines the relationship you will have with both sides (a 1:1 situation where everybody likes us is impossible). You can stay neutral, but, among others, you won't finish mission 21 (Monolith Survivors). No matter which side you have chosen, to will have to head to the warehouse (point 42) and kill the members of the opposite fraction (attackers - if you're with Freedom, or the defenders - Duty). Once the shooting ends, you should put your hands on the supplies hidden in the bunker (screen). If you're friends with Freedom, it will be the other way around - first the supplies, then shooting.
1. Debts
Received from: Vano
Beginning location: point 1 on the map
Target location: point 2 on the map
Mission description:
Vano will give you 5 000 and ask to pay his debt to the bandits. You have to get to the man marked on the minimap. Pass the guard telling that you're here about the debt. Jack (screen) will increase the sum to 7 000. You have three options - slaughter, bargain about the debt (you can get to 5 000 if you have a good weapon with you) or add the 2 000 from your money. I'd say you should choose the peaceful method. If you solve this (and the next) mission diplomatically, you will unlock an achievement thanks to which you will gain respect with the Stalkers. Of course no one said that after unlocking the achievement, you can't come back here and shoot a little... especially that Jack has a rare and good rifle with him.

2. Hostage
Received from: Grizzly
Beginning location: point 3 on the map
Target location: point 5, alternatively also 4 on the map
Mission description:
When accepting this mission, you will have to choose a way in which you will complete it. You have two options - diplomacy (preferred, because you will get an achievement - see mission 1) or strength (you can get some help [prize in money] which will be waiting for you at point 4 from 1 a.m. or without [a precious artifact - goldfish]). If you want to do it by force, fight your way to point 5 and quickly take out the gangster hoarding the Stalker (he will start shooting after a short while).

The diplomatic solution will be quite expensive. Take the artifact from Grizzly and head to the bandit camp. At the entrance, tell that you want to speak with the boss. Once in the hangar (screen), talk with the person standing in the middle.

You can now choose between giving money (15 000), or one of the upper shelf artifacts - goldfish or snowflake. If you want to return here and kill them after completing the mission and earning the achievement, give them the artifact (you will later get it back from the corpse). Before you can safely leave, one of them will cross you path and you'll have to pay once again. The amount is random, usually a couple thousands. Afterwards, return to the Stalker base together with the saved friend and collect your prize.
3. Bring Nitro tools
Received from: Nitro
Beginning location: point 6 on the map
Target location: points 7, 8 on the Jupiter map
Mission description:
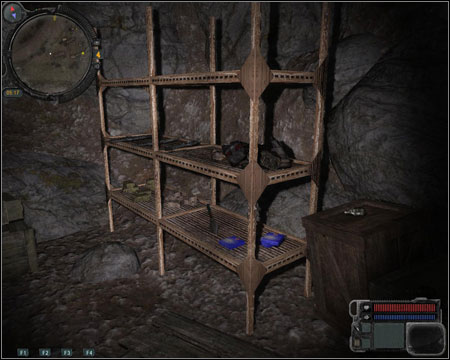
This time you have to search for tools for Nitro. Let's begin with the basic tools. Go to point 7, where you will find a train with an electric anomaly inside. Get on the roof by jumping from the nearby bridge. Find an open lid at the end of the last cart and go inside. Hide from the anomaly and head to the first cart. You will find the tools on the left side (screen). Behind the tools, on the left, there's the exit.

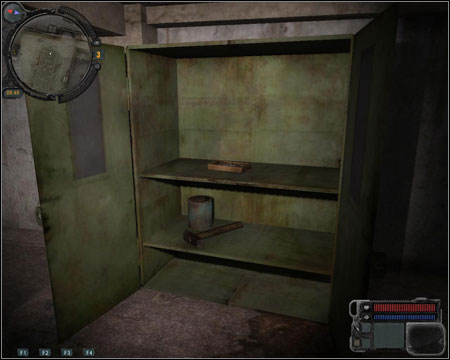
You will find the fine tools in the building at point 8. However before you will be able to get to them, you will have to fight your way through a group of dangerous dogs and bandits (red point on the map). At the top of the marked building there's an electric anomaly (and an artifact) waiting for you. Save often and reach the green cabinet inside of which you will find the tools (screen).
Phase 2 - calibration tools
Target location: point 10 on the Pripyat map;
These tools can be found only after reaching the Pripyat sector. Go have to go to the building in the northern part of the sector (point 10). Inside there's a difficult to avoid electric anomaly with an artifact (or two) inside. You can take the round path (through two doors and a hole in the wall) but then it will be hard to get the artifact. However if you do manage to get through the anomaly, you should jump through a "window" (screen) in the south-west part of the building.

You will get to some stairs leading to the upper floor. Once there, go left and try to reach the centre of the building. There will be a mutant pretending to be a Byurer. If you stay silent, you should be able to take him down with one headshot from the Gauss (see - mission 1 of the Pripyat sector). In the small room in the very middle of the building, you will find the tools (green point on the map - screen).

4. Radio Equipment
Received from: Nitro
Beginning location: point 6 on the map
Target location: point 9 on the map
Mission description:
In search for the radio components, you will have to go to the factory at point 9. Use the ladders at the back of the building (screen), get to the roof and inside through the open hatch. You have to look around the rooms. On one of the desks (1st floor counting from above) you will find a wire spool. Behind the hole in the floor leading to the lower floor there's a shelf with another part on it. The 2nd floor contains an artefact and two "green plates" (on the desk and a metal shelf) and a container with rosin.

3rd floor - another spool (table) and some electronic parts on the table by the opposite wall (screen). 4th - green plates on the table and radin in the small room on the right (behind the "hair" hanging floor the ceiling). Having completed all the radio components (there will be a mission update telling you that), return to Nitro.

5. Kopachy
Received from: Uncle Yar
Beginning location: point 10 on the map
Target location: point 11 on the map
Mission description:
It's worth taking a sniper rifle for this mission (See - orange points on the maps). Head out to the zombie-filled village together with Uncle (screen). Eliminate the zombies and head inside the building. Out friend is waiting on the upper floor.

After a short cutscene, you will be attacked by a group of mercenaries (screen). The sniper rifle will come in handy now; of course aim at the heads. Eventually collect the loot and talk with Yar.
6. Retribution
Received from: Splinter
Beginning location: point 12 on the map
Target location: point 1 on the map
Mission description:
This mission boils down to finishing mission 17 (In search of Magpie) from the Zaton sector. After learning Flint's identity, you have three possibilities - improve your relations with Duty (point 34) or Freedom (point 35) by telling the proper leader about Flint. You can also ignore them and only tell Gont from Zaton. You will receive an achievement for completing this mission.

7. Hunting the Swamp Bloodsuckers
Received from: Trapper
Beginning location: point 13 on the map
Target location: point 14 on the map
Mission description:
Trapper, asked for a job, will tell you about bloodsucking monsters roaming the marshes. There are three dangerous enemies waiting for you there. I'd suggest you constantly move during the fight and use the rifle. It's worth to walk backwards and shoot just before the attack. Don't forget about collecting your prize.
