North Samarach (Chult) - Main quests | North Samarach (Chult) NWN2: SoZ Guide
Last update: 11 May 2016
Quest 15: Following Sa'Sani
Received: after completing quest 14: Murder at Crossroads Keep
After getting through the portal you will find yourself back at the Lantanese Lumber Camp. Talk to Dall about Sa'Sani, and he wil tell you that her tracks lead north-east. Go to the Viper Temple. Inside, you will meet Sa'Sani. During the conversation about two fighting Yuan-Ti factions s you will be attacked by some Yuan-Ti. Deal with them and talk to Sa'Sani. After the conversation is over, Volo will appear. From now on you can meet him both here and at the Crossroads Keep. He has some items for sale.
Quest 16: The Fall of House Se'Sehen
Received from: Sa'Sani, after completing quest Following Sa'Sani
You need to stop the Yuan-Ti of the house Se'Sehen. In order to do that you need to go to the Temple of the World Serpent and defeat the Yuan-Ti leaders. Before entering the temple rest to regain life and spells.
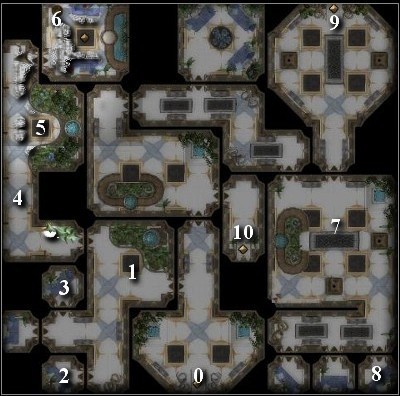
Temple of the World Serpent
Level 1

0. World map
1. Madeem
2. Merchant
3. Serpent king Hal'Seh
4. Door to the armory
5. Entrance to Level 2
6. Scrying Sphere
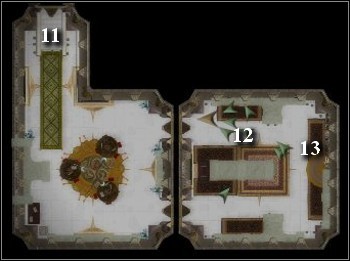
Armory

7. Back to Level 1
8. Chest - Longsword +3
9. Chest - Arrows +3, Composite bow (mighty +3)
10 Chest - Cloak (saving throws +3), magic amulet (armor bonus +3)
11 Chest - Chain shirt +3, boots (reflex saving throws +3)
12 Chest - Plate armor +3, heavy shield +3
Right after you enter the temple you need to choose a path to follow - you can either start slaughtering everyone that comes within eyesight or follow a more subtle path. You will be approached by Madeem who will mistake you for a guest they've been awaiting allowing you to get to the final area without fighting. If you manage to reach Level 4 without engaging your enemies you will receive a Master Infiltrator feat (Hide +2, Move Silently +2) you need to avoid the high-up Yuan-Ti, as such meetings will raise an alarm. Also be sure to avoid the traps scattered all throughout the temple. Triggering them may also alert the enemies. Stay away from Hal'Seh. You might want to buy some stuff from the merchant, who's selling some powerful Healing potions. Before leaving approach the scrying sphere, which will allow you to see some interesting moments and places. Now enter the armory, loot it and proceed to Level two.
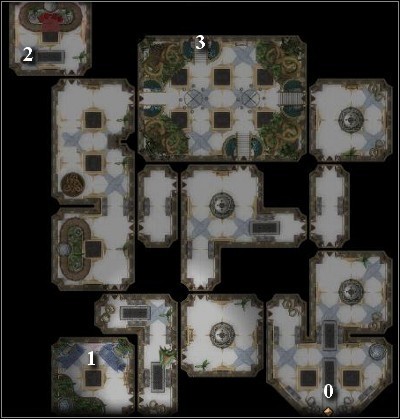
Level 2
0. Back to Level 1
1. Nessa
2. Chest - 2000 $, coin of life, Magic Ring (armor bonus +3)
3. Chest - Kukri +3, Healer's Kit +10
4. Trapped corridor
5. Golem
6. Chest - Calendar Se'Sehen
7. Serpent Lord Ar'Sulis
8. Chest - Wand (casts czar Cure Critical Wounds), magic amulet (will saving throws +3), Magic Ring (cold resistance 20)
9. Entrance to Level 3
10. Entrance to the library
Library
11. Back to Level 2
12. Archivist
13. Bookcase - Powerful magic scrolls
On the second level you should start off by talking to Nessa. If you manage to convince her, she will tell you that there is a Calendar hidden in one of the rooms here and that it should help you reaching the next level. It's not necessary, but you may want to use your rogue skills and send your character to retrieve it. On your way you should be wary not to get noticed by a golem. The corridor is filled with traps which are worth disarming for the experience they provide. Once you get through the corridor approach the chest and take the Calendar. You can now enter the library to pick up some powerful spell scrolls. There is an Archivist, who will recognize you here, but you can convince him that he's wrong unless you want to start a fight. You can also talk to Ar'Sulis and loot some chests. Now head to the door leading to Level three. In order to get through them you need to answer some questions (the answers can be found in the Calendar). Below, you'll see the list of questions and answers:
Winter Solistice - Greengrass
Melting - Midsummer
Highsun - Highharvestide
Leaffall - Midwinter
Marpenoth - Mirtul
Alturiak - Hammer
Elasias - Tarsakh
Kythorn - Ches.
Level 3
0. Back to Level 2
1. Chest - 10000 $, Bastard Sword +3, Tower Shield +3, Wand (casts Restoration)
2. Switch
3. Entrance to Level 4
On this level each and every Yuan-Ti is your enemy. If you want to sneak to the next level, none of them should notice you. Yuan-Ti can be found mostly in the western part of the area. There's only one patrolling the eastern part. You can sneak past him and get to the next level. You need to pay attention to traps scattered throughout the area and disable them whenever possible. The door to level four are open until you get noticed. If a Yuan-Ti notices you the door will close and you will need to use the switch in one of the western rooms. You might want to consider visiting the room with the chest, as there are some valuable items there. If you don't want to get noticed you can visit the room with your rogue in stealth mode only.
Level 4
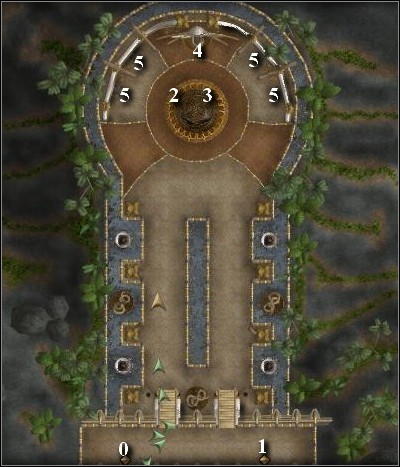
0. Back to Level 3
1. World map - Available only after the fight
2. Zehir's Herold
3. Hierophant N'Safa
4. Zehir
5. Fanatics
You finally reached the final battle (or the second to final, if you decide to deal with Sa'Sani). Be sure that you are prepared for it. Spread the healing potions and coins of life throughout your party and buff your characters. You will listen to a conversation between Zehir and his servants, and the fight will begin. Start by killing the fanatics bombarding you with magic missiles and only after you're done with them you should switch to Herold and the Hierophant. Those two are really tough but killable if you'll keep an eye out on dying characters and use resurrection magic whenever necessary. Summoning spells will be a great help here. After the fight is over you will talk to Zehir himself. You won't be able to face him. You can now leave the area. You have three options now: you can finish the game at this point, continue exploring or return to Sa'Sani. If you decide to return to Sa'Sani you will be given the option of either fighting her, getting her to pay you for her life (50000 $) or making her promise that she won't hurt anyone again. If you decide to kill her, you will find: bracers (armor bonus +8), Magic Ring (armor bonus +3), magic amulet (Wisdom +6), Magic Ring (Freedom of Movement).