
Life is Strange: Dark Room, Chapter 4 Life is Strange Guide
This page of the Life is Strange guide is dedicated to Chapter 4 of Episode 4 (Dark Room). We’ve described actions that have to performed in the barn and at the party. There are 5 achievements to obtain during this chapter: Fisheye, Manually Exposed, Slideshow, Tripod, Shutterbug and Dark Room.
Last update: 25 January 2022

You and Chloe will go to the mysterious place found in the clues. Before you start looking for the alternative entrance to the shed, go left and take another photo to your album. If the bird shown on the picture will fly away before you take the photo, go back in time.

After taking the photo, turn around and walk towards the side wall of the shed. Here you will find a metal cover, use the Move command on it. Once you get inside, look around for something suspicious.

You will walk on the hay while exploring the shed. However, in some places you will hear a metal cover under your feet. Walk towards the wall shown on the picture and uncover the entrance to the basement. Once you uncover the entrance, you will see a padlock.
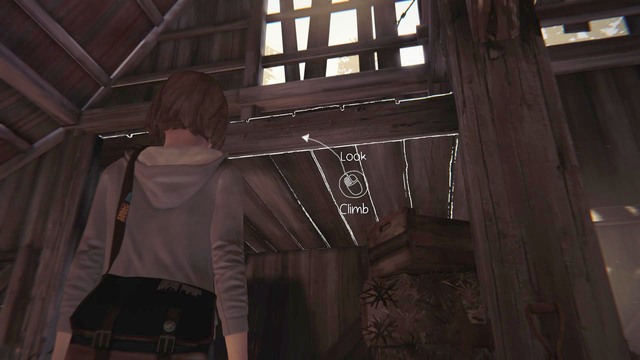
After an unsuccessful attempt at opening the padlock, walk towards the higher ledge shown on the picture and climb on it. Above, use the old engine to reach the first floor. Once you're there, you will find an owl, you can take a picture of it to your collection.

During the exploration, Max will decide to use the lever, rope and the old engine in order to open the hatch in the ground. Walk down and towards the hook shown on the picture. Attach it to the padlock and go back to the top. The old engine that allowed you to walk up will be perfect for lifting the hook on the hatch. Go back to the time when the engine was standing above, attach the rope and pull it down.

After getting to the basement you will see a technologically advanced bunker. You will have to guess the numerical password that protects the access inside. Max will inform you that some of the numbers are erased and that the password must be guessed by the method of attempts and failures. If you were observant, you should remember that the number was in Nathan's school documents (marked in red). The number is 542. After entering three wrong numbers the mechanism will block and you will have to go back in time.

After entering the bunker you will see a prepared photo shooting plan. You will find some clues that Kate and Rachel, under some strong narcotics, were forced to pose. Some information, including the photos, will be found in the computer. To find the rest you must walk towards the drawer next to Chloe and take the photo album set.

After escaping from the bunker, you and Chloe will go to the party in Vortex Club. After walking through the gates, walk towards the trampoline and look right. You will be able to take the last photo to your collection.

Go left, on the road to VIP section you will find Alyssa shown on the picture. Once again, you can warn her about the incoming danger. Once you reach the destination, talk with the girl about getting to the closed part of the party. After she refuse, you will have to find other way to get to the VIPs.

To get there through other way, walk to the other side of the pool and pull the blockade shown on the picture above. After getting to the other side, reverse the time so that everything will go back to normal.

Walk towards Victoria in the VIP section and talk with her about Nathan. During the conversation you can warn her about the bunker and that she will probably be the next victim or ignore it completely. Depending on the decisions made in previous episodes (the ones about being mean to Victoria), she can believe you and thank for the warning or ignore it. No matter the choice, go back to Chloe, leave the party together and go to the burial site of Rachel Amber.
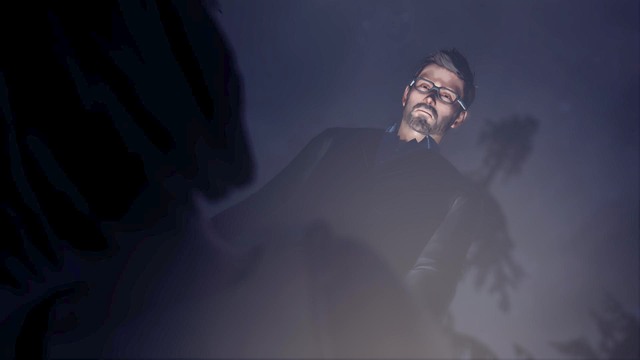
Once you reach the destination, follow Chloe. While exploring, you will be assaulted by the enemy who will inject you with a drug and will kill Chloe. You will learn that your enemy isn't Nathan but Mr. Jefferson.