Guides & Walkthroughs New Guides Popular RPG Action Strategy Adventure YouTube Guides Mobile App
Free iOS App iPhone & Ipad
Download Game Guide PDF, ePUB & iBooks

Life is Strange Game Guide & Walkthrough by gamepressure.com

Life is Strange Game Guide & Walkthrough

Table of Contents

Life is Strange: Chrysalis - photos Life is Strange Guide

On this page of the Life is Strange guide you can find the locations of all photographs which you can take during Episode 1 (Chrysalis). Taking all photos is rewarded with an achievement (Visionary).

Last update: 25 January 2022

Photo #1

You can find the first one at the beginning of the game, in the classroom - Life is Strange: Chrysalis - photos - Choices and decisions - Life is Strange Game Guide & Walkthrough

You can find the first one at the beginning of the game, in the classroom. It is enough to take a look at your desk to see a writing and the possibility of taking a photo.

Photo #2

While being outside get close to the statue and take a photo of it - Life is Strange: Chrysalis - photos - Choices and decisions - Life is Strange Game Guide & Walkthrough

While being outside get close to the statue and take a photo of it.

Photo #3

You can take the third picture while Justins friend is showing you a trick - Life is Strange: Chrysalis - photos - Choices and decisions - Life is Strange Game Guide & Walkthrough

You can take the third picture while Justin's friend is showing you a trick. Before he does that, though, you have to go through a few steps. The first one is talking to Justin and answering, correctly, to some question of his. You need to go back in time during that conversation to get the answer correctly. Next, choose the Tre Flip option, so that Justin's friend does the trick. After he falls you need to go close to him and take a photo of him.

Photo #4

You can take the next one when Victoria and her friends are in your way to the dormitory - Life is Strange: Chrysalis - photos - Choices and decisions - Life is Strange Game Guide & Walkthrough

You can take the next one when Victoria and her friends are in your way to the dormitory. Go left. You'll see a tree and squirrel next to it. Take a photo of it and it will join your collection.

Photo #5

Take the fifth photo in your room in the dormitory - Life is Strange: Chrysalis - photos - Choices and decisions - Life is Strange Game Guide & Walkthrough

Take the fifth photo in your room in the dormitory. Stand in front of the mirror and take a photo of yourself to add it to your collection.

Photo #6

The next one can be taken in Victorias room - Life is Strange: Chrysalis - photos - Choices and decisions - Life is Strange Game Guide & Walkthrough

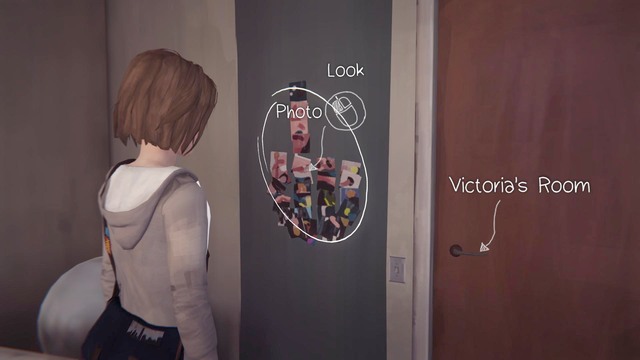
The next one can be taken in Victoria's room. Get close to the wall and mess up the pictures which are on it and then take a photo of that.

Photo #7

Take the next one when you warn Alyssa about the ball which is coming her way - Life is Strange: Chrysalis - photos - Choices and decisions - Life is Strange Game Guide & Walkthrough

Take the next one when you warn Alyssa about the ball which is coming her way. After you've done that, get close to the broken window and take a photo of that.

Photo #8

Take the eighth photo on the parking - Life is Strange: Chrysalis - photos - Choices and decisions - Life is Strange Game Guide & Walkthrough

Take the eighth photo on the parking. Draw something on the window of the van and take a photo of that drawing.

Photo #9

Youll find the last but one photo Chile running away from Chloes house - Life is Strange: Chrysalis - photos - Choices and decisions - Life is Strange Game Guide & Walkthrough

You'll find the last but one photo Chile running away from Chloe's house. Before going to the lighthouse turn around and take a photo of a big rock on the path. You'll find a bird on it, you can also take a photo of that bird.

Photo #10

You can take the last photo, of Chloe, when she is sitting next to the lighthouse - Life is Strange: Chrysalis - photos - Choices and decisions - Life is Strange Game Guide & Walkthrough

You can take the last photo, of Chloe, when she is sitting next to the lighthouse. Stand behind her back in order to take the photo.

See/Add Comments

You are not permitted to copy any image, text or info from this page.

This site is not associated with and/or endorsed by the Square-Enix / Eidos or DONTNOD. All logos and images are copyrighted by their respective owners.

Copyright © 2000 - 2024 GRY-Online S.A. for gamepressure.com, unofficial game guides, walkthroughs, secrets, game tips, maps & strategies for top games.