Groundbreaking | Campaign - Dungeons and Devils Heroes III HD Edition Guide
Last update: 11 May 2016
Key points of Heroes of Might & Magic III: HD Edition - Groundbreaking mission - Dungeons and Devils campaign
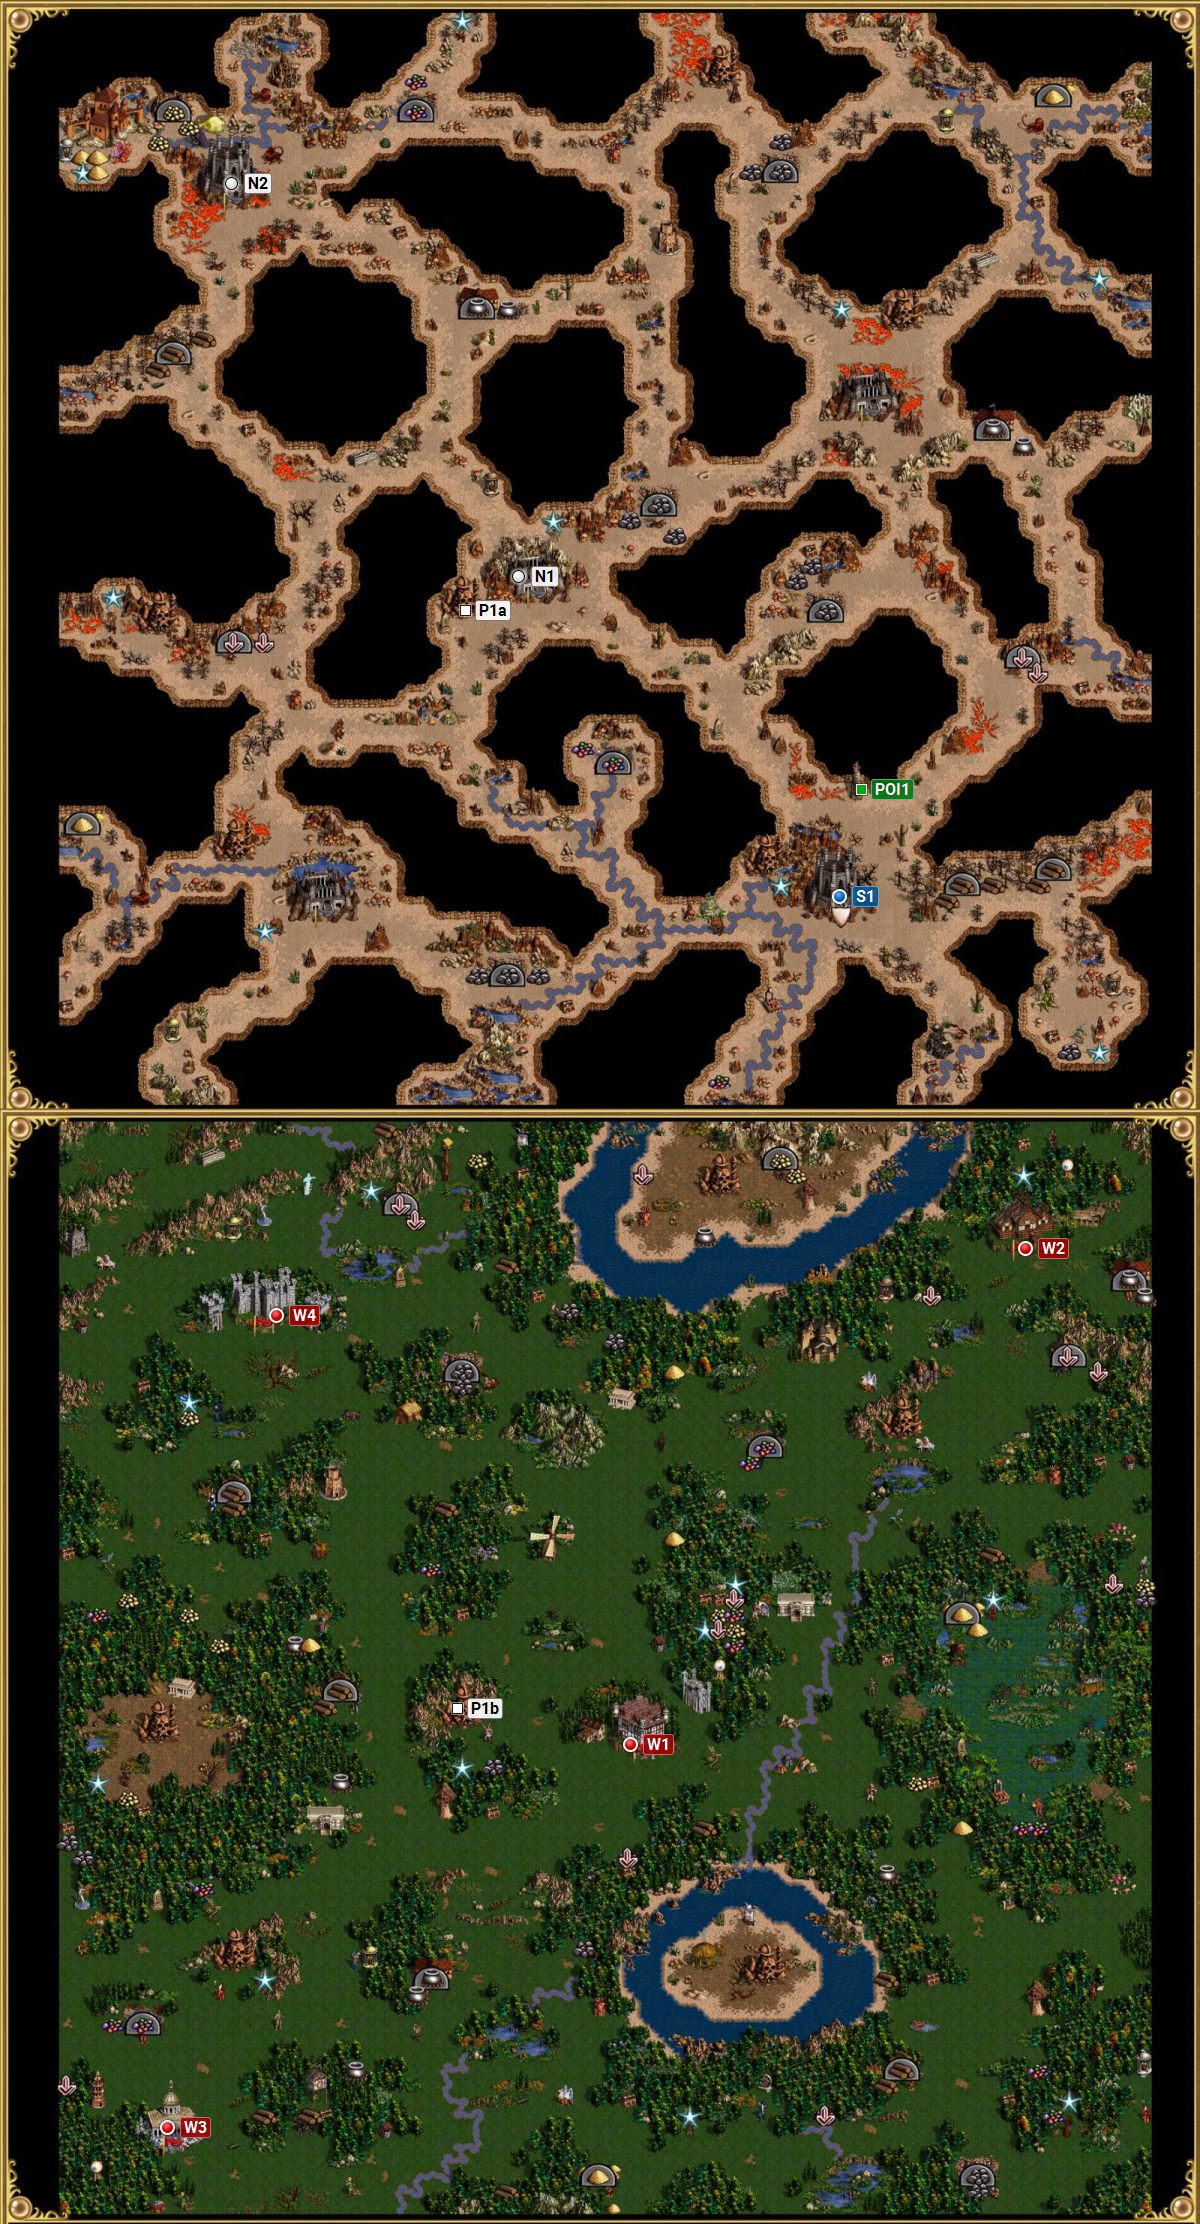
Cities, which belong to the player from the very beginning of the mission.
An enemy garrison building - to get to the other side, you must first defeat the units garrisoned there.
Guard - "a" stands for the Guard Tent, while "b" indicates the Guard Tower, which can be passed after visiting the Guard Tent.
The entrance to the underground - "a" stands for the entrance itself, while "b" indicates the exit leading to the surface.
A mirror entrance - "a" stands for the entrance, while "b" indicates the exit.
Points of interest - visiting, or capturing it can make the mission a lot easier.
This icon represents the place, in which the player can complete the main goal of the mission - it can either be the task to seize an artifact, defeat a certain enemy, or simply capture a city.
This icon represents key mines, which should be captured in order to complete the mission.
Neutral cities, which can be captured.
Cities, which belong to the enemy player.

Begin the mission by taking the Mage Guild lv. 1 as your starting bonus - it will come in handy to supply your hero with spells (don't forget to buy a spellbook!), as well as will speed up the process of your city development (especially the City Hall).
Start off with building the Pillar of Eyes, and after that recruit all your available units. Afterwards, head North from your starting city, reveal part of the underworld map by visiting the Pillar of Fire (point POI1 on the map), and from there head North-West. After a short while you should arrive at a neutral Dungeon city (point N1 on the map). Defeat the creatures dwelling inside, enter the city, build Town Hall and use the opportunity that you can build Harpy Hags here (upgrade those already present inside your army and recruit any available). After you've done that, continue to the North-West - you should soon arrive at a crossroads, leading upwards and to the left. Use whatever route you wish to and you should soon stumble upon another neutral city, located to the North-West of the previously captured one (point N2 on the map).

After capturing this Dungeon city, you will now have access to Minotaur Kings, the most powerful units at your disposal at the moment. Based on the day of the week in which you've captured this city, you can do two things - you can either wait till the beginning of the second week (while building the Citadel and the Castle along the way) to recruit more Minotaur Kings, or you can collect any troops available at the moment and head towards the entrance to the surface (the entrance can be found near the first city you've conquered - point P1a on the map). Naturally, during your skirmishes with your main hero, you should hire 1 or 2 additional ones and clear the area of any treasures.

You will surface near an enemy Castle-type city, which is located to the East of your current position (point W1 on the map). Capture it and head towards the North-Eastern edge of the map, where you will find another enemy city (this time a Rampart type - point W2 on the map). Capture it and head South-East - in the lower left corner of the map you will find an enemy Tower city (point W3 on the map).
You should now have 3 out of 4 enemy cities captured - the last one is located in the North-Western section of the map (point W4 on the map). Use the same tactic as during the first mission of the previous campaign - set your hero just outside the enemy city and use the rest of your heroes to clear out the whole map. Focus on gaining as much experience as possible - 8 out of your heroes, with a maximum 12th level, will be transferred to the next mission. Visit all the learning places, and those in which you can increase their stats, as well as try to build Mage Guilds in all of your cities (you will have access to several 5th level Mage Guilds this time). After you're finished with the preparations, attack the enemy city and finish this mission.

