login (email): password:
auto log in (cookie) | forgot your password?
all game guides

Fallout 3 - Rockbreaker’s Last Gas, Deathclaw sanctuary, National Guard depot - game guide, walkthrough, secrets, game tips & strategies

Fallout 3 Game Guide
Rockbreaker’s Last Gas, Deathclaw sanctuary, National Guard depot
by Jacek "Stranger" Halas (guides.gamepressure.com)
Free game guides, walkthroughs, solutions, game FAQs and maps for gamers.
Download this game guide for free in PDF File format.
rate guide:
Rockbreaker’s Last Gas, Deathclaw sanctuary, National Guard depot  (60/83)

Rockbreaker’s Last Gas

AREAS OF INTEREST

- You won’t find any items of interest in the immediate vicinity of the gas station. Instead you should travel west using directions provided by my map (screen). Eventually you’ll get to a small shack located on top of a large mountain. Enter an Abandoned shack and take your time to explore the surroundings. One of the lockers can only be opened if your lockpicking skill has been raised to the maximum. If you do manage to finally open it, you will gain possession of an excellent Victory sniper rifle. Watch out while exiting the shack, because you may be attacked by Talon mercenaries.


Deathclaw sanctuary

AREAS OF INTEREST

- Obviously this entire area is swarming with deatchlaws. You will encounter these beasts not only inside the caves, but near the entrance as well. Still you should consider travelling to the sanctuary when you have the chance. The main reason for that is to collect one of the bobbleheads, but you’ll also find two cool weapons in the sanctuary – a ripper (melee weapon) and a Gatling laser. Sadly you’ll have to explore the entire cave system to get to them.


National Guard depot

AREAS OF INTEREST

- A lot of security measures have been put in place in order to ensure the safety of this depot. You will have to watch out mostly for sentry bots, because they can inflict a lot of damage and they’re not easy to kill if you don’t have enough EM mines at your disposal. Your objective will be to get to the armory, because you will find miniguns, rocket launchers, armors, medical supplies and drugs inside.

- I guess you may not notice that the armory has been divided into two parts. The first part is relatively accessible. Sadly, in order to get to the second part you will have to acquire five holotapes. Here’s where you should look for them:


First holodisk – Hallowed Moors cemetary

Once you’ve reached the cemetary and eliminated all hostile creatures proceed to a destroyed chapel. The holodisk can be found inside a small ambo (screen). Make sure that you release the prisoners while you’re there, however you can also decide to run away the second you have the disk.


Second holodisk – Grisly diner

Watch out for traps! There are a lot of them outside the diner and also inside the building, near the counter. You should also know that raiders may arrive here in a short while. The holodisk can be found at the back of the diner, on the table (screen). You should also collect a rocket launcher, as well as medical supplies and defused landmines.


Third holodisk – Anchorage Memorial

The object you’re looking for can be found to the north of the memorial. Be on a look out for a yellow truck. You should know that there are a lot of supermutants and centaurs in the area, so it won’t be easy to get it. Eliminate the monsters from a larger distance if possible. Don’t forget that you can also blow up nearby vehicles. As for reaching the disk, you can swim to it or you can use the bridge. The tape is inside a large yellow tent.


Fourth holodisk – Rockbreaker’s Last Gas

You must travel to an abandoned shack which can be found on top of a large hill, to the west of the gas station. Check Rockbreaker’s Last Gas description for more info. The holodisk is located inside the shack (screen).
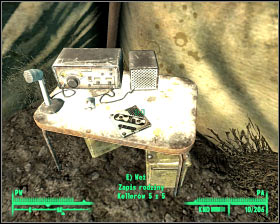
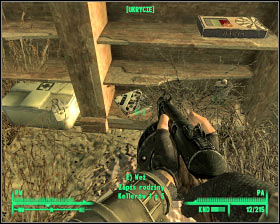
 

Fifth holodisk – VAPL-58 power station

You must travel to the north of the power station. Eventually you’ll be able to get to a small camp with two hostile wastelanders. Get rid of them – it shouldn’t be a problem. The holodisk can be found on one of the shelves (screen).


Once you’ve acquired all five holodisks and listened (it’s very important!!) to the recordings you may go back to the National Guard depot. Head on to the armory and locate a security terminal on the wall (screen). You now know the password, so you can use it to unlock a passageway. Don’t be scared if you see a feral ghoul heading your way. Kill the creature and check your surroundings. The most important object for you to collect is an experimental MIRV. It might seem that this weapon is worse than a standard fatman, but the main difference is that it fires a few nukes at the same time!


Rockbreaker’s Last Gas, Deathclaw sanctuary, National Guard depot  (60/83)
comments and responses

If you're still in the outer armory, there's a switch on one of the walls on the upper levels, it's hard to find, so I can't really help you about that part.
Mr. Progamer
22/02/2009 03:39
HELP! I'm trying to access the National Guard Armory and I have all five holodisks but I can't seem to find it. Is it past the utility door? I've tried it but it says that it's accessible elsewhere. Someone please help.
comxpaq
21/02/2009 01:09

Comments are moderated. Some features are NOT available in comments, but ARE available on forums. See this tread on forum.
Introduction
Fallout 3
Main quests
Main quests 1: Baby steps
Main quests 2: Growing up fast
Main quests 3: Future imperfect
Main quests 4: Escape!
Main quests 5: Following in his footsteps
Main quests 6: Radio Galaxy News
Main quests 7: Scientific Pursuits
Main quests 8: Tranquility Lane
Main quests 9: The waters of life
Main quests 10: Picking up the trail
Main quests 11: Finding the garden of eden
Main quests 12: The American Dream
Main quests 13: Take it back!
Main quests 13: Take it back! - Endings
Side quests
Megaton: The power of the atom
Megaton: The wasteland survival guide (first chapter)
Megaton: The wasteland survival guide (second chapter)
Megaton: The wasteland survival guide (third chapter)
Megaton: Blood ties
Grayditch: Those!
Rivet City: The replicated man
Rivet City: Stealing independence
Capitol Wasteland: Head of state
Museum of History: Reilly’s Rangers
Musem of History: You gotta shoot ‘em in the head
Canterbury Commons: The superhuman gambit
Paradise Falls: Strictly business
Big Town: Big trouble in Big Town
Tenpenny Tower: Tenpenny Tower
Vault 101: Trouble on the homefront
Little Lamplight: Rescue from paradise
Agatha’s house: Agatha’s song
Girdershade: The Nuka-Cola Challenge
Oasis: Oasis
Capitol Wasteland
Maps of the world
Main maps
sector 1, sector 2
sector 3, sector 4
sector 5, sector 6
sector 7, sector 8
sector 9, sector 10
Alphabetical list of primary locations
Other
Detailed maps
Big Town
The Underworld
Megaton
Rivet City
Tenpenny Tower
Main locations
Andale, The National Archives, Arefu
Capitol building, Canterbury Commons, Hallowed Moors cemetery
Citadel, Big Town, Evergreen Mills
Nuka-Cola plant, RobCo facility, Falls Church metro
Fort Bannister, Fort Constantine, Fort Independence
Girdershade, Grayditch, Hubris Comics
Dickerson Tabernacle Chapel, Vault 101 (return), Vault 106, Krypta 108
Little Lamplight, Megaton, Meresti trainyard
Museum of history, Wilhelm’s wharf, Paradise Falls
Reilly’s rangers compound, Raven Rock, The Republic of Dave
Rivet City
Springvale, Marigold station, Jury Street metro station
Northwest Seneca station, Temple of the Union, Takoma Park – factory district
Tenpenny Tower, Greener Pastures disposal site, Wheaton armory
Scrapyard, Other – Capitol Wasteland
Other
Enemies
Threats
Bonuses
Vault-Tec Bobbleheads part 1
Vault-Tec Bobbleheads part 2
Vault-Tec Bobbleheads part 3
List of achievements
Hints
Character creation and development
Basic
Perks part 1
Perks part 2
Perks part 3
Perks part 4
Perks part 5
Hidden perks
Combat
Basics
Useful hints
Equipment
Hints
Storing equipment and doing repairs
Unique weapon schematics
Other
Dirty deeds
This site is not assotiated with and/or endorsed by the Bethesda Softworks or Bethesda Softworks. You are not permitted to copy any image or info from this page.
All logos and images are copyrighted by their respective owners. Official Fallout 3 www page: http://prepareforthefuture.com/
Dragon Age: Origins | Risen | Divinity II: Ego Draconis | Batman: Arkham Asylum | Fallout 3: Mothership Zeta | ArmA II | Sherlock Holmes vs. Jack the Ripper | Fable II: See the Future | Fable II: Knothole Island | Call of Juarez: Bound in Blood | Fallout 3: Point Lookout | Prototype | more game guides ...