Walkthrough - Main Quests part 2 | Walkthrough Dragon Age: Origins - Awk Guide
Last update: 11 May 2016
The Awakening (part 2)
Quest giver: Seneschal Varel [Vigil's Keep - Throne Room]
After dealing with these three quests: Last of the Legion, Shadows of the Blackmarsh and The Righteous Path speak with Varel [Vigil's Keep - Throne Room]. During the conversation a peasant will come. She will inform you that [Amaranthine] is under attack. You will be send to defend the city (you may choose three companions with you).
When you will be in [Amaranthine] you will have to fight with some darkspawns. Then constable Aiden will contact you. He will tell you that the situation is very serious here. In the meantime a darkspawn messenger will come. He will tell you the message from The Architect: Vigil's Keep is under attack and The Architect wants you to go there and defend it. Now you have to make a decision: get back to the keep (that will result in destroying the Amaranthine) or you are defending Amaranthine (that will result in destroying the Vigil's Keep).
The Siege of Vigil's Keep
Quest giver: You will get this quest as a result of the decision made in quest: The Awakening (part 2)
After destroying the [Amaranthine] you will get to the [Vigil's Keep]. You will be informed about the current situation:
1. If you did the quests connected with the buildings in [Vigil's Keep] then the walls durability will be higher.
2. If you did the Elementary needs quest the equipment of your soldiers will be much better.
3. If you did the Bombs away! then you are able do use catapult.
The siege will start immediately after the conversation. Beside your normal abilities, you are able to use:
1. Additional soldiers: swordsmen, archers and infantry
2. Archer - click on the shield and then choose your target. This is a very powerful weapon (weaker troops will be eliminated at once).
3. Catapult - click on the catapult icon and them choose the area. It is a very powerful against groups of enemies.
The whole battle can be described in few phases:
1. Main Gate
2. Eastern Wall
3. The Front Gate
4. Medic
5. Massive armored ogre
6. Herold
Phase 1: Defend the keep
Go to the main gate and defend it.
Phase 2: Defend the Vigil's eastern wall
Eastern Wall is attacked by The Children of all kind.

Phase 3: Defend the gates again
Go to the main gates once again. When you will be there you will see that an ogre is killing Varel. Kill them all and speak with Varel for the last time.
Phase 4: Speak to the medic
You will see a medic. If you want to buy some healing potion them talk to him immediately. If you will be waiting for too long, he will run away.

Phase 5: The battle starts again
Defend the main gate.
Phase 6: Destroy the disciples trying to enter the keep
Go to the entrance gate and kill all the disciples.
Phase 7: Kill the armored ogre
During the battle an armored alpha ogre will run into the keep. Focus on him but remember that he is a very dangerous creature.

Phase 8: Slay The Herald
The last phase of the battle. Near the main gate a Herold will appear. He is very strong, but he is alone so it should be a very easy fight.

After dealing with Herold you will have to talk with your friends about the exact localization of The Mother. If you want to, you can do some shopping in [Vigil's Keep - Throne Room].
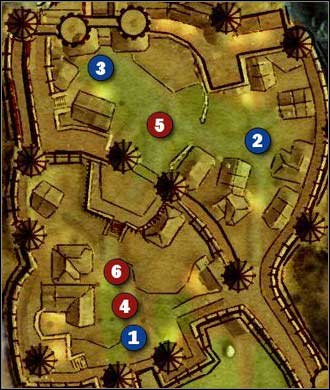
The Assault on Amaranthine
Quest giver: You will get this quest as a result of the decision made in quest: The Awakening (part 2)

1. Guard fighting with some darkspawns
2. City commander
3. The temple
4. Crown and Lion inn
5. Elite emissary and an armored ogre
You have decided to stay and defend this city. At the beginning you have to rescue guards that are fighting with some darkspawns.

You have 7 groups of guards here. If earlier you had order soldiers to get back to the [Amaranthine] then they will be in large number now. You help will not be necessary sometimes. When you will finish this task speak with the city commander. He will order you to go to the temple, where you will be able to rest.

In the temple soldier will come to you. He will inform you that darkspawns are coming from the [Crown and Lion inn]. You have to investigate this situation. When you will enter the inn, you will be attacked by some darkspawns and their general. Kill him and go downstairs to the [Smuggling tunnels].
 |  |
The first general will be in the inn. | Here is an entrance to the smuggling tunnels. |
 |  |
The second general is in the smugglers hideout. | The last general is in the city. He has an ogre as a guard. |
Here you will find another general. Kill him and go to the city. There you will find two very strong opponents: last general and armored ogre. After the battle the city will be saved.
Depths of Depravity
Quest giver: You will get this quest after dealing with The Assault on Amaranthine or The Siege of Vigil's Keep

1. World Map
2. Drake's Fall
3. Dragon
Now you know where is the hideout of The Mother. Go to the world map and then get to the [Dragonbone Wastes]. Go south kill some darkspawns. Before you will enter the [Drake's Fall] you will have to fight with a dragon. Try to kill all darkspawns at the beginning. After the battle enter the [Drake's Fall].

After you will get to this area you will get a side quest named The Crystals of the Imperium. It is good to complete it - fight with The Mother will be much more easier. [Drake's Fall] is full of darkspawns and you have to kill them all until you will get to the tower of Uraz (M11, 9). You will find an Architect and Utha (M11, 8) there. Now you have to make a very important decision:
Option 1: Siding with The Architect
Architect will tell you about his plan. You can agree with him and as a matter of fact he will help you in your final fight (you will gain a very powerful AoE ability). In fact, some of your friends will become hostile and they will attack you (you can take some new allies after the fight).
Option 2: Killing The Architect
Do not listen to the Architect and fight with him. It is good to have a good fire resistance because of his spell: Cataclysm.

Now you can go to the [Hive] where The Mother is waiting for you. If you have chosen to ally with architect then he will appear before the fight and you will learn that he has started the previous plague. This fight is very difficult. At the beginning Mother is fighting with tentacles (they are much stronger that these you have met in [Kal'Hirol - Lower Reaches]). Sometimes mother is summoning her children. Notice that your enemy is the best in close combat.
 |  |
You can try to kill the Mother from the distance. | The mother is very strong in close combat. |
She has many abilities that can be lethal for your team. That's why it is a good idea to fight with her from the distance. The area is very huge and you can run away whenever you want to. She will cast some spells on you too, but they are not so powerful as her hits.

After dealing with the Mother you will see a short cut scene in witch you can learn what have happened with the places and people from your adventure.