Mission 2 "Besieged City" - part 1 | Campaign "Falaise Pocket" CoH: ToV Guide
Last update: 11 May 2016
Main missions:
- Hold the garrisons.
- Build defence fortifications.
Additional missions:
Medal missions:
- Hold the whole terrain.
You begin the scenario will very little units placed on the south shore of the river. The mission is mainly about holding the garrisons - concentrate on those that you possess on the south, the ones across the river will be quickly taken over by the Allies and you can't really defend them. The church and the building behind it are used to recruit new infantry, support and vehicles. I'd suggest starting with two Luftlande units. As soon as they are ready to fight, equip them the weapons found on the map in the white circles (usually near the garrisons) - above all, take the panzerschrecks, they will be the most useful. Equip every unit you recruit this way (apart from those that are already upgraded and don't need to collect stuff from around the map).

There probably is one 88mm cannon already standing in front of the bridge. The other two can be placed by the Luftlande in the area near the other two passages, on the west and south-east wing. Place also a machinegun and a mortar at each bridge, you can find them on the map (for example in the south-east ammo depot). Man the mortars with some cheap infantry. Your vehicles should also be placed near the bridges. The screen below shows my defences in this part of the mission:

Of course it would be advisable to hold both ammo depots, on the north-west and south-east. I'd suggest spending the first experience points on mining strategic points and doing so at both depots with infantry units. There are also two wooden footbridges - one next to the north-west ammo depot and the second one to the south-east of the main, concrete bridge. However both of them can be destroyed using mortar grenades, which will prevent the enemy from crossing them and attacking you (of course you won't be able to use the bridges too). This way you will be able to transfer your units to more crucial areas, for example the main bridge. The decision is up to you - I destroyed those bridges at the very beginning and made use of the free units.
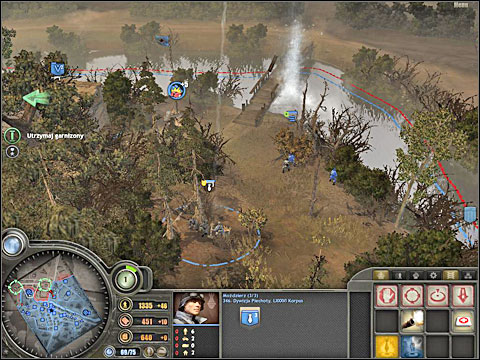
On the map above you could have seen they way in which I had deployed my units on the south shore. Because the map isn't rich in details, I will add some more screens showing the positions of my soldiers in the key places of the map. Let's begin with the main bridge in the centre. There was an 88mm Flak 36 cannon standing in front of it, which probably survived from the last mission. I the building on the right there was a sniper and a MG-42 unit, while in the left there was a machinegun section. There was a Luftlande unit equipped with panzerschrecks nearby and right behind the 88mm gun a sapper units, which has places some anti-tank barriers (on the other shore, behind the bridge) and mines on the closer end. The weak Allies attack in this area wasn't a problem.

On the south-east I decided to defend the ammo depot, transferring some of the forces across the river. The Luftlande units equipped with panzerschrecks, organized a Flak 36 post near the massive bunker with a mortar and had blocked the river crossing with some anti-tank things. I then placed the Goering boys in the bunker (together with the machinegun section), from which they can shoot the Allies with mortar grenades. The Luftlande was to repair the damaged Flak 36 or build a new one in case it would get destroyed. There was also some infantry equipped with anti-tank guns. On the other, south shore I had left some minor forces (in case the Allies would take over the ammo depot), that is a MG-42 and mortar sections (behind the walls, providing good, green cover from bullets), a 88mm cannon hidden in between the buildings and a StuG (an automatic cannon) behind a hedge, both sideway to the crossing.
