Basics | Gold Rush mode assumptions Battlefield: BC Guide
Last update: 11 May 2016
Basics
Gold Rush is a game mode in which players are divided into two groups - attackers and defenders.
The attackers' task is to destroy all the gold crates located on the map. The defenders must naturally prevent their enemies from doing this.
The Gold Rush mode starts on a small map. If the attackers destroy all the crates on that little piece of terrain, the defenders team will have to fall back to further, previously locked part of the map. There we go again - if the attackers blow up the boxes, the defending group falls back again. What is more, most of the places with gold crates become spawn points for the attackers once they destroy the boxes.
The game ends either when all gold crates are destroyed, or when attackers run out of their reinforcements.


To destroy a gold crate in 100%, the attackers must place an explosive charge on it. It can be done by any soldier class. Arming the bomb takes a while, so before You attempt to do it, make sure that enemies won't surprise You during planting the explosives.
The bomb goes off after several seconds, so You have to keep an eye on it all the time, as the defenders may reach the charge and defuse it before the explosion.
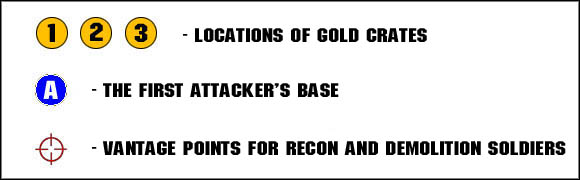
Map legend
In the further part of this game guide You'll find descriptions to all maps used in the multiplayer mode. To understand them properly, take a look on the map legend first.
The map descriptions have been divided into two parts - the first one describes the map structure. That includes terrain geometry, water presence, level of urbanization, possibilities of maneuvering with heavy machinery, etc. The second part is about the most common plays executed by players. The most important things are written in bold and sometimes a proper screenshot is provided.